The Complete Guide to Outdoor Comfort: How to Do a Park Picnic That Lasts All Afternoon (4–8 People)
· Yasmine Taljaard
TL;DR
A park picnic doesn’t have to end after 20 minutes because everyone’s uncomfortable. With a 3-layer blanket system, strategic shade placement, and a simple “reset routine,” you can create a genuinely comfortable outdoor lounge that lasts 2–4 hours. This guide shows you exactly how to set up, maintain comfort, and pack down with ease; all without hauling chairs.
Introduction
Most park picnics don’t end because everyone’s satisfied. They end because someone’s uncomfortable and once one person is done, the spell breaks.
You’ve seen it happen: twenty minutes in, someone starts shifting constantly. Another person is squinting into the sun. Someone else mutters about their lower back. And just like that, the peaceful afternoon you imagined dissolves into an awkward “should we head out?” conversation.
It doesn’t have to be this way.
The difference between a picnic that lasts 20 minutes and one that stretches luxuriously into the afternoon isn’t about luck or pain tolerance. It’s about understanding the simple physics of outdoor comfort: what your body needs to stay relaxed on the ground, how to manage summer weather, and why small adjustments every 30 minutes prevent the stiffness that ends most gatherings.
This guide will show you how to create a blanket-lounge setup that actually works for 4–8 people, with systems that let you stay comfortable for hours without overthinking it. No gear obsession, no complicated routines! Just a thoughtful approach to hosting a peaceful afternoon outside.
What you’ll learn:
- The 3-layer blanket system that keeps you dry, cushioned, and comfortable
- How to choose a park spot that won’t sabotage your comfort in 45 minutes
- The 30-second reset routine that prevents stiffness and keeps everyone relaxed
- Stay-time strategies for 30 minutes, 2 hours, or a full afternoon
- Summer comfort essentials: shade, positioning, and breeze management
- The 3-minute pack-down that leaves you calm (and the park pristine)
The Outdoor Comfort Equation
“Blanket-lounge isn’t a lack of planning. It’s a style of planning.”
Comfort outdoors isn’t one thing: it’s four things working together. Miss any one of them, and your picnic has a timer ticking.

The Four Elements
1. Ground (Dry + Insulated)
Cold and dampness seep up through a single blanket faster than you think. Even “dry” grass holds moisture. A proper ground layer creates a thermal and moisture barrier that makes hours-long lounging possible.
2. Body (Supported + Position Variety)
Your hips and lower back aren’t designed for prolonged sitting on a firm surface without support. Back support options and permission to change positions frequently are non-negotiable for comfort past 45 minutes.
3. Weather (Shade + Breeze)
Direct sun creates glare and heat stress. But full shade with wind can leave you chilly. The sweet spot: dappled shade or positioning where you can rotate between sun and shade as needed.
4. Time (Stay-Time Plan)
A 30-minute snack needs different prep than a 3-hour lounge. Knowing your target stay-time lets you pack appropriately and set realistic expectations.
The equation: Ground + Body + Weather + Time = Sustainable Comfort
Comfort is designed, not hoped for. The rest of this guide shows you exactly how to design it.
Choose the Right Spot in the Park (Comfort Scout)
You have about one minute to choose your spot. Here’s what actually matters.
The 1-Minute Scout Checklist
| Check | Why It Matters | What to Do If It Fails |
|---|---|---|
| Shade availability now + in 1 hour | Sun moves; what’s shaded at noon may be blazing at 1:30 PM | Check tree position; set up where shade will arrive OR bring portable umbrella |
| Ground dryness | Morning dew, sprinkler runoff, or yesterday’s rain makes blankets damp in 10 minutes | Touch grass with palm; if damp, use extra groundsheet layer or choose higher ground |
| Slope | Rolling bottles, sliding blankets, downhill body drift ruins relaxation | Do the “bottle test”: set one down; if it rolls, move 20 feet |
| Wind exposure | Breeze is nice until it’s not; full exposure can be chilly even in summer | Look for partial windbreak (hedge, building) not full block |
| Foot traffic | High-traffic paths mean frisbees, dogs, and people stepping near your space | Stay 15+ feet from main paths; near tree groves is usually quieter |
| Bathroom distance | More than a 2-minute walk discourages hydration and increases discomfort | Scout bathrooms before you unpack; know the route |
| Trash bin proximity | Carrying trash across the park at the end is annoying | Within 100 feet is ideal; have a discreet bag regardless |
Pro tip: The best spots are usually 20 feet away from where everyone else clusters. Near a large tree trunk (not directly under it, but close) gives you shade rotation options and a visual anchor.
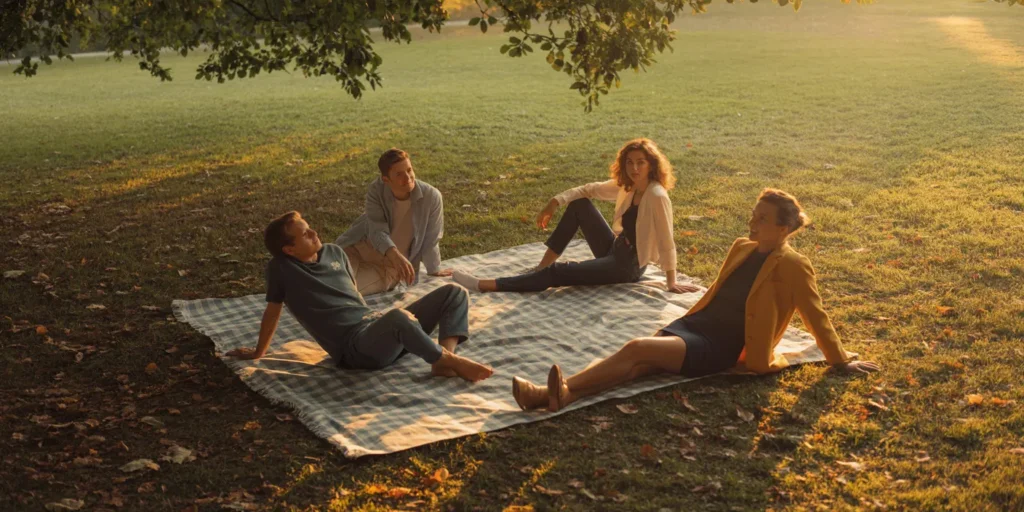
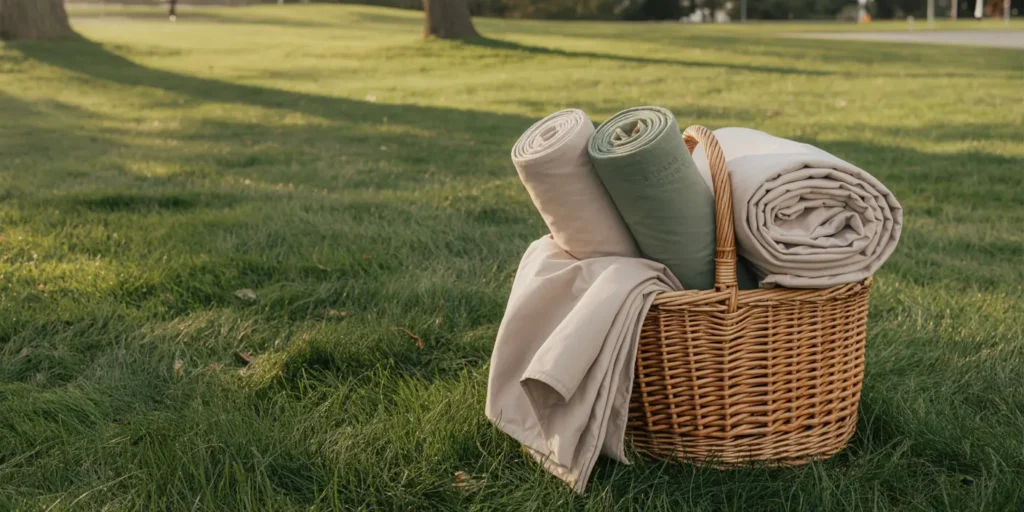
The 3-Layer Blanket Lounge System (Dry + Soft + Supported)
This is the foundation. Skip layers, skip comfort.

Why One Blanket Isn’t Enough
A single blanket on grass fails three ways:
- Moisture creeps up (even through “dry” grass)
- Cold conducts through (ground is 10–15°F cooler than air)
- Firmness fatigues (pressure points on hips and tailbone accumulate)
The 3-layer system solves all three.
The System
| Layer | Purpose | Best Materials | Group Tip (4–8 People) |
|---|---|---|---|
| Groundsheet | Moisture barrier + dirt shield | Tarp, tent footprint, painter’s drop cloth, or cheap shower curtain liner | Go oversize: 12′ × 12′ for 4–8 people; edges can fold up for added protection |
| Insulation | Cushioning + thermal buffer + dampness absorption | Foam camping pad, moving blanket, old quilt, or yoga mats | Place under the core lounge area (not the whole groundsheet); 8′ × 8′ covers 4–6 people |
| Blanket | Comfort surface + aesthetic | Large picnic blanket, cotton throw, or soft woven blanket | Bring 2 smaller blankets instead of 1 huge one: easier to adjust and layer |
Setup in 90 Seconds
- Lay groundsheet first, oversized so edges extend 6–12 inches beyond your lounge area
- Place insulation layer (quilt, pad, moving blanket) over the center zone where people will sit
- Top with blanket(s), tucking edges under or using clips/weights at corners to prevent lifting in breeze
Visual test: Kneel on your setup for 30 seconds. If your knees feel cold or damp, add another insulation layer.
Corner Anchoring
Wind will lift blanket corners. Fix this:
- Use 4 small clips or binder clips to attach blanket to groundsheet at corners
- Or place shoes, water bottles, or smooth rocks (not jagged) at corners
- For windy days, fold groundsheet edges up and over blanket edges
Seating Without Chairs: Back Support for Blanket People
Blanket lounging is glorious for 20 minutes. After that, your lower back has opinions.
Back Support Options (Ranked by Comfort)

| Option | Comfort | Packability | Best For | Notes |
|---|---|---|---|---|
| Stadium seat / low back support | High | Medium (2–4 units fit in a tote) | Long conversations, eating | Use 2–4 for group rotation; game-changer for 90+ minute stays |
| Large pillows propped behind back | Medium | Easy (if you have travel pillows) | Casual lounging, reading | Compress over time; re-fluff every 30 min |
| Folded blanket “bolster” | Medium | Easy (use an extra blanket) | Quick position changes | Underrated. Roll a blanket tight and place behind lower back |
| Leaning against tree trunk | Mixed | N/A (location-dependent) | Sitting, relaxing | Find a smooth-barked tree; bring a thin cushion for your back |
| Picnic table bench | Low to Medium | N/A (if park has tables) | Eating only | Can be posture-taxing for long periods |
The Stadium Seat Sweet Spot
For groups of 4–8, bring 2–4 stadium seats (lightweight back supports with straps). Not everyone needs one simultaneously—they rotate as people shift positions.
Why they work: They give you reclined support without the bulk of a chair, and they fold flat for transport. Two people can use them while others lounge flat or sit cross-legged, then swap after 30–45 minutes.
Where to place them: On top of your blanket layer, positioned so the person leans back at a comfortable angle (not bolt upright).
The “Stay-Time Plan” (30 Min vs 2 Hours vs 4 Hours)
Not all picnics are created equal. Match your setup to your ambitions.
Stay-Time Tiers
| Stay-Time | What Fails First | Minimum Setup | Nice Add-On |
|---|---|---|---|
| 0–30 minutes | Usually nothing | Single blanket on dry grass | Cold drink, small snack |
| 30–90 minutes | Hips, lower back, glare | 3-layer blanket base, shade awareness | 2 stadium seats, extra water, sunglasses |
| 90–240 minutes | Sun exposure, stiffness, boredom | Full 3-layer system, shade plan, reset routine | Small throw blanket, books/games, portable speaker, extra cushions |
| 240+ minutes | All of the above + food safety | Everything above + food rotation system | Cooler with ice, backup shade (umbrella), comfort rotation stations |
Calibrating Expectations
30 minutes: Pack light. One good blanket and a snack. Comfort isn’t critical yet.
2 hours: This is the sweet spot for most groups. Full 3-layer system, back support for 2–4 people, shade strategy, drinks in a cooler, and the 30-second reset routine (see next section).
4+ hours: You’re hosting an outdoor living room. Add backup shade (umbrella or pop-up), extra insulation layers for position variety, more water than you think you need, and a small trash system to keep the space pleasant.
Summer Comfort: Shade, Breeze, Glare
Weather isn’t just “nice” or “bad.” It’s a set of variables you can actively manage.

The Shade Strategy
Why shade matters: Direct sun heats your skin 15–20°F above ambient air temperature and creates glare that causes squinting and eye fatigue. After 30 minutes in full sun, discomfort compounds quickly.
The ideal: Dappled shade or positioning where you can rotate between sun and shade as the afternoon progresses.
Shade options:
- Tree shade: Best for long stays. Scout where the shade will be in 1–2 hours (sun moves west to east in your awareness, but remember it arcs).
- Building shade: Reliable and predictable, but can be windy or echoey depending on structure.
- Portable umbrella: A large beach umbrella (6–8 ft diameter) gives you control. Stake it securely or use a weighted base.
Pro tip: Set up your blanket so half is in shade and half in sun. As people warm up or cool down, they can shift positions without moving the whole setup.
Reference for UV protection guidance: The American Academy of Dermatology recommends seeking shade, especially between 10 AM and 2 PM, and wearing protective clothing and sunscreen.
Managing Breeze
Wind feels great until you’re sitting still in shade for 45 minutes. Then it becomes a heat thief.
The physics: Moving air removes heat from your body faster, even when ambient temperature is comfortable. This is why 75°F in shade with a breeze can feel cooler than 75°F in still air.
Solutions:
- Position near a partial windbreak (hedge, low wall, grove of trees) rather than in full exposure
- Bring a light long-sleeve layer for each person (even in summer)
- If it’s too breezy, rotate people into the sun for 5–10 minutes to warm up
Reference: NOAA explains how wind increases heat loss from the body (wind chill effect).
Defeating Glare
Glare is the silent comfort killer. You don’t notice it for the first 20 minutes, then suddenly you’re squinting, tense, and ready to leave.
Quick fixes:
- Sunglasses (obviously, but people forget to bring extras)
- Repositioning: Turn 90 degrees so the sun isn’t directly in your line of sight
- Shade your face: Wide-brim hat or baseball cap
- Use an umbrella as a glare shield, even if you’re not in direct sun
The reset rule: Every 30 minutes, check if the sun has moved enough to create new glare angles. Adjust your position before it becomes annoying.
The 30-Second Reset Routine (Move Without Making It a Workout)
Staying in one position for more than 30–45 minutes is how picnics die. The fix is absurdly simple.
Why Resets Work
Your body wasn’t designed to be motionless. Small, frequent movements prevent stiffness, improve circulation, and give your hips and lower back a break. You don’t need to exercise, just interrupt the stillness.
The 30-Second Reset Wheel (Do Any Two)
Every 30–45 minutes, pick two of these:
- Stand up and shake your legs (10 seconds of gentle shaking loosens everything)
- Swap sitting position (cross-legged → side-sit → legs extended → knees up)
- Shoulder roll + unclench jaw (tension sneaks into neck and jaw without you noticing)
- Refill your water (hydration + movement + reason to stand)
- Change where you’re facing (new view + glare adjustment)
- Take a 20-step walk (to the tree, around the blanket, anywhere)
Key principle: These aren’t exercises. They’re micro-adjustments that keep your body happy without disrupting conversation or the vibe.
Pro tip: Assign someone as the informal “reset reminder” every 30 minutes. It’s easy to lose track of time when you’re comfortable.
Reference: Physical therapists recommend frequent position changes to prevent stiffness. For general posture and movement guidance, resources like Rehab and Revive offer accessible explanations.
Comfort Kits: Minimal vs Standard vs Luxe (for 4–8 People)

Not sure what to bring? Use these kits as templates.
Minimal Kit (0–90 Minutes, 4 People)
Ground:
- 1 large blanket (8′ × 8′ or bigger)
- Optional: tarp or groundsheet if ground is damp
Body:
- 2 throw pillows or 1 stadium seat
Weather:
- Sunglasses for everyone
- 1 light layer (hoodie or cardigan)
Extras:
- Water bottles
- Small snack bag
- One trash bag
Carries in: One large tote or backpack
Standard Kit (2–3 Hours, 4–8 People)
Ground:
- 1 groundsheet (tarp, 10′ × 10′ or larger)
- 1 insulation layer (moving blanket or old quilt)
- 2 blankets (easier to layer than 1 huge one)
- 4 small clips or corner weights
Body:
- 3–4 stadium seats (for rotation)
- 2–3 pillows or cushions
- 1 extra rolled blanket (for lumbar support bolsters)
Weather:
- Sunglasses + hats
- 1 light layer per person
- Portable umbrella (beach size, 6–8 ft)
Extras:
- Cooler with drinks + ice
- Snacks in containers
- Trash bag + wet wipes
- Small first aid kit (band-aids, sunscreen)
Carries in: Two large totes or one wagon
Luxe Kit (4+ Hours, 6–8 People)
Everything from Standard Kit, plus:
Ground:
- Extra foam pads (for dedicated “nap zone” or reading corner)
Body:
- 5–6 stadium seats + variety of cushions
- Extra throw blankets (2–3 for layering)
Weather:
- Large pop-up shade (10′ × 10′) or two umbrellas
- Battery-powered fan (clip-on style)
- Extra layers (light fleece or blankets for evening)
Extras:
- Full cooler with ice + backup drinks
- Proper food containers (not just snacks)
- Cutting board + knife (for fresh fruit, cheese)
- Trash + recycling bags (keep it organized)
- Portable speaker (low volume, considerate of neighbors)
- Books, games, frisbee
Carries in: Wagon highly recommended
Troubleshooting: Fast Fixes in 60 Seconds
Things go wrong. Here’s how to fix them without packing up.
The Bookmark-Me Table
| Problem | Likely Cause | 60-Second Fix | Prevent Next Time |
|---|---|---|---|
| Blanket creeping downhill | You’re on a slope | Use corner clips + weights; fold groundsheet edges up to create “walls” | Do the bottle-roll test before setup |
| Damp feeling under blanket | No groundsheet, or ground was wetter than you thought | Add emergency layer (use jackets, bags, extra blanket); move to drier ground if severe | Always bring groundsheet; touch-test grass |
| Lower back hurts | No lumbar support + no position changes | Roll a blanket tight, place behind lower back; stand and stretch for 30 seconds | Bring stadium seats; set reset timer |
| Glare in eyes | Facing the sun | Rotate 90 degrees; use umbrella as glare shield; sunglasses | Check sun position every 30 min; adjust |
| Drinks getting warm | In direct sun | Move cooler into shade; cover with light-colored towel; add ice | Always place cooler in shade from start |
| Area getting messy | No designated zones | Create quick zones: bags in one spot, trash in one bag, drinks together | Plan zones during setup (see next section) |
| Feeling chilly in shade | Wind + prolonged stillness | Move into sun for 5 minutes; add a layer; do 20 jumping jacks | Bring light layers even in summer |
| Hips/tailbone sore | Pressure points on firm ground | Add another insulation layer under your seat; shift to side-sit position | Use thicker insulation; change positions every 30 min |
The Park Picnic Zones (Keep It Organized)
A little spatial organization prevents the slow descent into chaos.
The 5-Zone System
1. Lounge Zone (Center)
The main blanket area where people sit, lie down, and relax. Keep this clear of clutter.
2. Food Zone (One Side)
Snacks, cutting board, containers. Keep food together and accessible but off to the side so people can lounge freely.
3. Drinks Zone (Shaded Area)
Cooler, water bottles, cups. Always in shade. Stable surface so bottles don’t tip.
4. Bags Zone (Behind or Far Corner)
All personal bags, extra layers, and gear go in one spot. Keeps lounge area uncluttered and prevents “where’s my bag?” searches.
5. Trash/Wipes Zone (Discreet Corner)
One designated trash bag + wet wipes or napkins. Everyone knows where it is; no one has to hunt for it.
Why zones matter: They create a sense of order without effort. People naturally respect the system once it’s set up.
The 3-Minute Pack-Down (Leave Calm, Leave No Trace)
How you leave is as important as how you arrive.
The Calm Exit Routine
Minute 1: Collect + Consolidate
- Gather all trash and wipes into your designated bag
- Consolidate any leftover food into one container
- Do a 10-foot radius sweep for small items (bottle caps, napkins, utensils)
Minute 2: Shake + Fold Blankets
- Shake each blanket to remove grass, dirt, and crumbs (away from other park-goers)
- Fold blankets loosely (you’ll refold them properly at home)
- Roll insulation layer if needed
Minute 3: Final Check + Pack
- Fold groundsheet (dirt side in)
- Pack everything into totes or wagon
- Do a final visual sweep of the area (look for anything you missed)
- Leave the grass looking as good or better than you found it
Reference: Pack out everything you brought in. For more on responsible outdoor practices, see Leave No Trace principles.
The trust signal: When you pack down calmly and leave the area pristine, you’re signaling to other park-goers (and park staff) that you respect the space. This keeps parks welcoming for everyone.
Common Questions
Q: How much does this setup cost?
Minimal kit (if you already have blankets): $0–30 (just a tarp and maybe stadium seats). Standard kit: $60–120. Luxe kit: $150–250. Most items you already own or can borrow.
Q: What if it starts raining?
Your groundsheet becomes a rain cover. Quickly gather valuables under the tarp, fold it over, and secure edges. If rain is likely, consider a pop-up shelter or have an exit plan.
Q: Can I do this with kids?
Absolutely. Kids actually benefit from the structured zones system (they know where snacks and toys are). Add: extra wipes, kid-safe sunscreen, and a dedicated toy zone.
Q: Is this overkill for a simple picnic?
Not if you want to stay longer than 30 minutes. The minimal kit takes 5 minutes to set up and dramatically improves comfort. You can scale up from there.
Q: What about food safety in summer?
Keep perishable foods in a cooler with ice. The FDA recommends keeping cold foods below 40°F and avoiding the “danger zone” (40–140°F) for more than 2 hours (1 hour if it’s above 90°F outside). FDA food safety guidance has details.
Final Thoughts: Comfort Is a System, Not a Hope
The picnics that last, the ones people remember, aren’t accidents. They happen because someone thought about the ground, the body, the weather, and the time, then put a simple system in place.
You don’t need expensive gear or complicated routines. You need:
- A 3-layer blanket system that keeps you dry and cushioned
- A park spot chosen with intention (not just the first empty patch)
- Light back support for 2–4 people (stadium seats are the secret weapon)
- A 30-second reset routine every 30–45 minutes
- Shade awareness and position changes as the sun moves
- Designated zones so the space stays pleasant and organized
Do these things, and your picnic doesn’t end after 20 minutes. It stretches into the afternoon, calm and comfortable, the way it should be.
Now go lounge.
About This Guide
This guide was created to help groups of 4–8 people enjoy longer, more comfortable park picnics without hauling heavy gear. It’s based on principles of outdoor comfort, body mechanics, and thoughtful hosting, not gear obsession.
For more picnic ideas, planning tips, and recipes, explore our related guides:
Leave a Reply