10 Candle and Lighting Ideas for Evening Picnics That Set Pure Magic
· Yogi
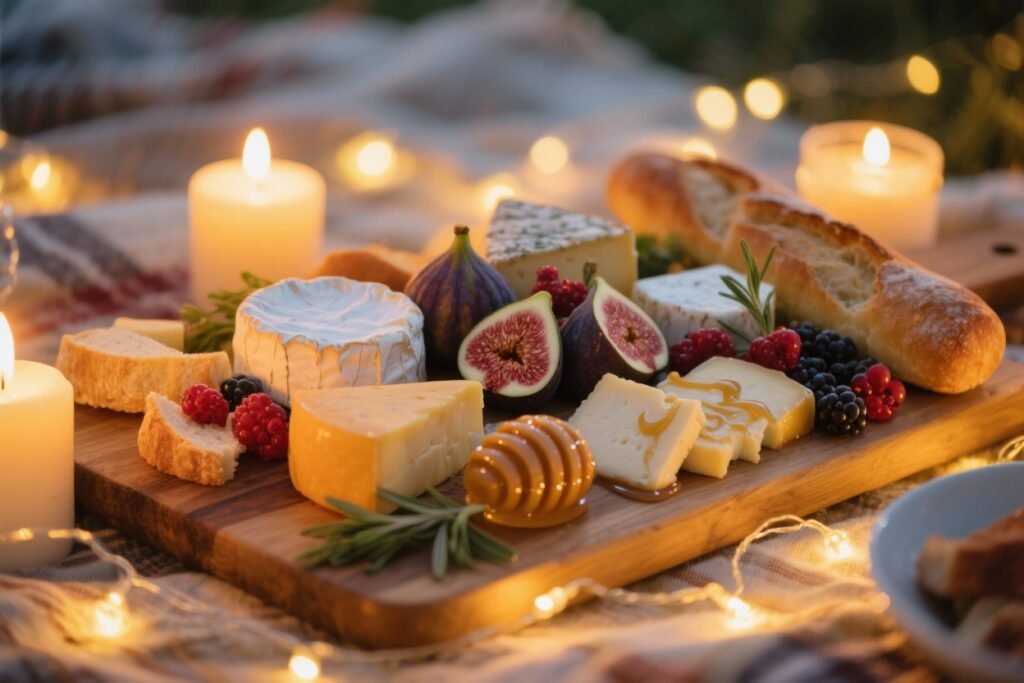
You’ve packed your picnic basket with dreamy cheeses, juicy berries, and that crusty loaf you pretended not to tear into on the way over. Now it’s time for the glow. These 10 candle and lighting ideas turn any evening picnic into a soft-lit escape—romantic, cozy, and totally photo-ready. We’re talking easy setups, affordable finds, and clever tricks so your blanket oasis looks like a movie set (without the drama).
Each “recipe” gives you simple ingredients, step-by-step instructions, and pro tips to keep things safe, windproof, and delightfully bright. Ready to light it up?
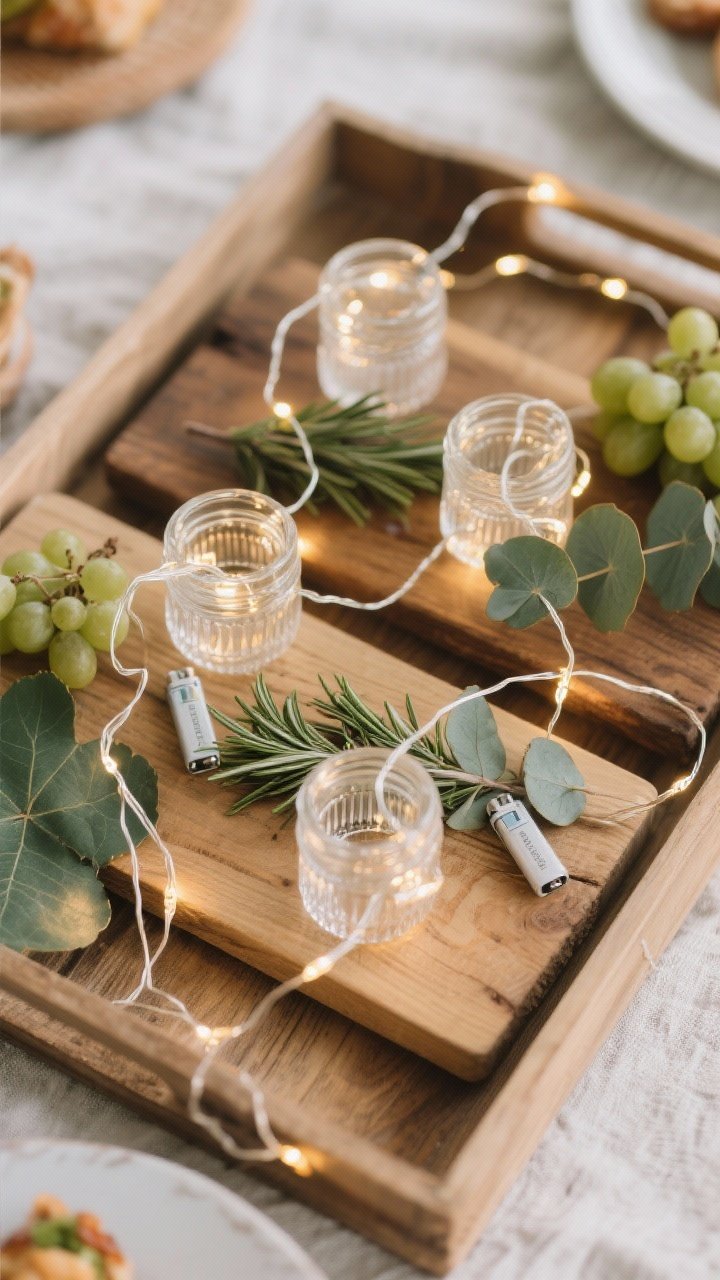
1. Mason Jar Meadow Lights That Make The Grass Sparkle
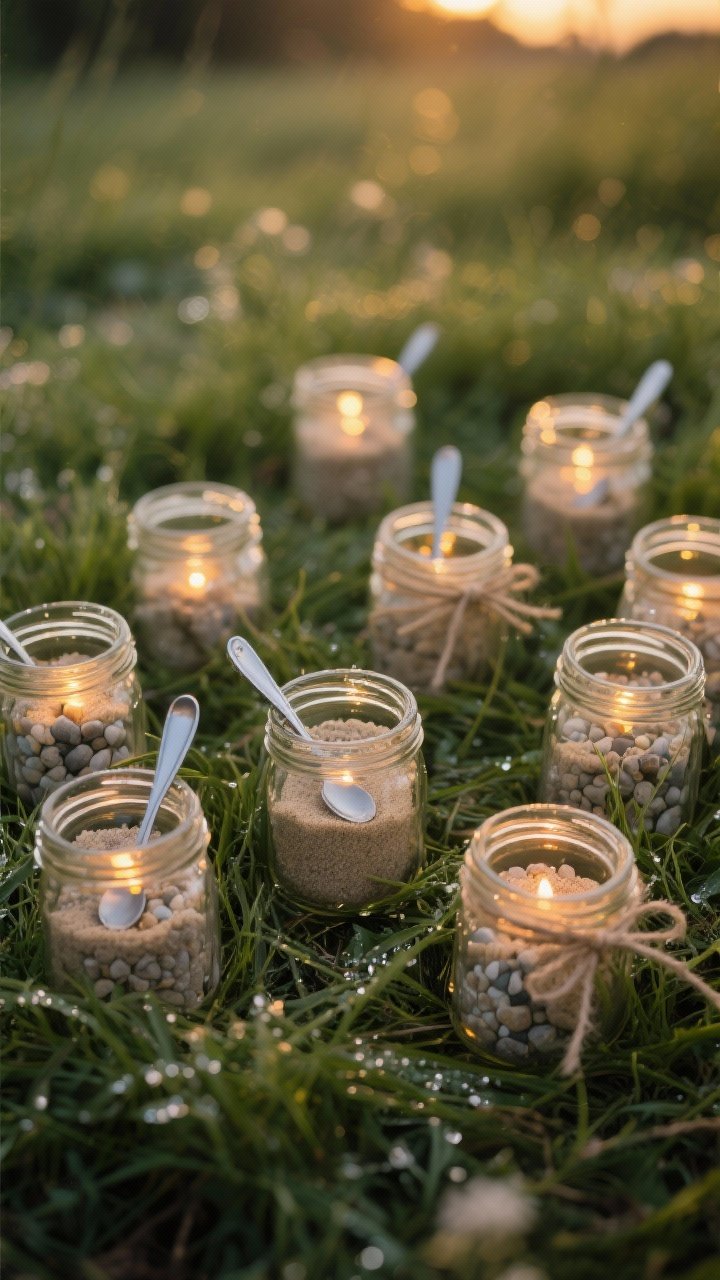
This is the classic for a reason—mason jars keep flames safe, glass glows beautifully, and the setup looks charming on any blanket. Scatter them around like glowing dewdrops and watch the whole meadow shimmer. They’re easy to carry, wind-resistant, and reusable for your next late-night picnic.
Ingredients:
- 8–12 pint-size mason jars (with or without lids)
- 8–12 tea lights or LED tea lights
- 1 cup fine sand or small pebbles
- Optional: thin ribbon or twine for a rustic touch
- Optional: a few sprigs of rosemary or lavender for scent
Instructions:
- Rinse and dry the jars. Add a tablespoon or two of sand or pebbles to the base to stabilize the candles.
- Place one tea light in each jar. If using real candles, keep wicks short to reduce smoke.
- Arrange jars around your blanket: a ring of light for a cozy perimeter or a zigzag path from the walkway to your picnic spot.
- If it’s breezy, screw on lids loosely between lighting to keep flames from blowing out. For LED tea lights, lids can stay on for a soft glow.
- Tie on twine or ribbon if you want a cottage-core vibe. Slip in a small rosemary sprig for a subtle herbal aroma.
Serve your evening with a chilled rosé and a bright salad—these lights flatter everything. For variation, use tinted jars or colored sand to match your theme. Pro tip: pack a long lighter and an extra pack of tea lights. You’ll thank yourself at sunset.
2. Wine Bottle Glow Sticks For Instant Bistro Vibes
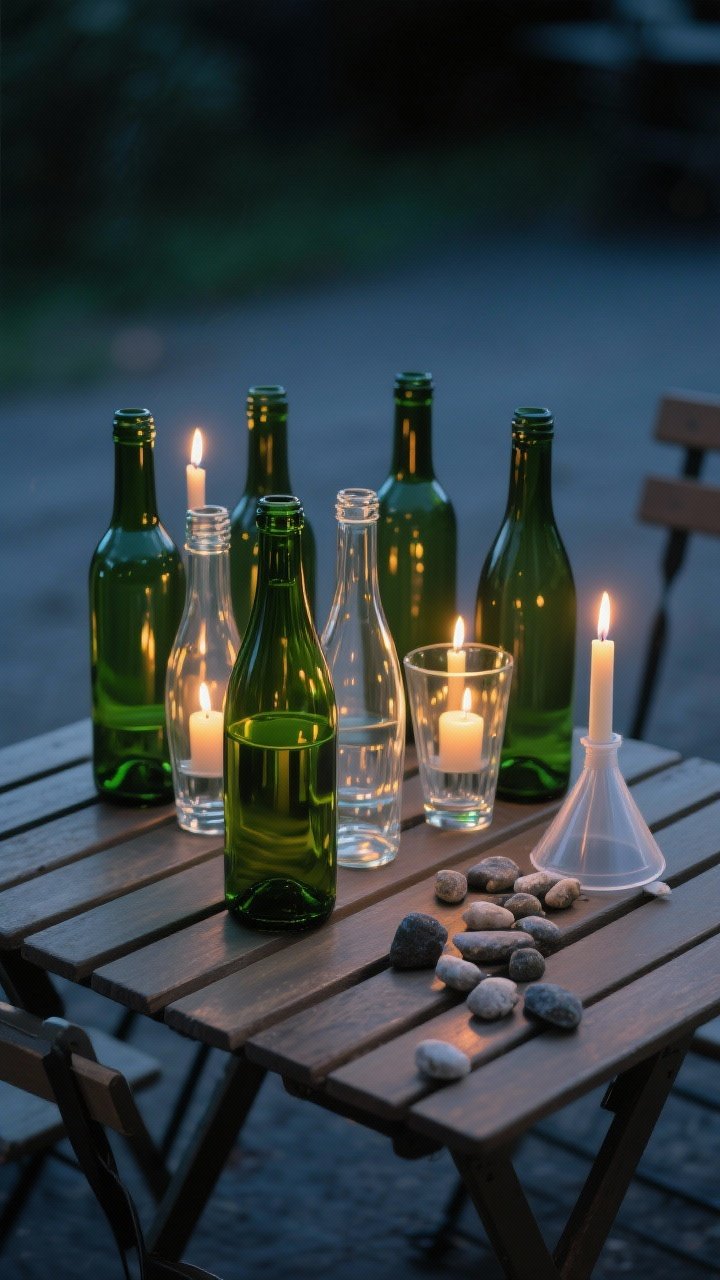
Empty wine bottles become elegant lanterns with almost no effort—think chic sidewalk café energy on your picnic blanket. The glass diffuses light beautifully, and the narrow opening protects the flame. Plus, it’s the perfect excuse to bring a bottle just for the “decor.”
Ingredients:
- 4–6 empty wine bottles (labels removed for a clean look)
- 4–6 taper candles (dripless preferred)
- Optional: a funnel and a handful of sand or tiny stones
- Optional: LED taper candles if open flame isn’t allowed
Instructions:
- Clean bottles inside and out. If needed, pour a little sand inside with a funnel to add weight and stability.
- Warm the base of each taper candle slightly with a lighter, then twist it into the bottle opening for a snug fit.
- Light candles once your setup is secure and the bottle is placed on level ground. Cluster for drama or line them along the edge of the blanket.
- Keep a small dish or jar under each bottle neck if you want to catch drips, or go with dripless tapers for less cleanup.
Serve with charcuterie and crusty bread—the vibe is pure European picnic. Try green glass for a forest glow or clear for crisp brightness. Safety tip: don’t leave taper candles unattended and keep hair, scarves, and napkins clear of flames.
3. Lanterns In The Trees (Or Tripods) For Floating Fireflies
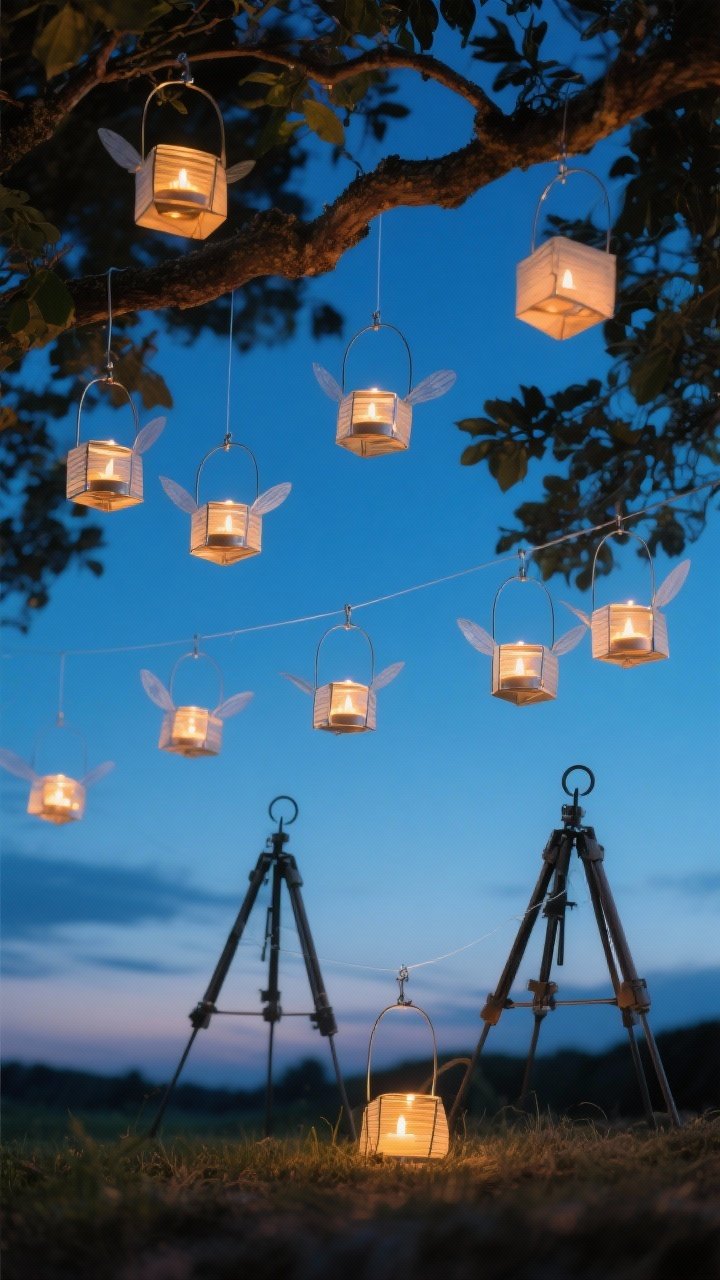
Hanging lanterns create that dreamy, floating light that makes everything look cinematic. If trees aren’t an option, bring a simple tripod or collapsible shepherd’s hooks. You’ll lift the glow off the ground and bathe your picnic in soft, overhead light.
Ingredients:
- 6–10 lightweight metal or paper lanterns
- 6–10 LED tea lights or small battery candles
- Clear fishing line or thin wire
- Optional: collapsible tripods or shepherd’s hooks
- Optional: mini carabiners for easy hanging
Instructions:
- Prep lanterns at home: insert LED lights and attach fishing line or wire to the hanging loops.
- Choose branches above your picnic spot and tie lanterns at varying heights for depth. If no trees, space tripods or hooks around the blanket’s perimeter.
- Switch on LED lights once everything’s hung. Aim for a scattered constellation effect—some low, some high.
- Check stability. A gentle tug should not bring anything down. Avoid real flames in paper lanterns for safety.
These pair perfectly with a light pasta salad and sparkling water. For a boho twist, pick lanterns in muted tones like blush, sage, and cream. Pro tip: bring extra batteries—you’ll want that glow to last through dessert.
4. Flameless Fairy Light Picnic Tray That Doubles As A Centerpiece
Fairy lights tucked under and around serving boards instantly elevate your setup and keep the glow low and cozy. It’s like your cheese board got a halo. Zero open flames, all ambiance—ideal for breezy nights or parks with fire restrictions.
Ingredients:
- 2–3 strands of warm white fairy lights (battery-operated)
- 1–2 sturdy wooden boards or trays
- 2–3 small clear containers or low bowls
- Fresh greenery: eucalyptus, rosemary, or grape leaves
- Extra batteries
Instructions:
- On your blanket, place trays in the center to anchor the space.
- Snake fairy lights beneath the edges of trays and around small containers to lift the glow up and create dimension.
- Tuck greenery between the lights and the edges of trays for a soft, natural frame—but keep it away from hot foods.
- Switch lights to warm white and keep them on a constant glow (not flashing) for that candlelike feel.
Load up with grapes, marinated olives, and chocolate. For variation, use copper wire fairy lights for a richer tone. Tip: tape down the battery packs under the trays with painter’s tape so they stay invisible and accessible.
5. Sand-Filled Votives For Coastal, Windproof Glow

Headed to the beach or a breezy hill? Sand-filled votives are your best friend. The sand anchors the candle and cuts wind, while the glass gives soft, flattering light on faces and food.
Ingredients:
- 10–14 glass votive holders or small jars
- 1–2 cups clean sand (or fine gravel)
- 10–14 votive candles or LED votives
- Optional: seashells or tiny driftwood pieces
- Optional: a shallow tray for grouping
Instructions:
- Fill each holder one-third full with sand. Nestle a votive candle inside so the rim rises just above the sand line.
- Light and place holders in clusters of three to five for visual impact. Keep clusters slightly off the blanket to avoid spills.
- Decorate with shells or driftwood around the base for a coastal nod. If it’s very windy, switch to LED votives and add more sand for weight.
Pair this glow with salty snacks, citrus wedges, and chilled beer or spritzes. For a subtle scent, use unscented candles and add a sprig of crushed mint nearby. Pro tip: pack sand in a zipper bag; it’s clean, easy, and reusable.
6. Citrus Candle Boats With Herb-Scented Smoke
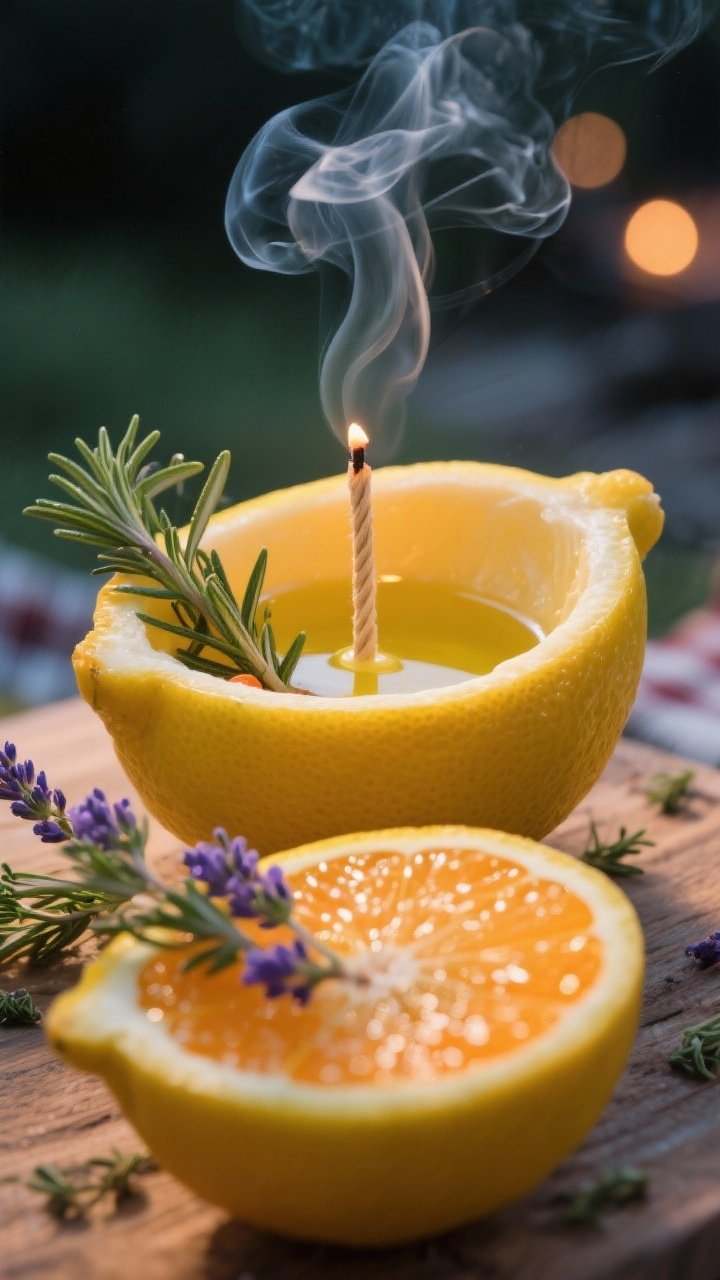
Want a light that also smells like summer? Citrus peel “boats” make adorable, biodegradable candles. They’re small, easy to make on the spot, and give off a gentle citrus-herb aroma that feels fresh and cozy.
Ingredients:
- 3 oranges or large lemons
- 6 tablespoons vegetable oil or olive oil
- Fresh herbs: rosemary, thyme, or lavender
- 6 short wicks (or cotton string as a wick)
- Matches or lighter
- Optional: a small foil square as a heat barrier on the ground
Instructions:
- Halve the citrus crosswise. Scoop out the fruit (snack time!), keeping the peel intact as a bowl.
- Fill each peel half with 1 tablespoon of oil. Insert a short wick in the center—secure it by pressing into the peel’s pith, or wrap the base around a tiny herb sprig.
- Let the wick soak for 2–3 minutes. Light carefully, and place the candle on a flat, heat-safe surface (use foil if needed).
- Sprinkle a few herb leaves around the flame—not directly on it—to release gentle fragrance as the air warms.
These are adorable next to a lemony couscous, grilled chicken, or a bright caprese. They don’t last all night, but they’re perfect for the golden hour. Tip: keep wicks short for a steady flame, and never move them while lit.
7. Paper Bag Luminaria Lane For A Grand Entrance
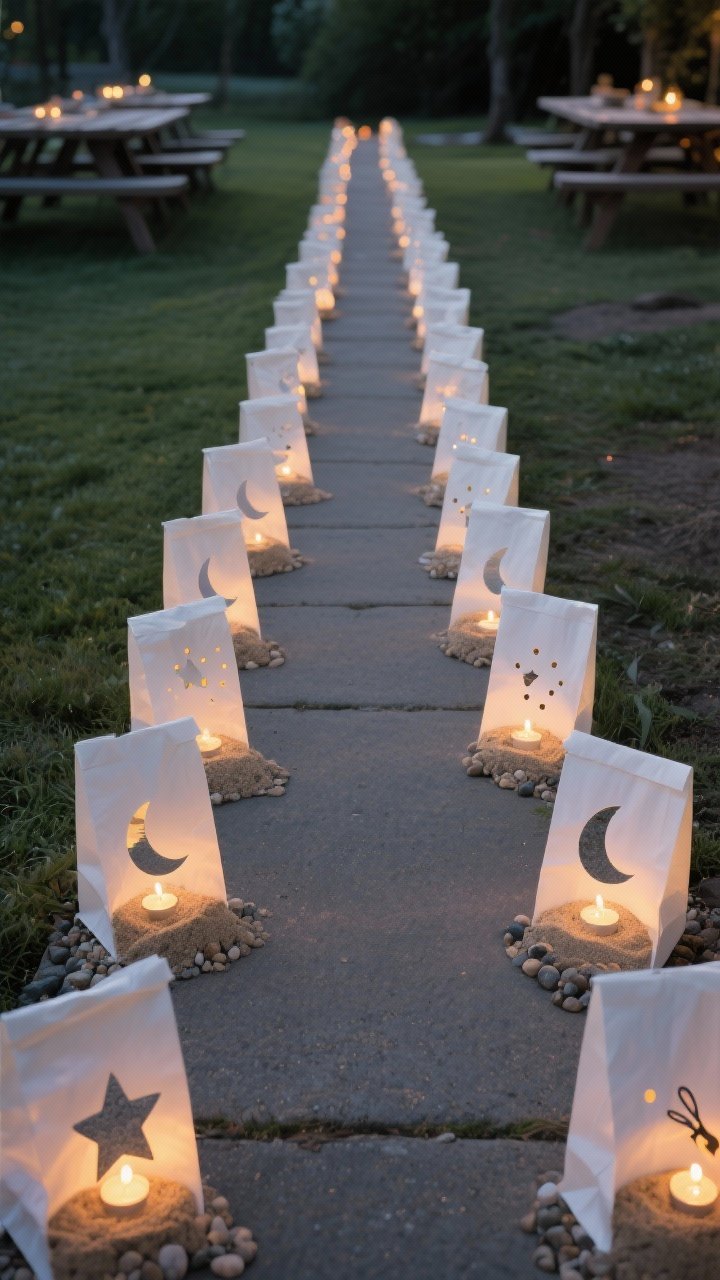
If you want the wow-factor walkway, luminarias are it. They look like glowing paper clouds and guide guests straight to your blanket with a soft, romantic shimmer. Use LED candles to keep things low-risk and park-friendly.
Ingredients:
- 10–16 white paper lunch bags
- 10–16 LED tea lights
- 2–3 pounds of sand or small pebbles
- Optional: hole punch or craft scissors for simple cut-out patterns
- Optional: stencils for stars, hearts, or initials
Instructions:
- At home, punch or cut simple shapes on the front-facing side of each bag for a patterned glow.
- On-site, add a cup of sand or pebbles to each bag for weight. Place one LED tea light inside, centered.
- Arrange the bags in a gentle curve leading to your picnic spot, spaced 2–3 feet apart. Turn on lights just before dusk.
- Keep bags upright and watch for wind; fold the top edge down once if you need extra stability.
Serve alongside a big sharing salad or a basket of warm hand pies—instant party. For a custom touch, spell out a message with letter cutouts. Pack out everything to leave no trace, of course.
8. String-Light Canopy You Can Set Up In Minutes
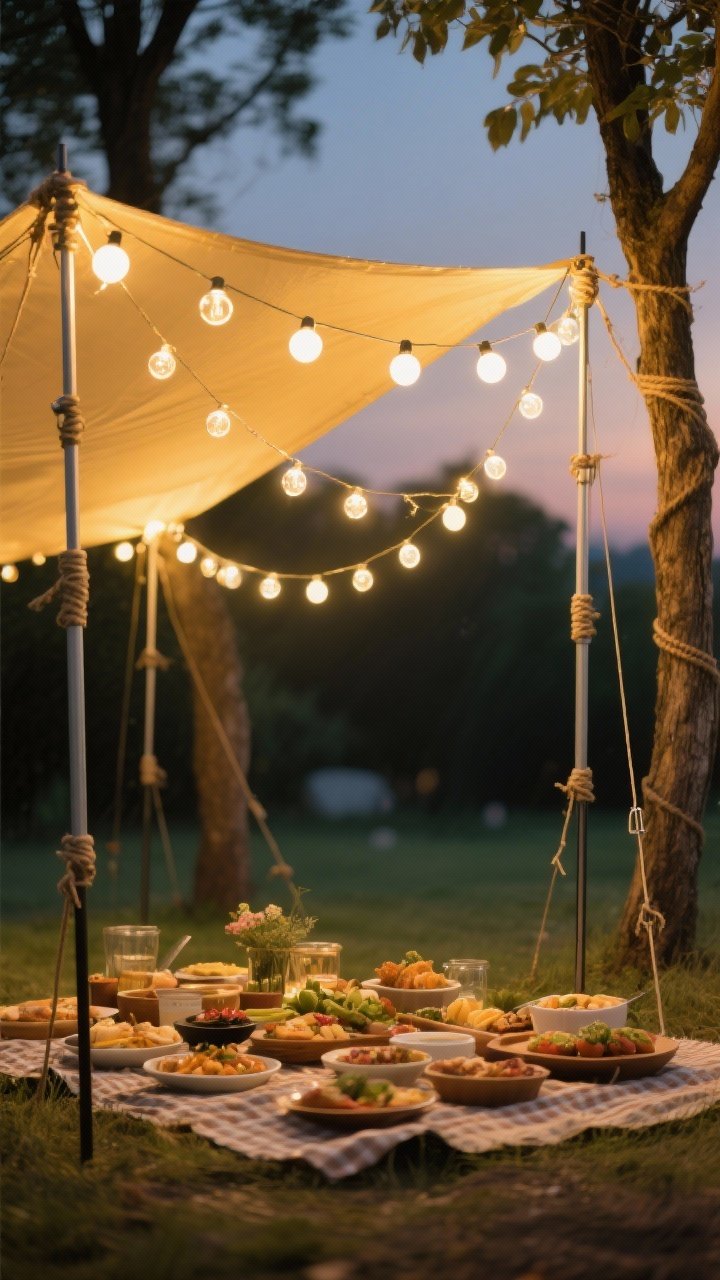
This is the move when you want drama with minimal effort. A string-light canopy creates a cozy ceiling of warm light that feels intimate and luxe. You can rig it between trees, tent poles, or collapsible stands—no plugs needed if you go battery or USB power bank.
Ingredients:
- 2–3 strands of warm white globe or Edison-style string lights (battery or USB)
- 2 lightweight telescoping poles or two nearby trees
- Paracord or sturdy twine
- 4–6 ground stakes or tent pegs
- USB power bank or fresh batteries
- Optional: sheer fabric or a lightweight scarf for soft drape
Instructions:
- Tie twine between two anchor points (trees or poles) to form a central “spine” over your blanket.
- Drape string lights over the spine, allowing gentle swoops for that canopy look. Secure with clips or a simple half-hitch knot.
- Stake the poles securely if using them, and keep the blanket centered beneath the brightest section.
- Connect to a power bank or switch on battery packs. Add a scarf or sheer fabric at the highest point for a soft-focus effect.
Perfect for date night with burrata, tomatoes, and a crusty baguette. Go Edison bulbs for vintage charm or soft globes for a dreamy vibe. Pro tip: keep cords off the ground and away from footpaths to avoid trips.
9. Tin Can Constellations With Punched Star Patterns
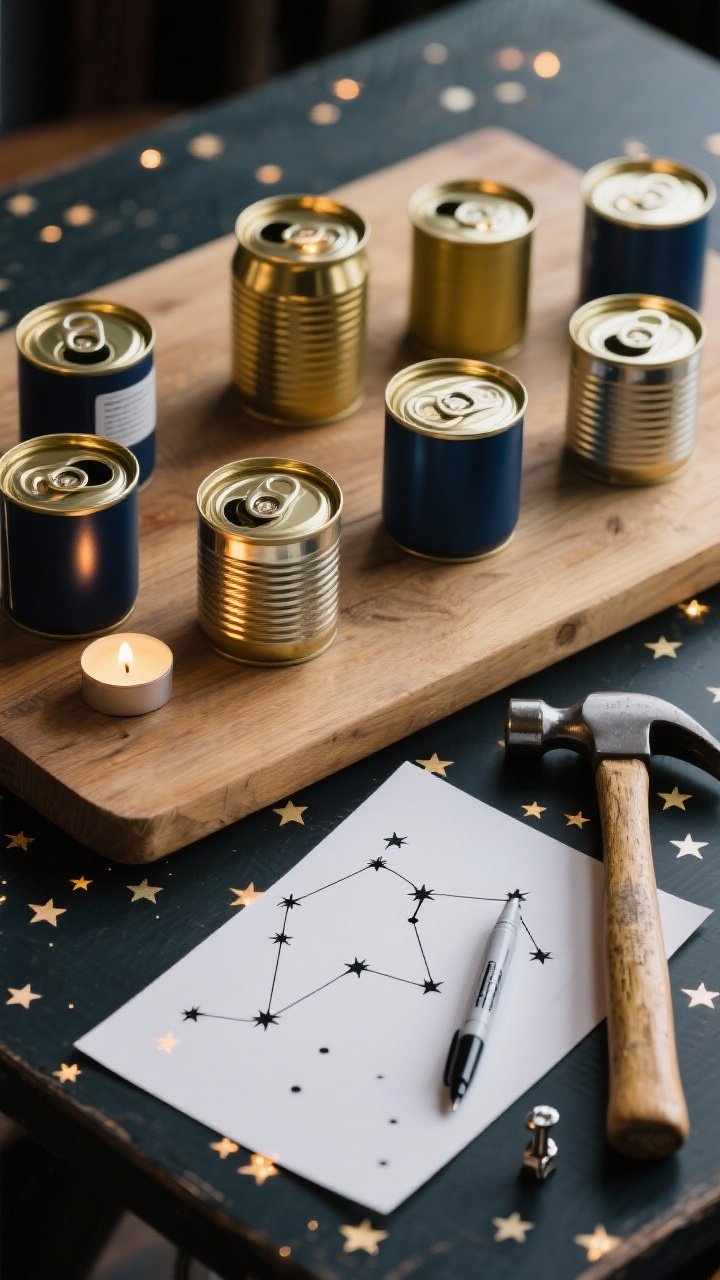
Upcycled and adorable, these tin can lanterns throw tiny constellations of light across your blanket. They’re durable, wind-friendly, and fully customizable—make stars, moons, or even initials. Your picnic turns into a star show, even if the clouds roll in.
Ingredients:
- 6–8 empty tin cans (labels removed, edges smoothed)
- LED tea lights or votives
- Marker and paper for templates
- Nail and hammer (prep at home) or small metal punch
- Optional: spray paint in matte white or gold
- Optional: wire for handles
Instructions:
- At home, fill cans with water and freeze (prevents dents while punching). Mark your star patterns on the outside.
- Use a nail and hammer to punch holes along your design. Let ice melt, dry cans, and smooth any sharp edges.
- Spray paint if desired and let dry completely. Add wire handles if you want to hang them.
- Place LED candles inside and set cans around your picnic in clusters. The patterns will glow like little galaxies.
Pair this cosmic glow with dark chocolate, berries, and soft jazz. For extra sparkle, line the inside with reflective foil before adding lights. Tip: keep a couple taller cans to act as mini “torches” at the edges of your spread.
10. Solar Lantern Bouquet That Packs Down Tiny
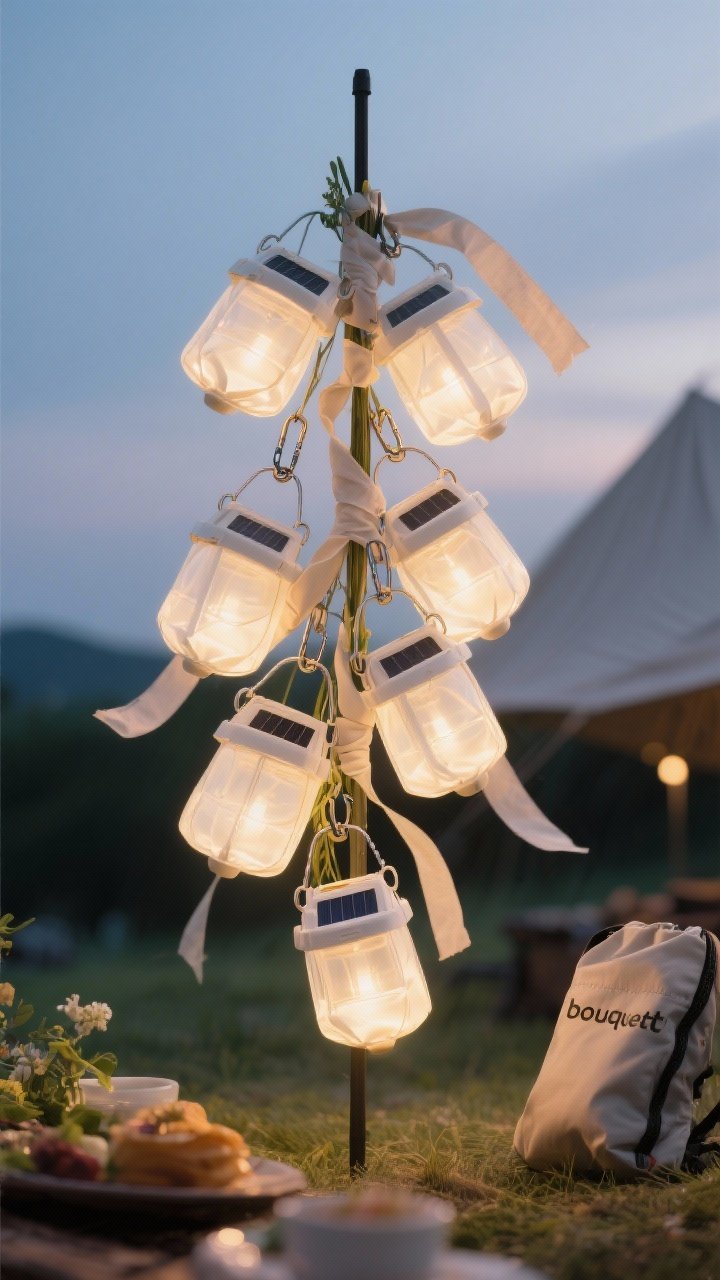
When you want max portability and zero fuss, go solar. Modern collapsible solar lanterns are light, bright, and surprisingly chic. Charge them on the go, clip them to your bag, and unveil a bouquet of glowing cubes or discs when the sun goes down.
Ingredients:
- 4–8 collapsible solar lanterns (warm white preferred)
- Small carabiners or clips
- Optional: one tall stake or pole to group a few lanterns at different heights
- Optional: soft-toned fabric ribbons for subtle movement
Instructions:
- Charge lanterns in sunlight during the day or via USB if supported.
- At your picnic, inflate or unfold and switch to warm mode. Cluster three at the center and scatter the rest around the edges.
- Clip a few to a pole or low branch to create a layered effect. Add soft ribbons to dance in the breeze.
- Adjust brightness to low for meal time and bump to medium when the stars come out.
These are perfect with anything from sushi to picnic tacos—clean, modern, and effortlessly cool. Mix sizes for texture, and keep one extra lantern in your bag as a path light for the walk back. Bonus: totally weather-friendly.
Tips For Safe, Blissful Glow
- Check local rules on open flames. When in doubt, go LED.
- Keep flames away from dry grass, fabrics, and hair. Use heat-safe bases.
- Bring a small snuffer or a metal lid to safely extinguish real candles.
- Pack in, pack out. Leave the park or beach as spotless as you found it.
There you have it—10 ways to turn an ordinary evening picnic into a softly lit dreamscape. Whether you’re going rustic with mason jars, coastal with sand-filled votives, or modern with a string-light canopy, the right glow makes the food taste better and the company feel closer. Pick one, mix a few, and watch sunset melt into your very own golden-hour magic. Go on—grab the blanket, cue your playlist, and light it up.
Printable Recipe Card
Want just the essential recipe details without scrolling through the article? Get our printable recipe card with just the ingredients and instructions.
Leave a Reply