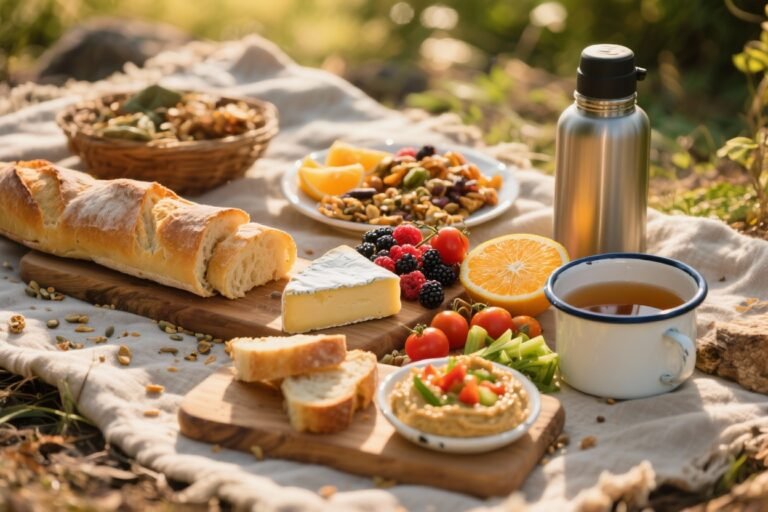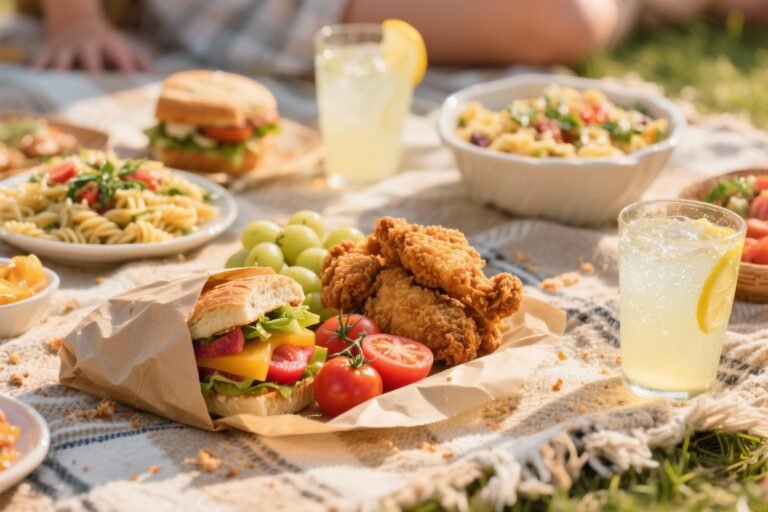
10 Kid-friendly Picnic Foods That Disappear Faster Than You Can Unpack
You know that magical moment when you spread out the picnic blanket and suddenly everyone’s starving? These kid-friendly picnic foods are built for exactly that—fun to make, quick to pack, and even easier to devour. We’re talking handheld bites, colorful snacks, and smart make-ahead dishes that survive the car ride and still taste amazing.
Each recipe is practical, flavor-packed, and tested on picky eaters. Think less fuss, more munch. Ready to become the hero of the park, playground, or backyard? Let’s fill that cooler with things kids (and honestly, you) will actually want to eat.
1. Rainbow Veggie Pinwheel Wraps Kids Actually Ask For
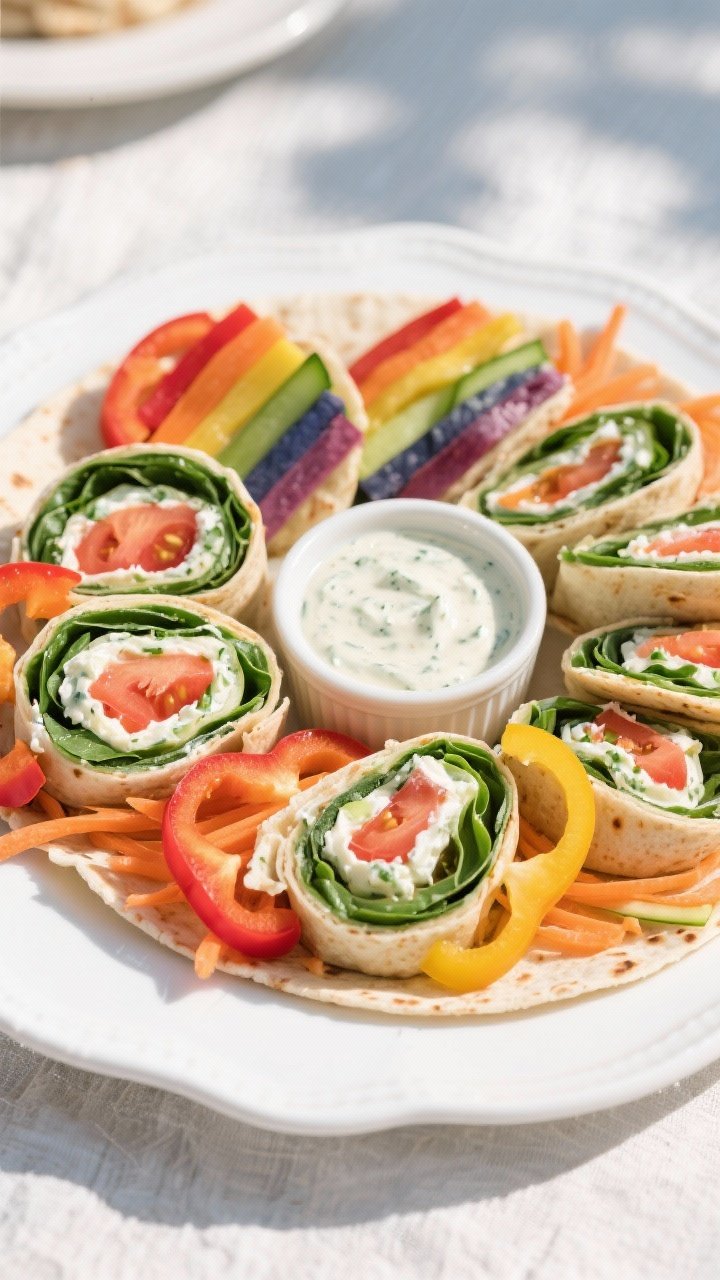
These colorful pinwheels are basically salad in disguise. They’re crunchy, creamy, and perfectly packed for tiny hands. Bonus: they look like confetti spirals, so kids think they’re a party snack—even when it’s just a park bench and a juice box.
Ingredients:
- 4 large flour tortillas (10-inch, spinach or tomato for color)
- 8 oz cream cheese, softened
- 2 tbsp ranch seasoning or 1/4 cup ranch dressing
- 1 cup shredded carrots
- 1 cup thinly sliced bell peppers (red, yellow, orange)
- 1 cup baby spinach or shredded lettuce
- 1/2 cup cucumber, seeded and finely chopped
- 1/2 cup shredded cheddar cheese
- Salt and pepper to taste
Instructions:
- Mix the cream cheese and ranch until smooth. Taste and season lightly with salt and pepper if needed.
- Lay out a tortilla and spread a thin, even layer of the ranch cream cheese to the edges.
- Sprinkle on carrots, peppers, spinach, cucumber, and cheddar in thin layers. Don’t overfill or the roll won’t hold.
- Tightly roll the tortilla from one end to the other. Wrap in plastic and chill for 20–30 minutes to set.
- Slice into 1-inch pinwheels and pack snugly in a container so they don’t unravel.
Serve with a small container of extra ranch for dipping. Swap in turkey or hummus if you want more protein. For crunch, add crushed baked chips right before rolling—kids go wild for that texture.
2. Mini Caprese Skewers With Sweet Balsamic Drizzle
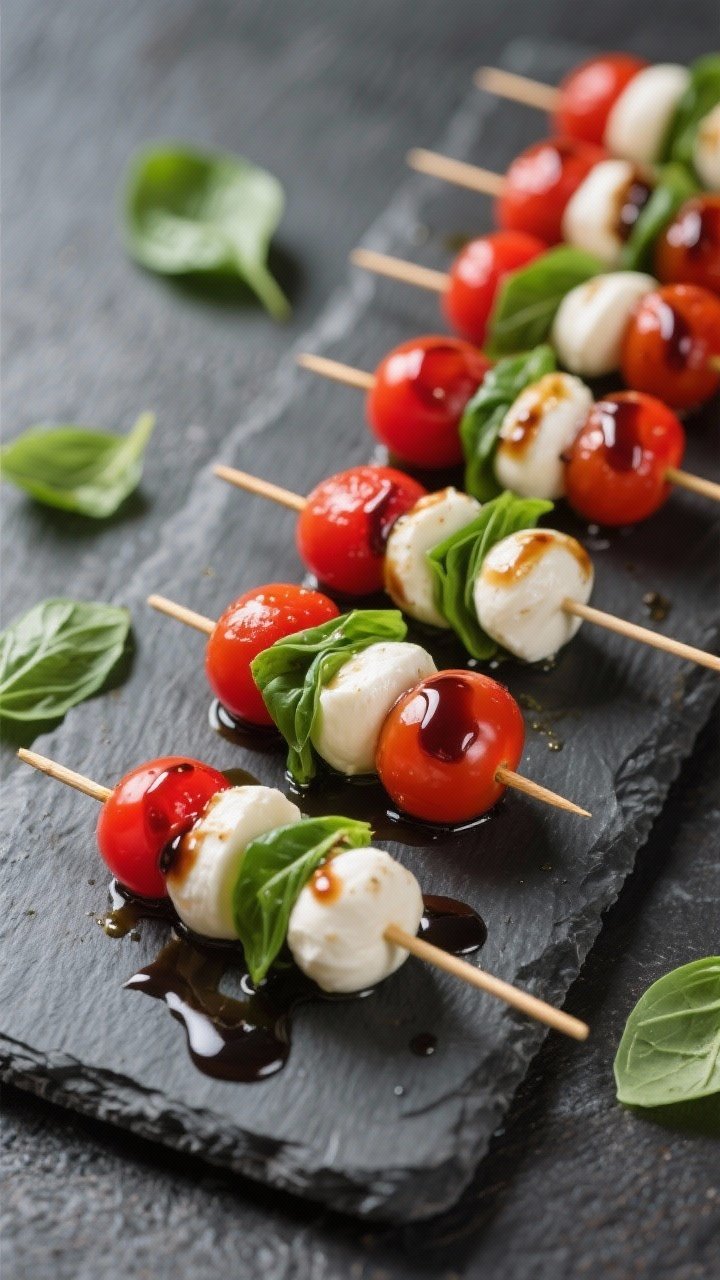
Everything tastes better on a stick—especially when it’s juicy tomatoes and cheese. These mini skewers are bite-sized, mess-free, and cute enough to feel fancy. The balsamic drizzle adds a touch of sweetness that kids love.
Ingredients:
- 1 pint cherry tomatoes
- 8 oz fresh mozzarella balls (ciliegine or pearl size)
- 1 cup fresh basil leaves
- 1/4 cup balsamic glaze (store-bought or reduced balsamic vinegar)
- 2 tbsp olive oil
- Pinch of salt
- 12–16 small skewers or toothpicks
Instructions:
- Thread one tomato, one basil leaf (folded), and one mozzarella ball onto a skewer. Repeat until ingredients are used.
- Arrange on a platter or in a shallow container. Drizzle with olive oil and a small pinch of salt.
- Just before serving, drizzle lightly with balsamic glaze—or pack it in a squeeze bottle for on-the-spot drizzling.
Serve with breadsticks or mini focaccia squares. If basil is too strong for little palates, swap in baby spinach or omit it. For extra sweetness, add a cube of melon between the tomato and cheese.
3. No-Mess Chicken Caesar Pita Pockets
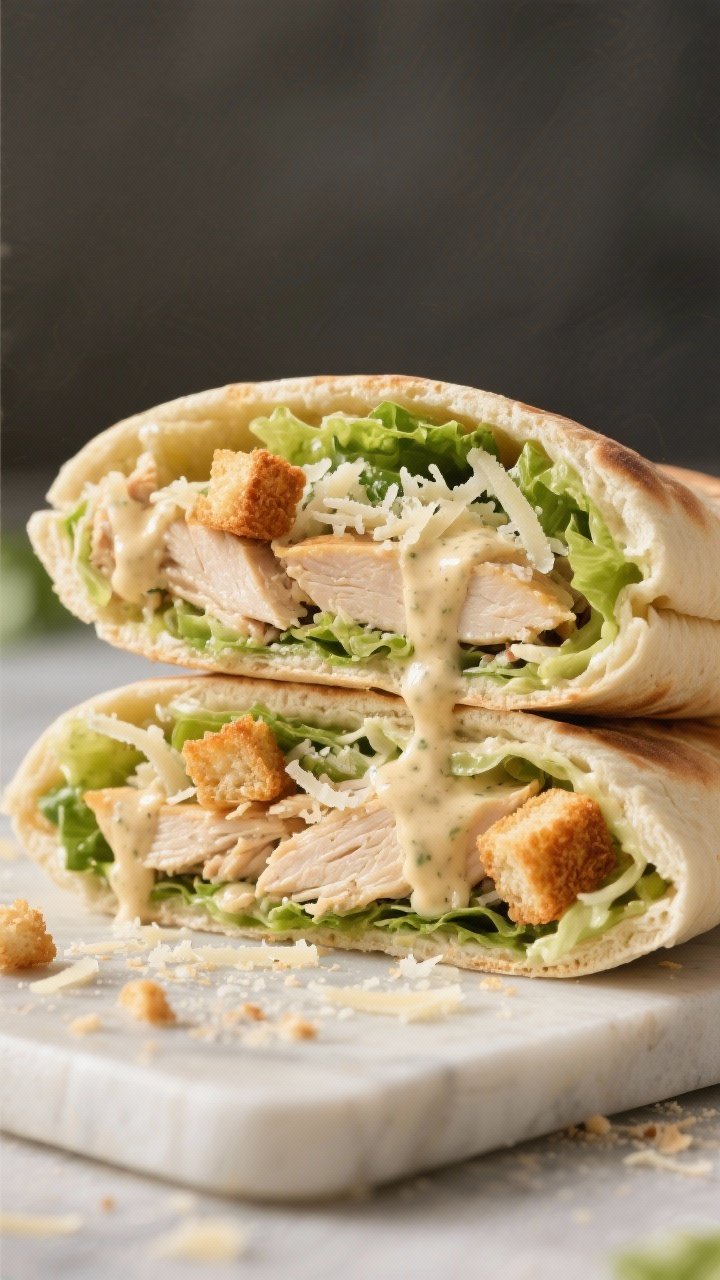
Same beloved Caesar salad vibe, but handheld and spill-proof. These pita pockets keep crisp lettuce and juicy chicken tucked neatly inside, so there’s no dressing dripping onto your picnic blanket. Parents cheer. Kids crunch. Everyone wins.
Ingredients:
- 2 cups cooked chicken, chopped (rotisserie works great)
- 1/4 cup Caesar dressing (plus more to taste)
- 2 cups chopped romaine lettuce
- 1/2 cup shredded Parmesan
- 1 cup crunchy croutons, lightly crushed
- 4 whole pita breads, halved
- Salt and pepper to taste
- Lemon wedges (optional)
Instructions:
- In a bowl, toss chicken with Caesar dressing until lightly coated. Season with salt and pepper.
- Fold in romaine, Parmesan, and crushed croutons right before packing so they stay crunchy.
- Stuff the mixture into pita halves. Wrap each pocket tightly in parchment or foil.
- Pack lemon wedges on the side for a fresh squeeze if your kids love zippy flavors.
Add cherry tomatoes or bacon bits for extra pop. For a dairy-free version, use a vegan Caesar and skip the Parmesan—still deliciously crunchy and savory.
4. Ham-and-Cheddar Puff Pastry Twists That Travel Like a Dream
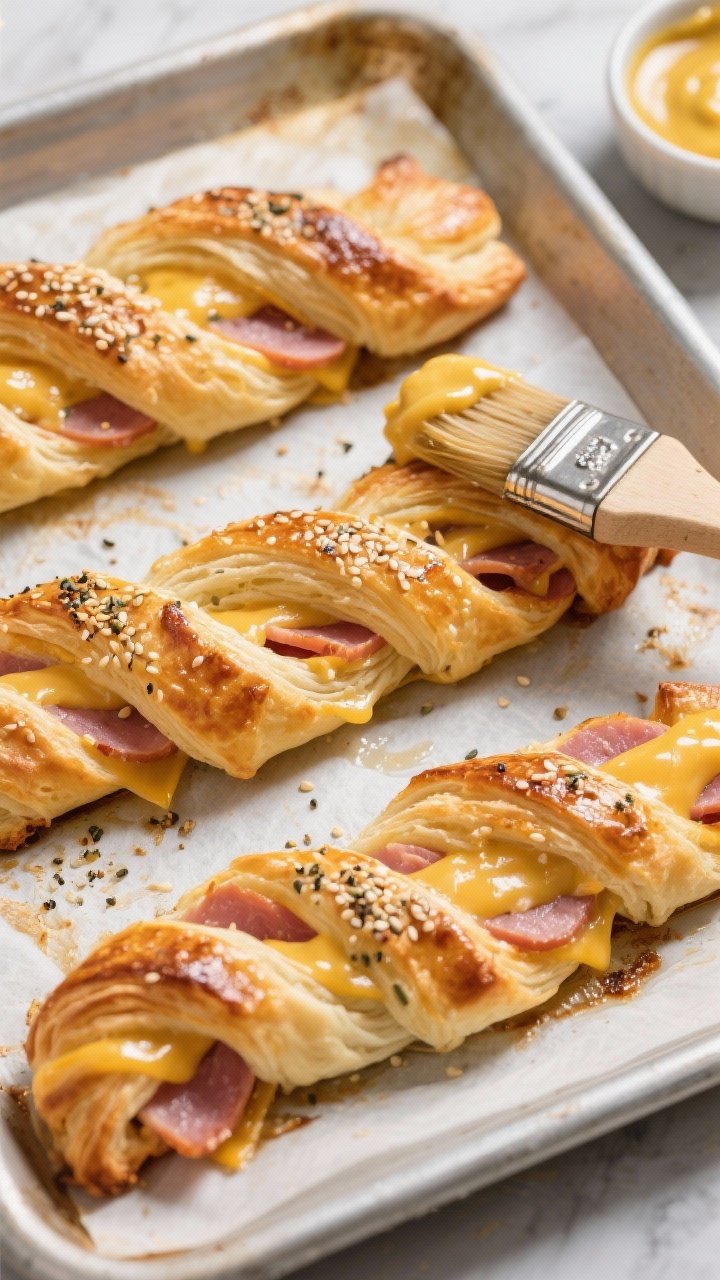
Flaky, cheesy, salty—these twists are bakery-level and ridiculously easy. They hold up beautifully at room temperature and don’t crumble all over the place. They also vanish quickly, so maybe double the batch.
Ingredients:
- 1 sheet puff pastry, thawed
- 2 tbsp Dijon or honey mustard
- 6 oz thinly sliced ham
- 1 cup shredded sharp cheddar
- 1 egg, beaten (for egg wash)
- 1 tsp sesame seeds or everything bagel seasoning (optional)
Instructions:
- Preheat oven to 400°F (200°C). Line a baking sheet with parchment.
- Unroll puff pastry and spread with mustard. Layer ham evenly and sprinkle with cheddar.
- Fold the pastry in half to enclose the filling. Gently roll with a pin to seal.
- Cut into 1-inch strips, twist each strip several times, and place on the baking sheet.
- Brush with egg wash and sprinkle with seeds or seasoning.
- Bake 15–18 minutes until puffed and golden. Cool completely before packing.
Serve with apple slices for a sweet-savory combo. Swap ham for turkey, or try pesto and mozzarella for a fun twist. These freeze well—bake from frozen with a few extra minutes.
5. Crunchy Cornflake Chicken Bites With Honey-Mustard Dip
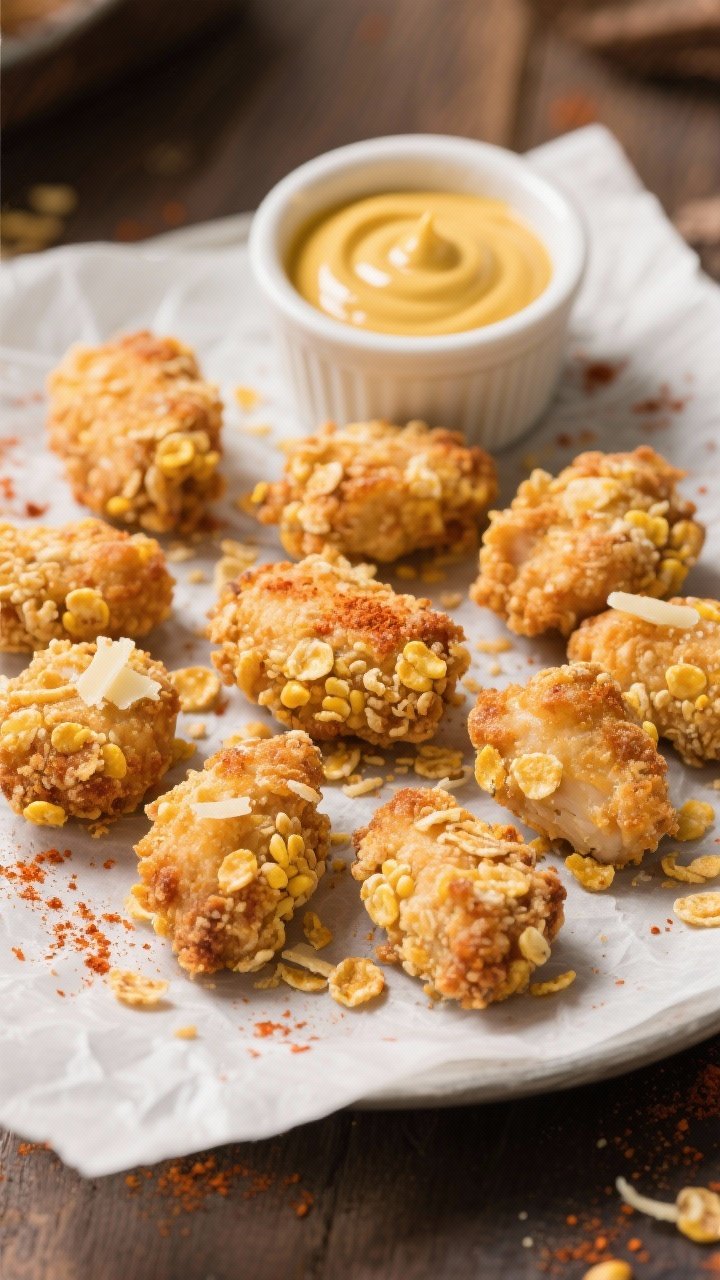
Imagine chicken nuggets, but crunchier and oven-baked. These bites stay crisp even after the car ride and pair perfectly with a sweet-tangy dip. Kids devour them. Adults casually “taste-test” half the batch.
Ingredients:
- 1.5 lbs boneless, skinless chicken breasts, cut into 1.5-inch pieces
- 2 cups cornflakes, crushed
- 1/2 cup grated Parmesan
- 1 tsp garlic powder
- 1 tsp paprika
- 1/2 tsp salt
- 2 large eggs, beaten
- 2 tbsp milk
- Olive oil spray
For the Honey-Mustard Dip:
- 1/4 cup Dijon mustard
- 2 tbsp honey
- 2 tbsp mayonnaise or Greek yogurt
- 1 tsp lemon juice (optional)
Instructions:
- Preheat oven to 425°F (220°C). Line a baking sheet with parchment and set a wire rack on top if you have one.
- In a shallow bowl, mix crushed cornflakes, Parmesan, garlic powder, paprika, and salt.
- In another bowl, whisk eggs and milk. Dip chicken pieces in egg, then press into cornflake mixture to coat.
- Place on the rack or parchment and spray lightly with olive oil.
- Bake 14–16 minutes, flipping once, until cooked through and crisp.
- Stir together dip ingredients and pack separately.
Serve warm or at room temp. Add a second dip—BBQ or ketchup—for variety. Want it gluten-free? Use gluten-free cornflakes and check your condiments.
6. Peanut-Butter-and-Berry Sushi Rolls (No Fish, Just Fun)

These playful “sushi” rolls turn classic PB&J into something kids can’t resist. They’re rollable, sliceable, and totally snackable. Plus, you can make them nut-free with a simple swap.
Ingredients:
- 4 slices soft sandwich bread, crusts removed
- 1/2 cup peanut butter or sunflower seed butter
- 1/4 cup berry jam or honey
- 1/2 cup fresh berries (sliced strawberries or whole blueberries)
- 1 tbsp chia seeds (optional, for crunch)
Instructions:
- Use a rolling pin to flatten each bread slice into a thin sheet.
- Spread a thin layer of peanut butter, then a thinner layer of jam.
- Line up berries along one edge. Sprinkle with chia seeds if using.
- Roll tightly from the berry side into a log. Slice into 1-inch “sushi” pieces.
- Pack snugly in a container so they hold their shape.
Drizzle with a little honey before slicing for extra stickiness. Try cream cheese with sliced peaches or Nutella with banana for playful variations. For a protein boost, add a dusting of finely chopped peanuts or granola inside.
7. Mason Jar Pasta Salad With Hidden Veggie Goodness
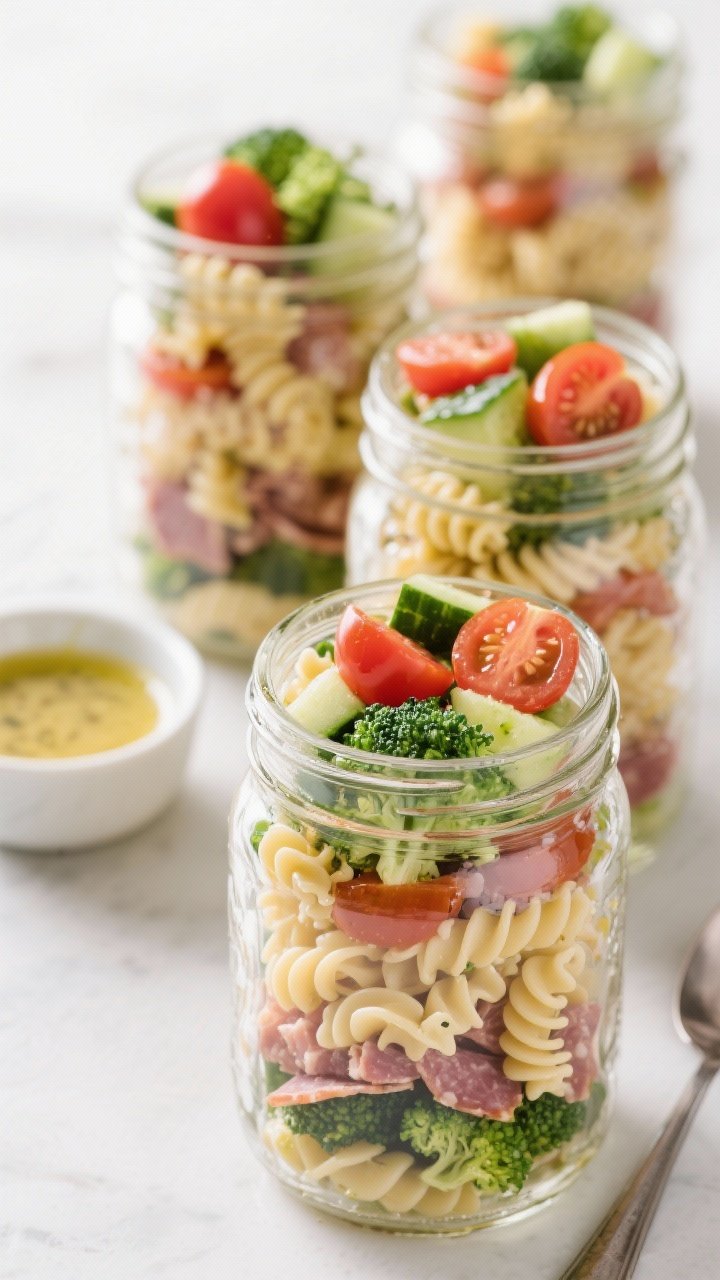
Layered pasta salad is the ultimate make-ahead move. It stays fresh, travels well, and kids love shaking it up themselves. The trick? Tender pasta, sweet veggies, and a zippy but mild dressing.
Ingredients:
- 8 oz small pasta (mini shells, rotini, or farfalle)
- 1 cup cherry tomatoes, halved
- 1 cup cucumber, diced
- 1 cup steamed broccoli florets, chopped
- 1/2 cup diced mild salami or turkey (optional)
- 1/2 cup mini mozzarella balls or diced cheddar
- 1/4 cup black olives, sliced (optional)
- 2 tbsp grated Parmesan
For the Dressing:
- 1/4 cup olive oil
- 2 tbsp red wine vinegar or lemon juice
- 1 tsp honey
- 1 tsp Dijon mustard
- 1/2 tsp dried Italian seasoning
- Salt and pepper to taste
Instructions:
- Cook pasta in salted water until just tender. Rinse under cold water and drain well.
- Whisk dressing ingredients until emulsified. Taste and adjust seasoning.
- In mason jars, add 2–3 tbsp dressing to the bottom. Layer in this order: pasta, broccoli, cucumber, tomatoes, cheese, meats, olives, Parmesan.
- Seal and chill. At the picnic, shake to distribute dressing and eat straight from the jar.
Use colorful pasta to make it extra fun. Add peas or corn for sweetness. To keep it dairy-free, skip the cheese and add chickpeas—still hearty and satisfying.
8. Sweet Corn and Cheddar Muffins That Don’t Crumble
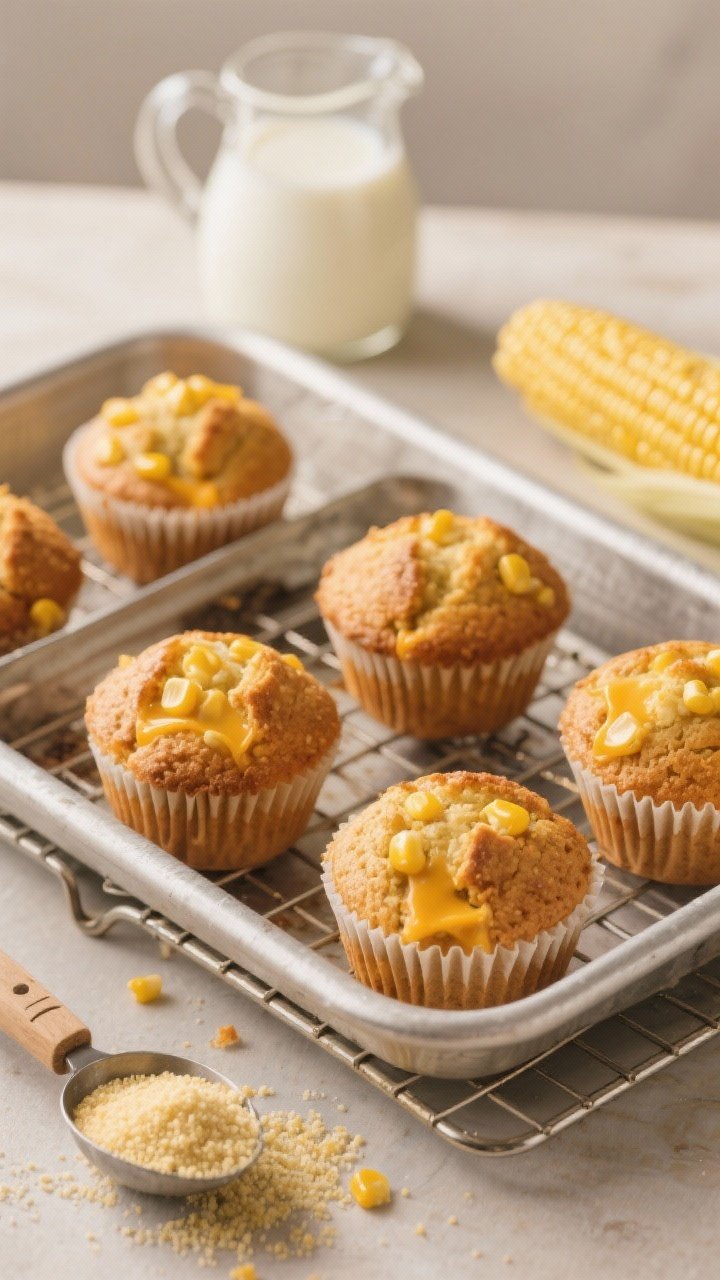
These savory-sweet muffins are soft, sturdy, and surprisingly filling. They pack beautifully and pair with fruit or a simple salad. Kids eat them warm, room temp, or straight from the cooler—no complaints either way.
Ingredients:
- 1 cup yellow cornmeal
- 1 cup all-purpose flour
- 2 tbsp sugar (optional)
- 1 tbsp baking powder
- 1/2 tsp salt
- 1 cup milk
- 1/3 cup neutral oil or melted butter
- 1 large egg
- 1 cup corn kernels (fresh, frozen, or canned and drained)
- 1 cup shredded cheddar
- 2 tbsp chopped chives or green onion (optional)
Instructions:
- Preheat oven to 400°F (200°C). Line a 12-cup muffin tin.
- Whisk cornmeal, flour, sugar, baking powder, and salt.
- In another bowl, whisk milk, oil, and egg. Fold wet into dry just until combined.
- Stir in corn, cheddar, and chives. Divide batter into muffin cups.
- Bake 14–17 minutes until golden and a toothpick comes out clean. Cool before packing.
Serve with butter and honey for dipping. Add crumbled cooked bacon for a brunchy twist. To go gluten-free, use a 1:1 gluten-free flour blend and check your baking powder.
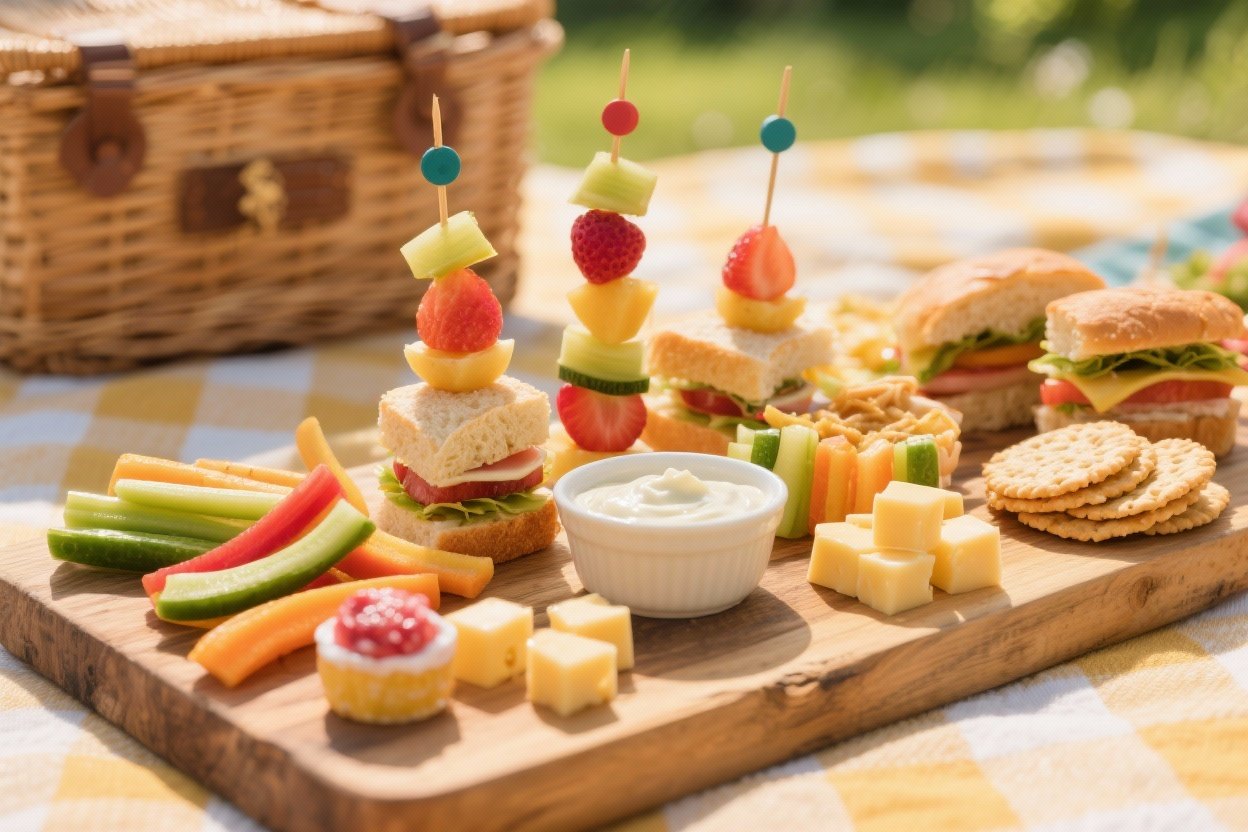
9. Fruit Wands With Vanilla Yogurt Dip
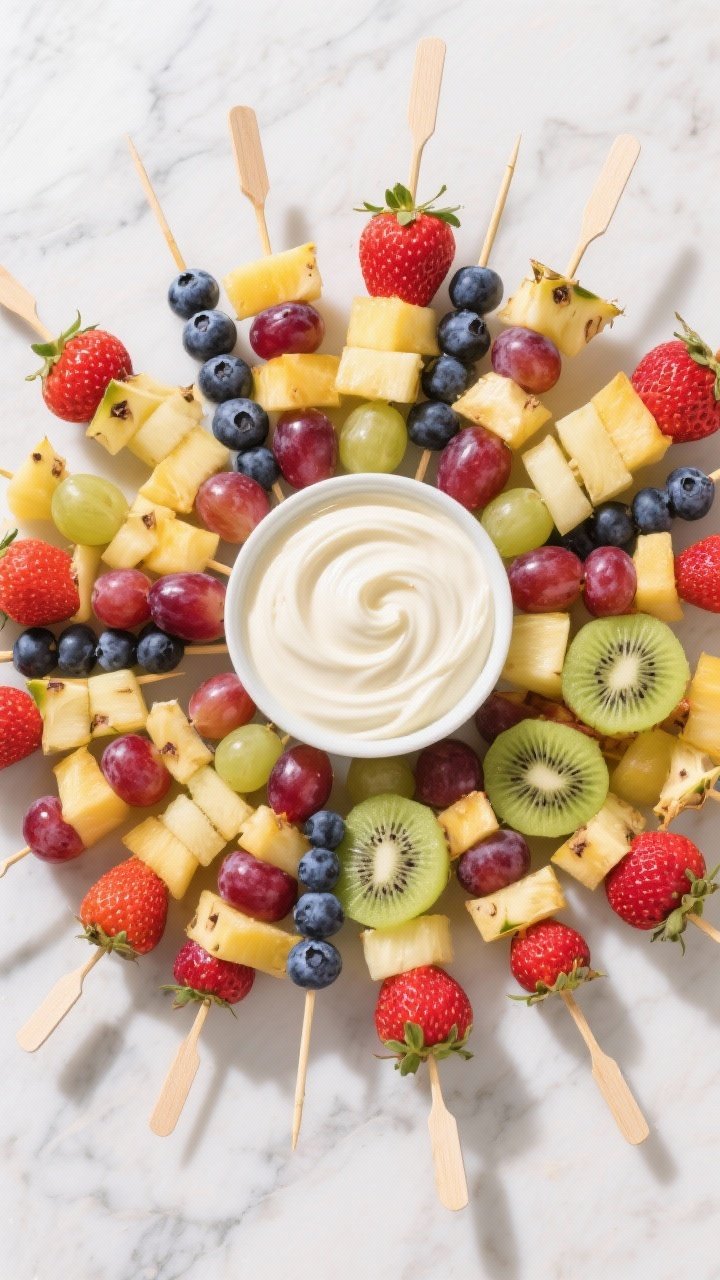
Want kids to eat more fruit? Put it on sticks and call them wands. These are colorful, customizable, and endlessly fun—especially with a creamy vanilla dip that feels like dessert but isn’t a sugar bomb.
Ingredients:
- 2 cups strawberries, hulled and halved
- 2 cups seedless grapes
- 2 cups pineapple chunks
- 2 kiwis, peeled and sliced
- 1 cup blueberries
- 12–16 wooden skewers
For the Dip:
- 1 cup Greek yogurt (vanilla or plain)
- 1–2 tbsp honey or maple syrup (to taste)
- 1/2 tsp vanilla extract
- Pinch of cinnamon (optional)
Instructions:
- Thread fruit onto skewers in rainbow order or mix it up. Leave a little space at the base for a handle.
- Whisk yogurt, honey, vanilla, and cinnamon until smooth. Pack in a small lidded container.
- Keep fruit chilled until serving so it stays crisp and refreshing.
Use star-shaped cutters on melon for “magic wand” tops—instant wow factor. For dairy-free dip, use coconut yogurt. Sprinkle crushed graham crackers on the dip for a cheesecake vibe—seriously good.
10. Build-Your-Own Mini Taco Cups
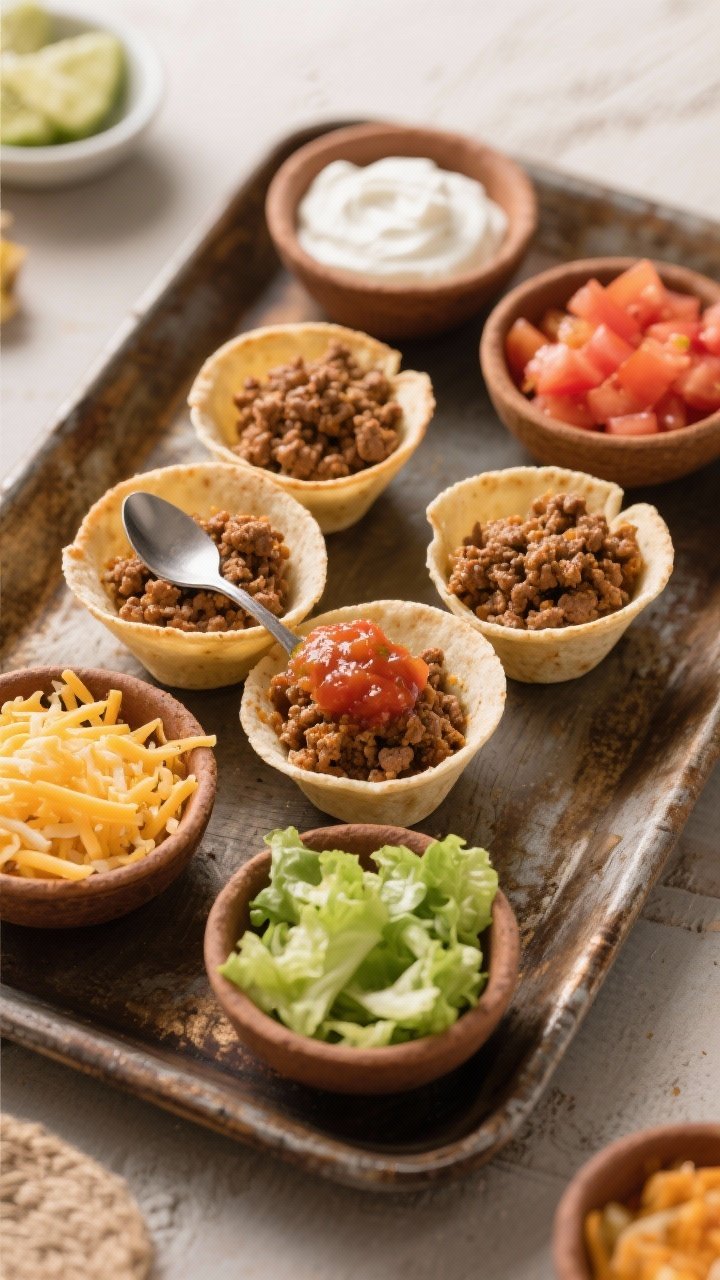
These taco cups are portable, customizable, and guaranteed to get kids excited. Each shell is a crunchy little bowl for toppings, and everyone gets to build their own. No soggy tortillas, no mess—just happy picnic faces.
Ingredients:
- 12 small flour tortillas (street taco size) or 24 mini corn tortillas
- 1 tbsp olive oil
- 1 lb lean ground beef, turkey, or plant-based crumbles
- 2 tsp taco seasoning (or to taste)
- 1/2 cup salsa
- 1 cup shredded lettuce
- 1 cup shredded Mexican blend cheese
- 1 cup diced tomatoes
- 1/2 cup corn kernels
- 1/2 cup black beans, rinsed and drained
- Sour cream or Greek yogurt (optional)
- Lime wedges
Instructions:
- Preheat oven to 375°F (190°C). Lightly oil a muffin tin.
- Microwave tortillas for 20–30 seconds to soften. Press each into a muffin cup to form a bowl.
- Bake 8–10 minutes until lightly crisp. Cool completely.
- Cook the meat in a skillet with olive oil, breaking it up. Stir in taco seasoning and salsa; simmer 2–3 minutes. Cool before packing.
- Pack shells and toppings separately. At the picnic, fill shells with meat, lettuce, cheese, tomatoes, corn, beans, and a dollop of sour cream. Finish with a squeeze of lime.
For a vegetarian version, use seasoned black beans or lentil taco meat. Add guacamole or mild pico for extra flavor. Keep shells crisp by filling right before eating, not a second earlier.
Tips for Picnic Success
Keep cold things cold with ice packs and store dips separately to avoid sogginess. Pack sturdy containers and reusable napkins, and don’t forget a small cutting board—it doubles as a tray for assembly. Most of these recipes can be made the night before, saving your sanity when everyone’s already got their shoes on.
You’ve got 10 kid-friendly picnic foods that bring color, crunch, and total crowd-pleaser energy. Pick a few, mix and match, and watch those lunchboxes come back empty. Now grab the blanket, find some shade, and enjoy every bite.
Printable Recipe Card
Want just the essential recipe details without scrolling through the article? Get our printable recipe card with just the ingredients and instructions.