10 Best Picnic Blankets That’ll Upgrade Every Outdoor Feast
Planning a sunny day spread? You bring the snacks, I’ll bring the blankets—well, the blanket talk. The right picnic blanket can turn a crumb-strewn scramble into a luxe lounge session. We’re talking cozy layers, no soggy grass seepage, and enough room to sprawl like you mean it.
Here are 10 picnic blanket “recipes”—fun, DIY-friendly ways to create the perfect outdoor mat for every vibe and budget. Think of them like meal prep for your park life: smart materials, easy steps, and clever add-ons. Ready to roll out?
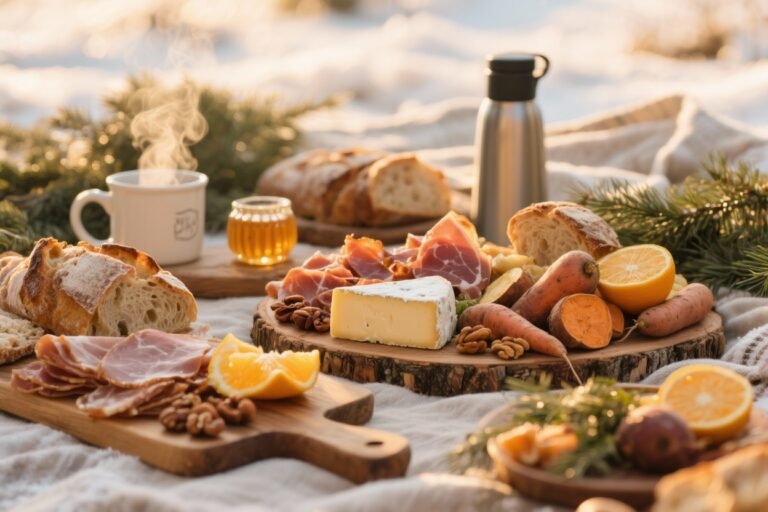
1. Classic Checkered Blanket With Waterproof Backing
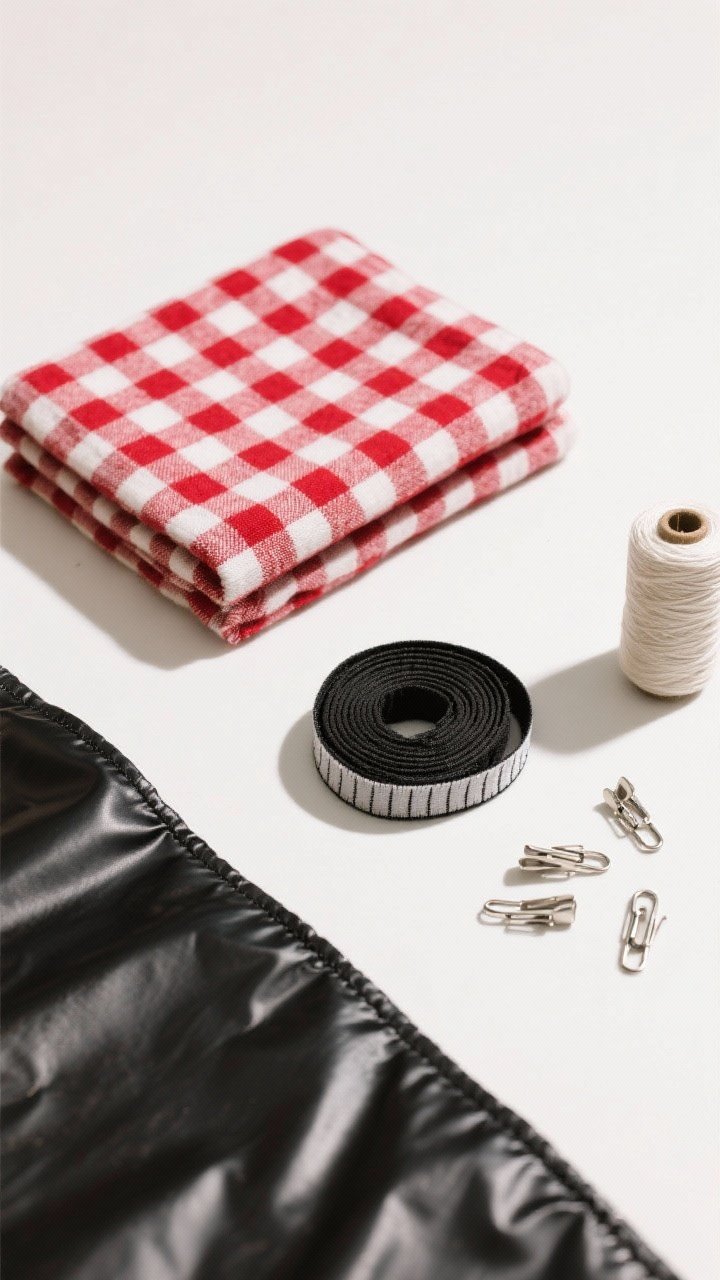
The iconic picnic look with modern comfort. This blanket blends that vintage red-and-white charm with a sturdy waterproof layer so your baguette knows only bliss, not damp grass. It’s big, durable, and easy to clean—call it a park essential.
Ingredients:
- 2 yards cotton gingham fabric (54-inch wide)
- 2 yards waterproof nylon or polyurethane-coated fabric
- 1/2 inch bias tape (8 yards) or binding of choice
- Fabric clips or pins
- Polyester thread (color to match)
- Fabric scissors or rotary cutter
- Sewing machine with universal needle
- Optional: Spray adhesive for fabric, corner weights (flat washers)
Instructions:
- Trim both fabrics to the same size. Aim for about 60 x 70 inches for roomy seating.
- Layer the waterproof fabric wrong side up, place the gingham right side up on top. Clip in place.
- Lightly mist the wrong side of the cotton with spray adhesive to help it cling to the backing (optional but helpful).
- Stitch around all edges with a 1/2-inch seam allowance, leaving a neat finish.
- Apply bias tape around the perimeter. Miter corners for a clean look.
- Topstitch around the edges to secure. If adding weights, stitch a small pocket at each corner and slip in a washer before closing.
Roll it, strap it, picnic it. This one pairs with classic sandwiches and lemonade—nostalgia looks good on you. Swap gingham for any cotton print if checks aren’t your thing.
2. Boho Fringe Blanket With Hidden Cushion Layer
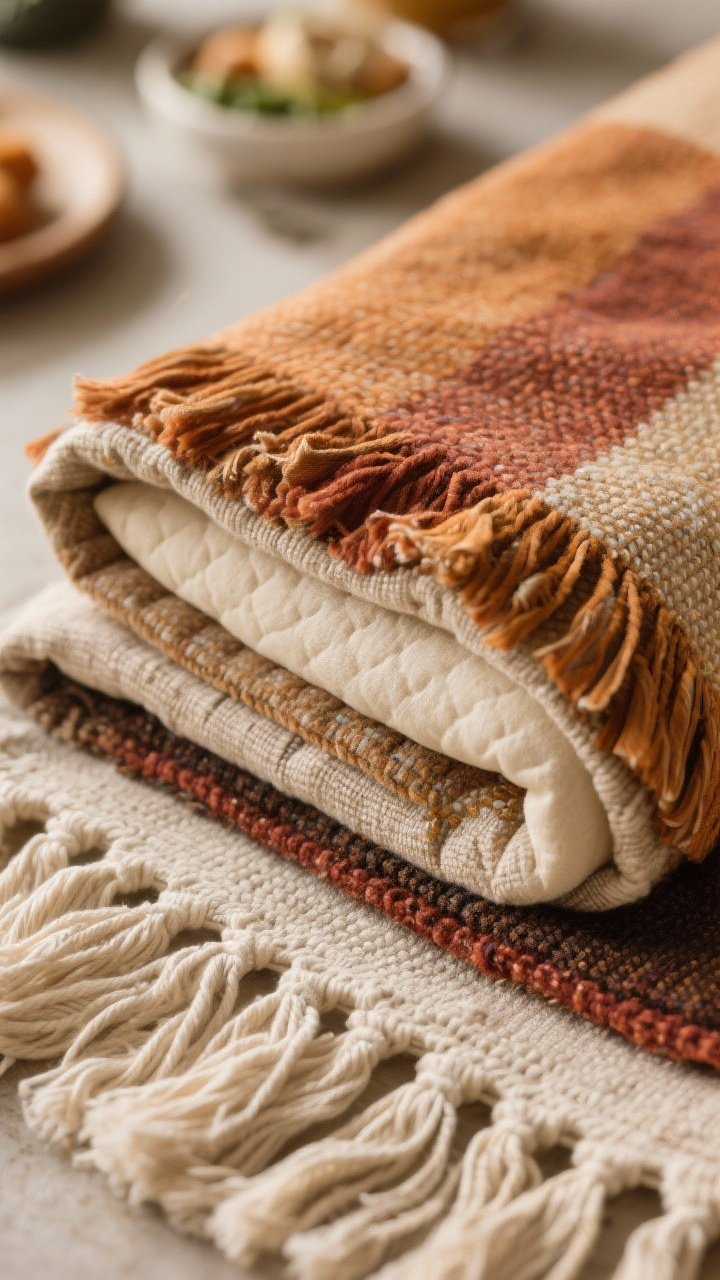
Want that languid, boho vibe with actual comfort? This blanket sneaks in a foam layer so you can sit for hours without numb legs. Bonus: fringed edges for a little flair that looks great in photos.
Ingredients:
- 2 yards woven cotton or linen blend
- 2 yards brushed cotton or canvas (backing)
- 1/4 inch high-density foam padding (cut to finished size)
- Fringe trim (8–9 yards, depending on perimeter)
- Fabric glue or fusible web (optional)
- Polyester thread
- Sewing machine, scissors, clips
Instructions:
- Cut both fabrics and foam to your desired size (about 60 x 60 inches for a square).
- Place the top fabric right side up, foam centered on top, and backing fabric right side down. You’ll make a fabric-foam sandwich.
- Clip all layers. Stitch around the perimeter with a 1/2-inch seam, leaving an 8-inch gap.
- Turn right-side out through the gap, ensuring the foam lays flat. Hand-sew or topstitch the gap closed.
- Attach the fringe along the edges, stitching over the trim for durability.
Perfect for charcuterie spreads and sparkling drinks. If grass is damp, add a thin waterproof liner between foam and backing. Wash on gentle and air-dry to protect the trim.
3. Roll-Up Canvas Blanket With Leather Straps
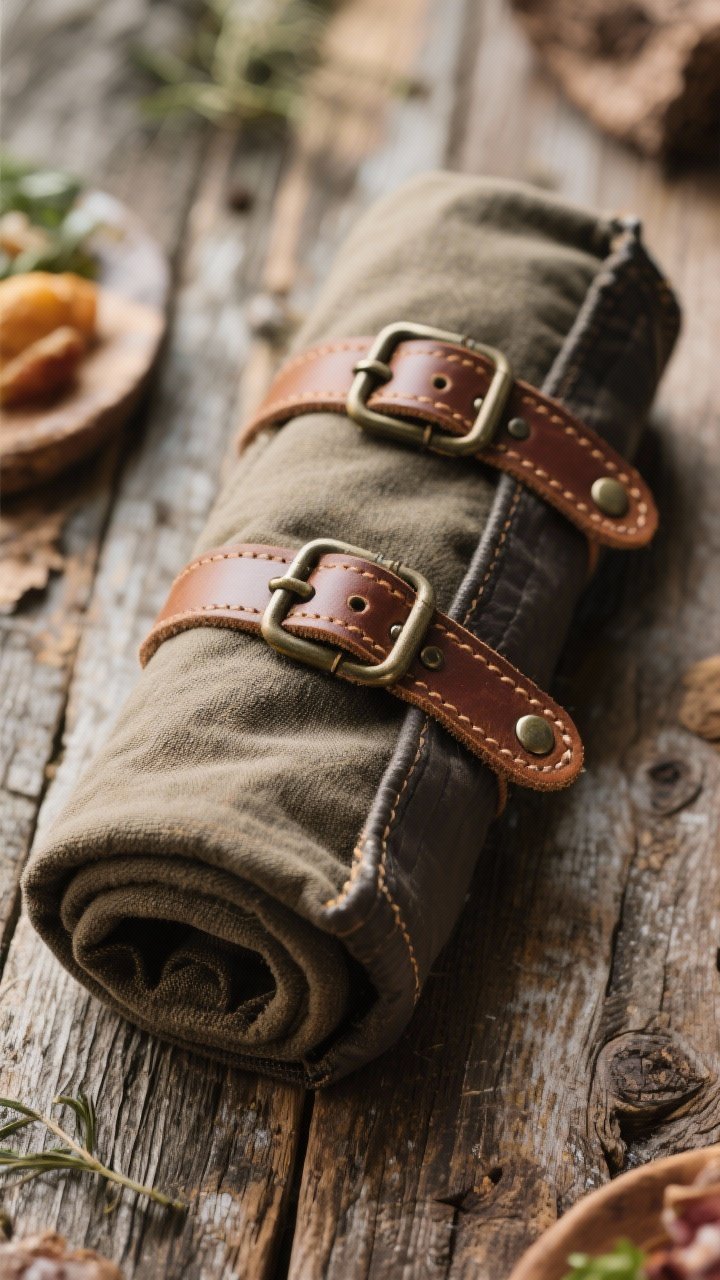
For the organized picnicker who loves good gear, this rugged roll-up looks sharp and travels even better. It’s durable, wipeable, and screams “outdoor pro.” Trust me, it’ll outlast your cooler.
Ingredients:
- Heavy-duty canvas (duck cloth), 2–2.5 yards
- Waxed canvas or nylon (backing), 2–2.5 yards
- Two leather straps (1 inch wide) with buckles, 24–30 inches each
- Rivets or heavy-duty snaps and setting tools
- Polyester thread, heavy-duty needle
- Measuring tape, fabric marker, scissors
- Optional: Carry handle (webbing or leather), beeswax for waxing canvas
Instructions:
- Cut both fabrics to ~58 x 72 inches. If waterproof backing isn’t used, wax the canvas lightly.
- Layer top canvas right side up and backing right side down. Sew around, leaving an 8-inch gap.
- Turn right-side out, press edges, and topstitch the perimeter.
- Attach the carry handle at the midpoint of one short side.
- Place leather straps about 12 inches from one short edge. Rivet in place. Ensure buckles face outward when rolled.
Roll from the opposite end toward the straps and cinch. This one’s great for beach trips, parks, or festivals. Add a monogram patch if you want extra swagger.
4. Patchwork Picnic Quilt That Tells a Story
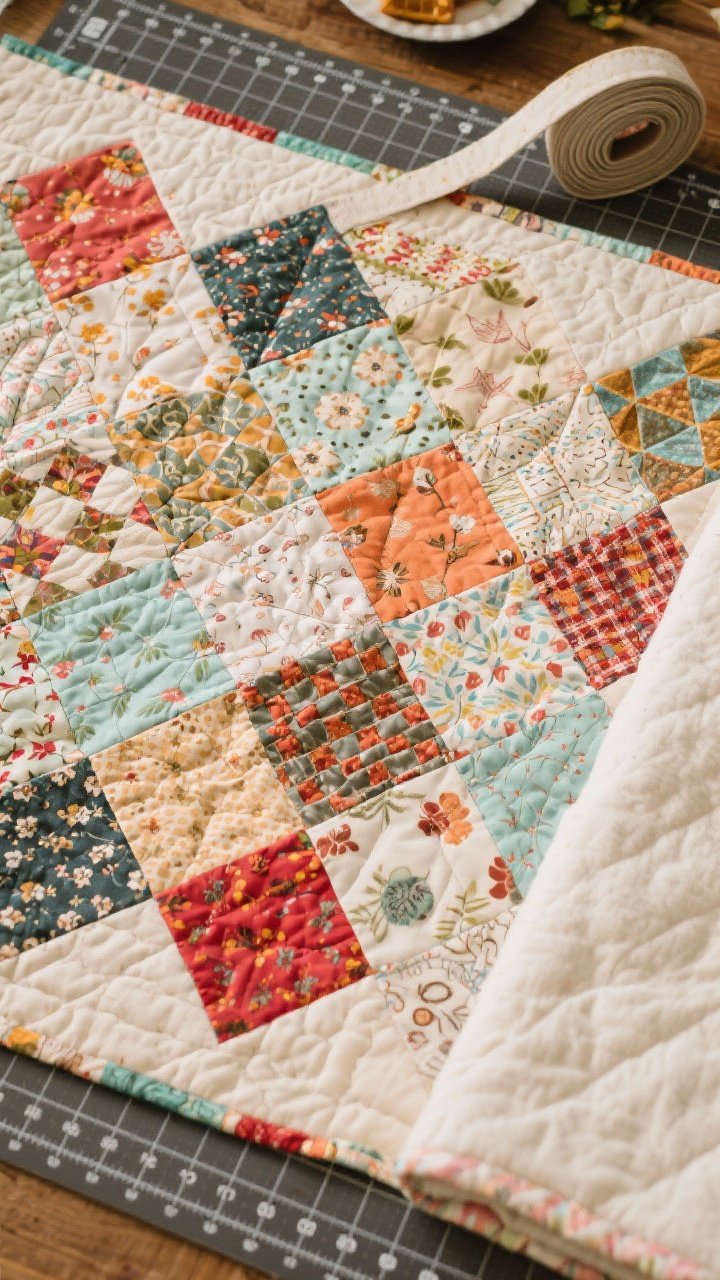
Got fabric scraps? This blanket turns them into a memory quilt you can actually use outside. It’s cozy, colorful, and guaranteed to spark conversations while you pass the potato salad.
Ingredients:
- Assorted cotton quilting squares (about 60–80 pieces, 8-inch squares)
- Quilt batting (thin or medium loft)
- Backing fabric (cotton or flannel), enough for 60 x 70 inch quilt
- Binding tape or bias tape (8 yards)
- Rotary cutter, cutting mat, ruler
- Sewing machine, quilting thread
- Safety pins or basting spray
Instructions:
- Arrange squares into a layout about 7 x 9 blocks. Mix colors thoughtfully.
- Sew rows with 1/4-inch seam allowance, then sew rows together to complete the top.
- Layer backing (wrong side up), batting, and quilt top (right side up). Baste with pins or spray.
- Quilt straight lines across the blanket, either in a grid or diagonally, about 6 inches apart.
- Trim edges and bind with bias tape. Miter corners for neatness.
This blanket is perfect for family events and summer evenings. Use darker prints or a stain-resistant spray if you’re worried about spills. Machine wash gentle, tumble low.
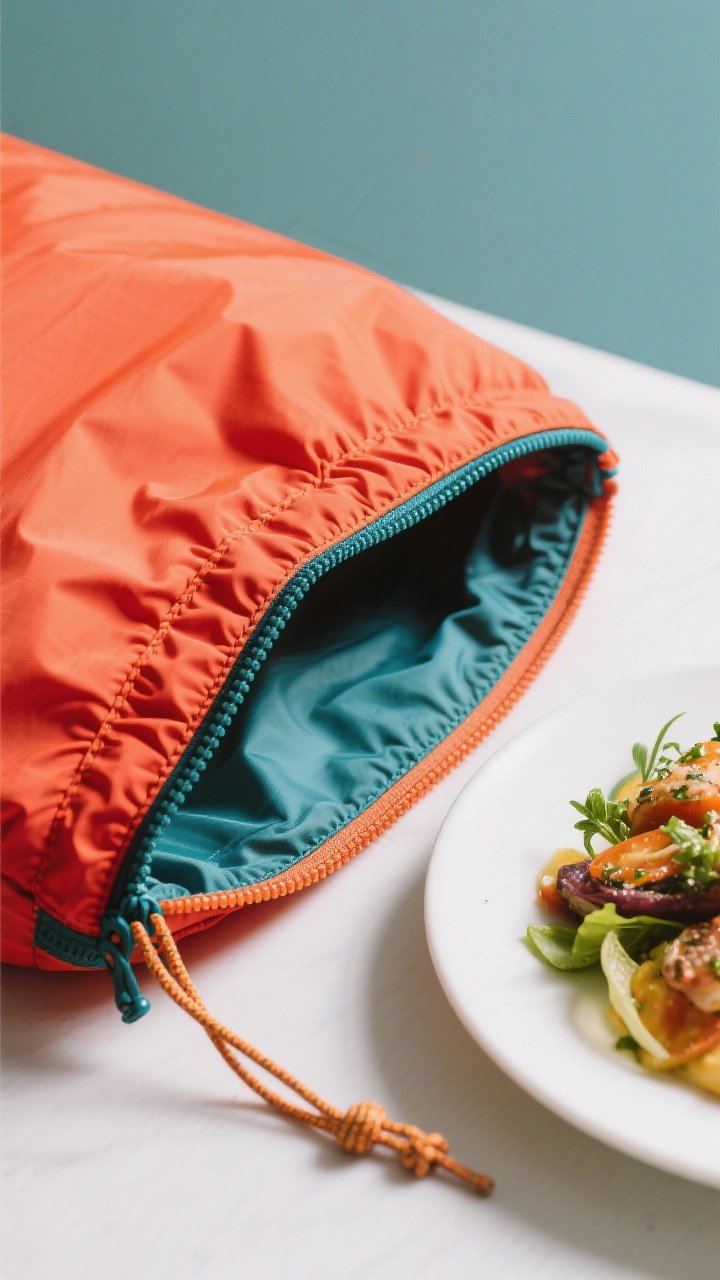
5. Lightweight Travel Blanket That Packs Into Itself
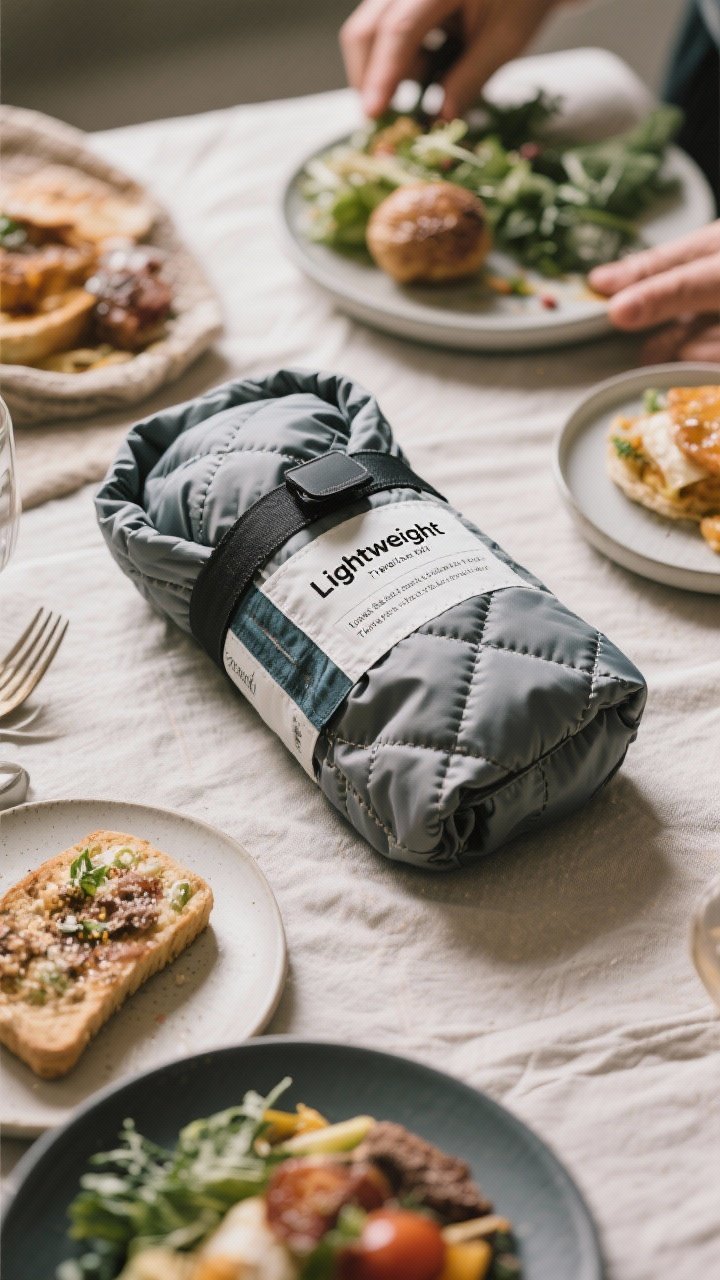
If you’re always on the move, this ultra-packable blanket is your best friend. It’s featherlight, folds into a pocket, and still handles damp grass like a champ. Think pocket blanket, but roomy and comfy.
Ingredients:
- Ripstop nylon (1.1–1.9 oz), 2 yards
- Silnylon or PU-coated nylon (water-resistant), 2 yards
- Fold-over elastic (6–8 yards)
- Small zipper or cord for stuff pocket (8–10 inches)
- Polyester thread, microtex needle
- Lightweight cord and mini cord lock (optional)
- Scissors, clips
Instructions:
- Cut both fabrics to about 58 x 70 inches. Designate a corner for the stuff pocket (approx. 10 x 12 inches).
- Sew a small pouch from leftover ripstop with zipper closure; attach it to the corner of the top fabric.
- Layer top and backing right sides together; stitch around, leaving a small gap.
- Turn right-side out, press, and finish edges with fold-over elastic for durability.
- Add tiny loops at corners for stakes if windy. Fold blanket into the attached pocket to pack.
Ideal for hikes, road trips, and spontaneous sunsets. Shake off crumbs, wipe clean, and go. Pick bright colors so you can spot it fast in crowded parks.
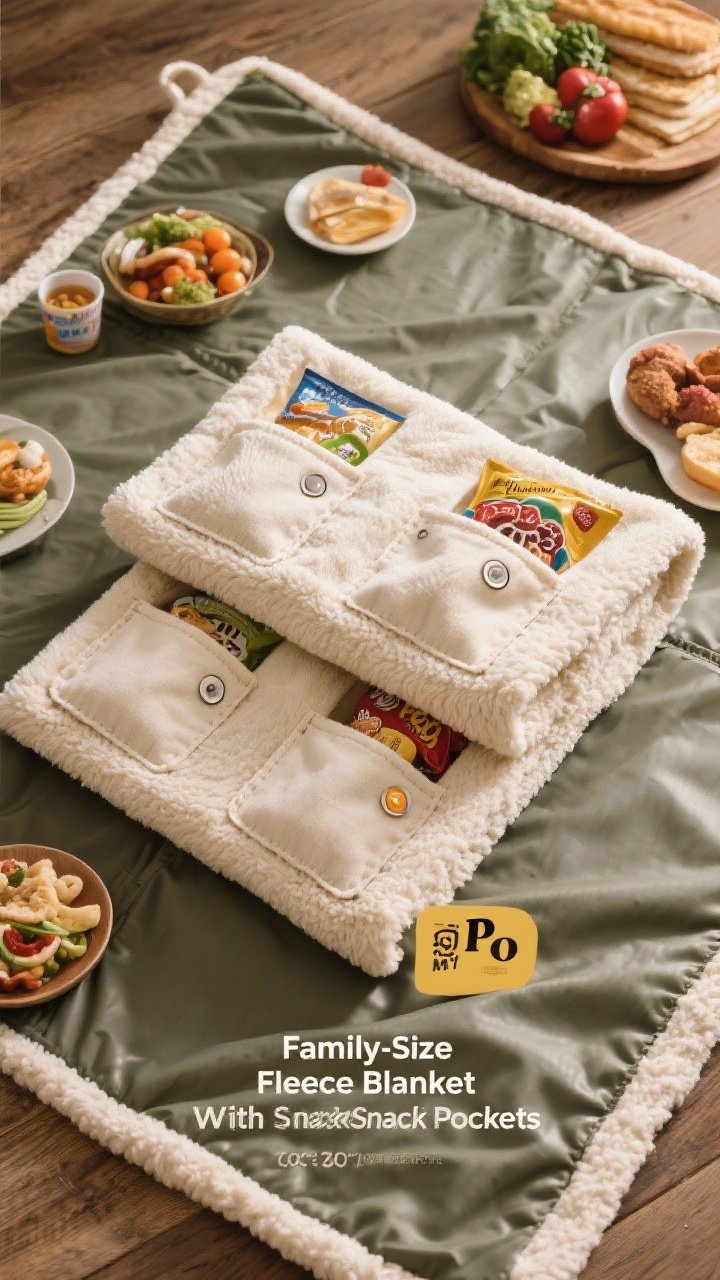
6. Family-Size Fleece Blanket With Snack Pockets

Soft, warm, and sized for the whole gang. This fleece blanket has built-in pockets for napkins, utensils, and even a sneaky chocolate stash. Kids love it. Adults do too—no judgment.
Ingredients:
- Anti-pill fleece, 2 pieces at 70 x 80 inches
- Waterproof fabric for the back layer, 70 x 80 inches
- Scrap fabric for pockets (canvas or cotton), 1 yard
- Velcro or snaps for pocket closures
- Polyester thread, ballpoint needle
- Measuring tape, scissors, clips
Instructions:
- Cut fleece pieces and backing to the same size. Decide pocket placement along one short side.
- Create pocket pouches: cut rectangles, hem tops, and add Velcro or snaps.
- Sew pockets onto the top fleece, spacing evenly. Reinforce corners.
- Layer fleece top (with pockets), second fleece, and waterproof backing. Stitch around, leaving a gap.
- Turn right-side out and topstitch to secure layers and close the gap.
Great for cool evenings or early spring picnics. Choose darker fleece to hide grass stains. Machine wash cold; hang dry to preserve shape.
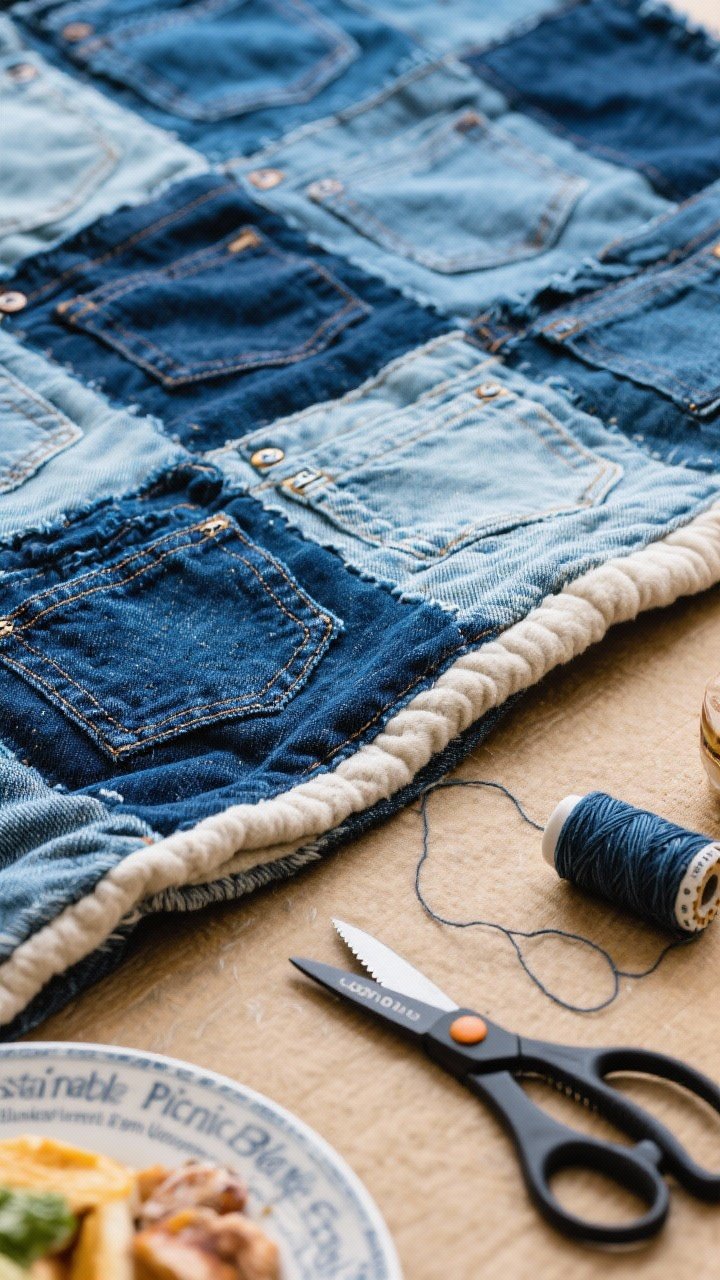
7. Sustainable Picnic Blanket From Upcycled Jeans
Denim lovers, assemble. This sturdy, eco-friendly blanket puts old jeans to work with patchwork style and serious durability. It looks effortlessly cool and stands up to dirt, dogs, and dance parties.
Ingredients:
- 8–12 pairs of old jeans (various shades)
- Heavy cotton or flannel backing, 60 x 70 inches
- Quilt batting (optional for cushion)
- Heavy-duty thread and needle
- Rotary cutter, denim scissors, ruler
- Seam roller or iron
- Bias tape for edges (8 yards)
Instructions:
- Cut jean legs into uniform rectangles (e.g., 8 x 12 inches). Avoid thick seams where possible.
- Lay out pieces in a brick pattern. Mix light and dark denim for contrast.
- Sew pieces with 1/2-inch seams. Press seams open to flatten bulk.
- Layer denim top, batting (optional), and backing. Quilt with long straight lines to secure.
- Bind edges with bias tape. Use a zigzag stitch for flexibility over thick areas.
It’s tough, chic, and sustainable. Add a jean pocket panel somewhere on top as a phone holder. Spot clean or wash on gentle and line dry.
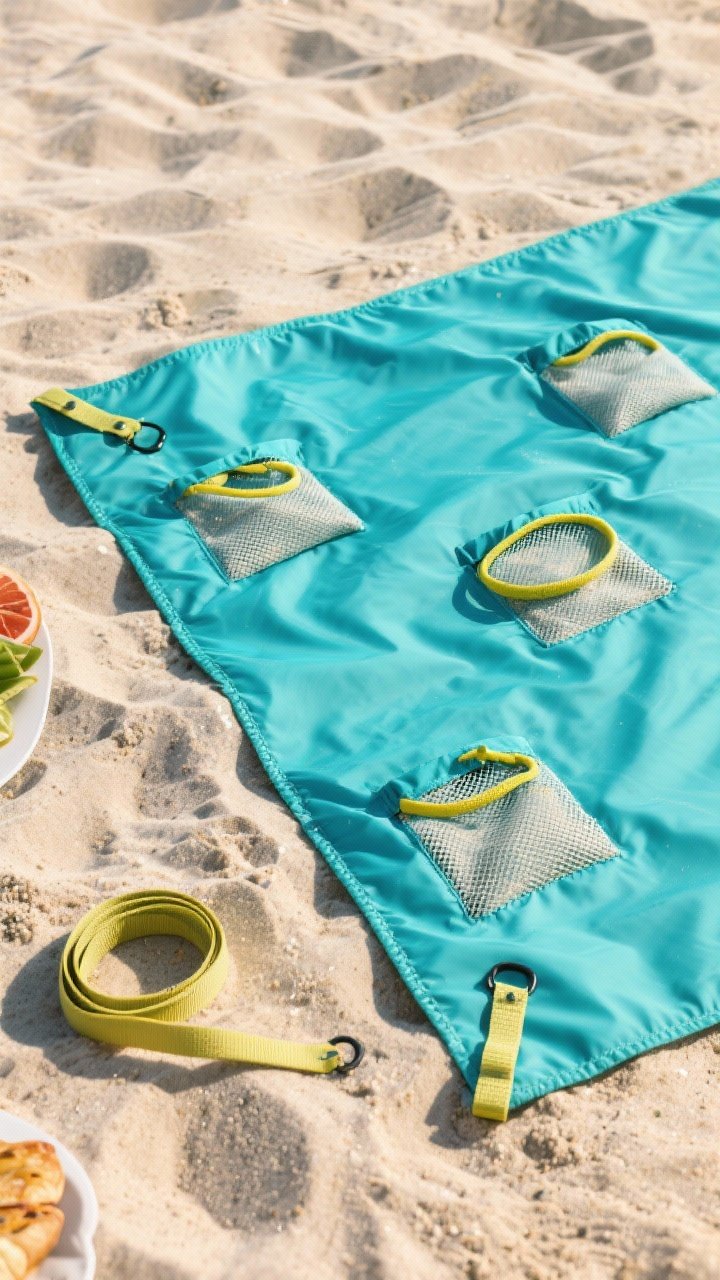
8. Sand-Resistant Beach Picnic Blanket With Corner Anchors
Hate sandy sandwiches? Same. This beach-friendly blanket shakes clean, stays put, and dries fast. Corner anchors keep the wind from flipping your happy place inside out.
Ingredients:
- Quick-dry polyester or parachute nylon, 2–2.5 yards
- Mesh fabric for sand pockets (1/2 yard)
- Elastic or webbing for corner loops (4 pieces, 5 inches each)
- Fold-over elastic or hem tape
- Mini stakes or sand bags (optional)
- Polyester thread, microtex needle
- Scissors, clips
Instructions:
- Cut fabric to about 70 x 80 inches for beach lounging.
- Sew small mesh pockets at each corner; leave top openings to fill with sand as anchors.
- Add loops just outside each corner pocket for stakes if you prefer.
- Finish edges with fold-over elastic or a narrow hem.
- Optional: Add a center seam reinforcement if using lightweight fabric.
Shake, fold, done. Pair with cold fruit, salty chips, and a view. Go bright or patterned so it stands out on the sand.
9. Luxe Wool-Blend Blanket With Carry Strap
For breezy evenings and vineyard picnics, go luxe. A wool-blend top keeps things warm and stylish, while a soft backing keeps it comfy. Add a simple strap and you’re picnic-chic wherever you land.
Ingredients:
- Wool-blend fabric (like melton), 2 yards
- Soft cotton twill or flannel backing, 2 yards
- Wide cotton webbing (carry strap), 1.5 yards
- Two D-rings or a buckle set
- Bias tape or turned hem finish
- Polyester thread, universal needle
- Clips, scissors
Instructions:
- Cut both fabrics to the same size (approx. 60 x 70 inches).
- Place right sides together and stitch around, leaving a gap.
- Turn right-side out, press, and topstitch edges to close the gap and secure layers.
- Create a carry strap: thread webbing through D-rings, stitch to secure, and make a loop that cinches around the rolled blanket.
- Optional: Add a small monogram or stitched lines for a tailored finish.
Serve with artisan cheese, olives, and a bottle of something chilled. Spot clean the wool and machine wash the backing if detachable.
10. Kid-Proof Picnic Play Blanket With Game Board
Keep little hands busy between bites. This blanket doubles as a play mat with a simple game board printed or painted on top—think checkers, tic-tac-toe, or a hopscotch-style path. Parents get peace, kids get play. Win-win.
Ingredients:
- Durable cotton duck or canvas, 2 yards
- Waterproof backing (PEVA or coated nylon), 2 yards
- Fabric paint or permanent fabric markers
- Painter’s tape and stencils
- Bias tape for edges
- Polyester thread, universal needle
- Optional: Foam checker pieces, small drawstring pouch
Instructions:
- Cut top and backing to the same size, about 60 x 60 inches.
- Use tape and stencils to paint a checkerboard and a tic-tac-toe grid. Let dry fully per paint instructions.
- Layer right sides together, stitch around, and leave a gap. Turn right-side out.
- Topstitch edges and add bias binding for durability.
- Sew a small pouch onto one corner to store game pieces.
Pack snacks, lay out the blanket, and let the games begin. Use contrasting colors for the grid so it’s visible on sunny days. Wipe clean and air dry.
Ready to picnic like a pro? Whether you’re all about portability, plush comfort, or playful details, these blankets have your back (and your snacks). Pick one, gather your favorite bites, and claim your patch of sunshine. See you at the park!
Printable Recipe Card
Want just the essential recipe details without scrolling through the article? Get our printable recipe card with just the ingredients and instructions.