Viral 9 Cottagecore Picnic Pressed-Flower Decor Ideas That Pack Flat
Love a dreamy picnic but hate hauling bulky decor? Same. These pressed-flower ideas bring full-on cottagecore charm and still slide neatly into your tote. We’re talking lightweight, reusable, and ridiculously pretty—so your picnic looks curated without requiring a sherpa.
Grab a flower press (or a heavy book and parchment), pull together a pastel palette, and let’s make your blanket spread look like a pastoral painting. Ready to flex your inner fairy-forager?
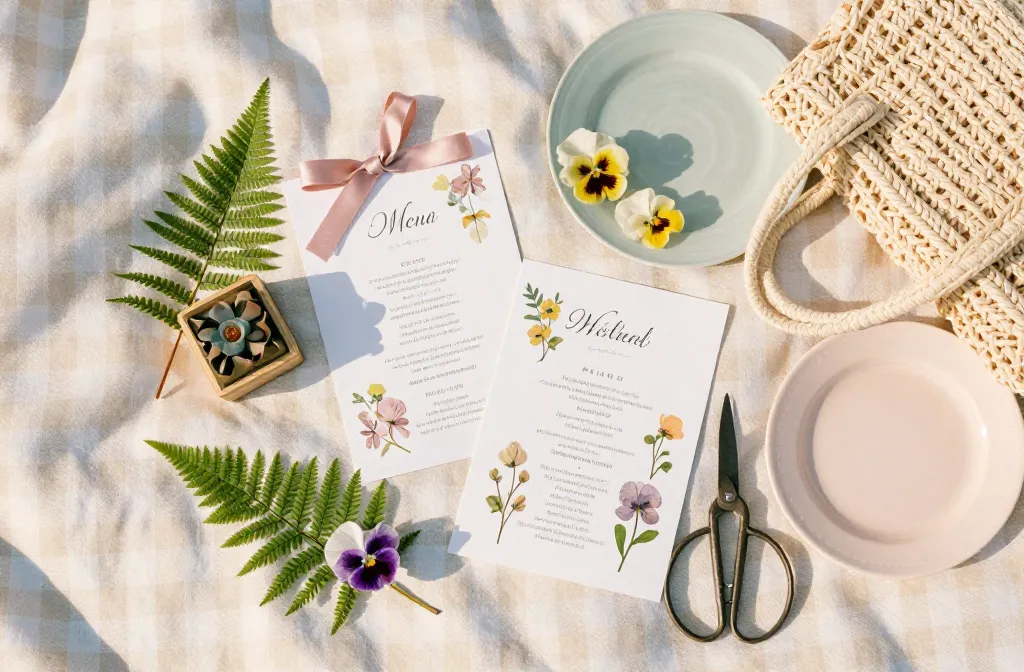
1. Pressed-Flower Menu Cards With Ribbon Tabs

Nothing whispers “I’m extra in the best way” like delicate menus with real petals sealed inside. These look luxe but pack flatter than a postcard. They also set the vibe instantly—thoughtful, romantic, and a little bit whimsical.
Materials
- Cardstock in cream or pale sage
- Pressed flowers (pansies, violas, fern tips)
- Clear matte contact paper or self-laminating sheets
- Mini eyelets or hole punch
- Silk or velvet ribbon
Write your menu (hand-lettered or printed), artfully place a few tiny pressed blooms along the edge, then sandwich with contact paper for durability. Add a top corner hole and tie a short ribbon so it peeks out of baskets for that cottagecore flair.
Use these for picnic courses or as place cards. Bonus: they double as keepsakes your friends will actually keep, FYI.
2. Flat-Pack Floral Garland Panels
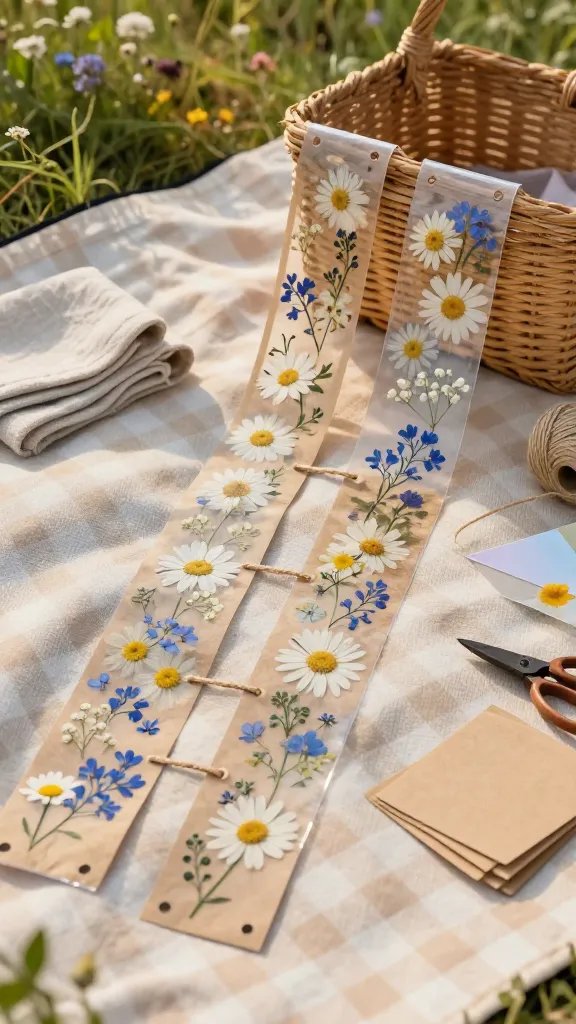
Traditional garlands tangle and shed. Instead, make flat “garland panels” you can tile along the edge of your blanket or prop against a basket. They travel like folders and assemble in seconds.
How-To
- Cut long strips of kraft cardstock (3–4 inches wide).
- Arrange pressed daisies, larkspur, and sprigs of baby’s breath in a repeating pattern.
- Seal with clear contact paper or thin laminating sheets on both sides.
- Punch tiny holes at each end and thread with twine to connect panels.
Mix different flower colors for gradients—pale to vivid, or blush to lavender. You’ll get that drapey garland look, but it stacks flat like bookmarks.
Perfect for marking the picnic perimeter or dressing up a dull bench. Pack six panels, customize on-site, and call it curated.
3. Botanical Coasters That Won’t Blow Away
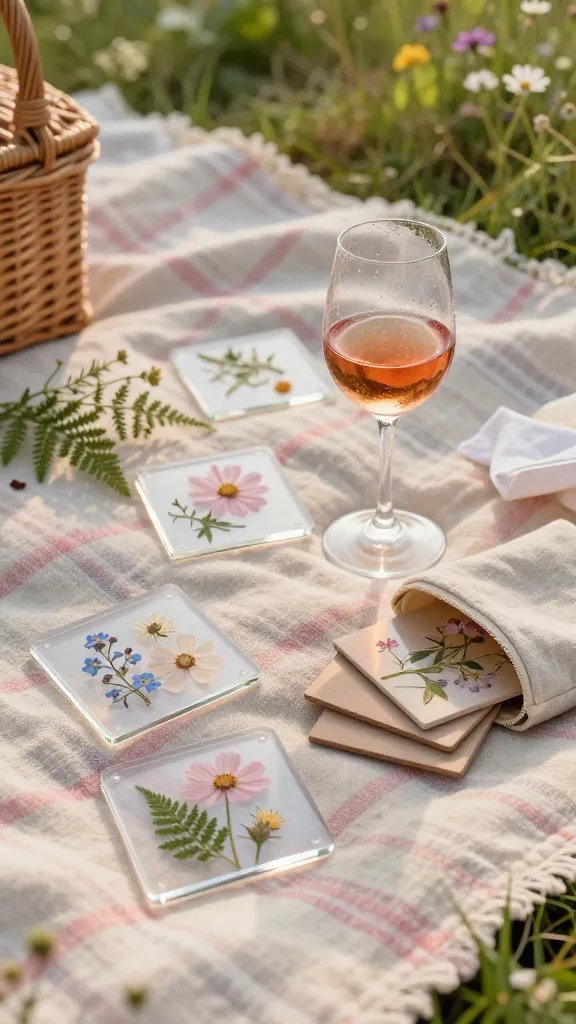
Drippy rosé rings on your vintage blanket? No thanks. Pressed-flower coasters look pretty and protect surfaces, and they slide neatly into a zip pouch. Plus they make every sip feel like a tiny garden party.
Key Points
- Use 4×4-inch square acrylic sheets or thick laminated cardstock.
- Layer a single bloom or a trio of tiny petals for a minimalist look.
- Seal edges well to prevent moisture creeping in.
Stick non-slip dots on the bottom if you’re using acrylic. If wind picks up, tuck a coaster edge under a plate corner—lightweight but effective.
Bring a set of four to six. They’ll amp up the vibe and, IMO, make every snack feel more intentional.
4. Pressed-Flower Napkin Bands (AKA Wraps That Do The Most)
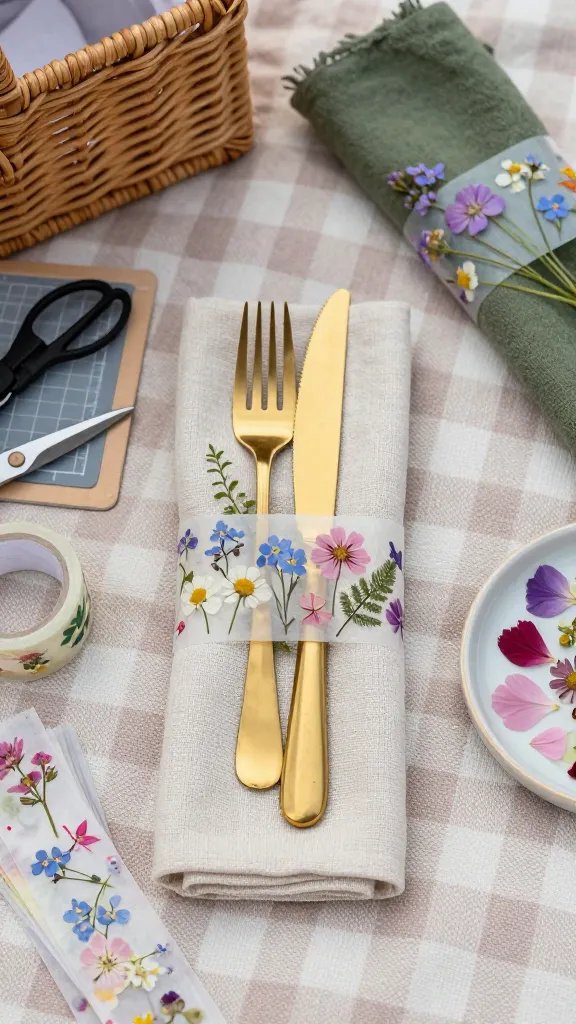
Napkin rings are bulky. These pressed-flower bands deliver the same polish but flatten to nothing. They hold cloth napkins, cutlery, and a slim wildflower sprig in one adorable bundle.
Quick Build
- Cut 1.25-inch strips of vellum or translucent paper.
- Arrange tiny pressed petals in the center third.
- Cover with clear washi tape or laminate just that section.
- Wrap around napkin + cutlery and secure with double-sided tape.
Go matchy-matchy with your flowers and blanket, or contrast for pop. These also function as subtle place markers—write names in a delicate script and watch your friends swoon.
Use for brunch picnics, tea-time moments, or anytime you want your roll-ups to look editorial.
5. Envelope-Style Place Mats With Swappable Florals
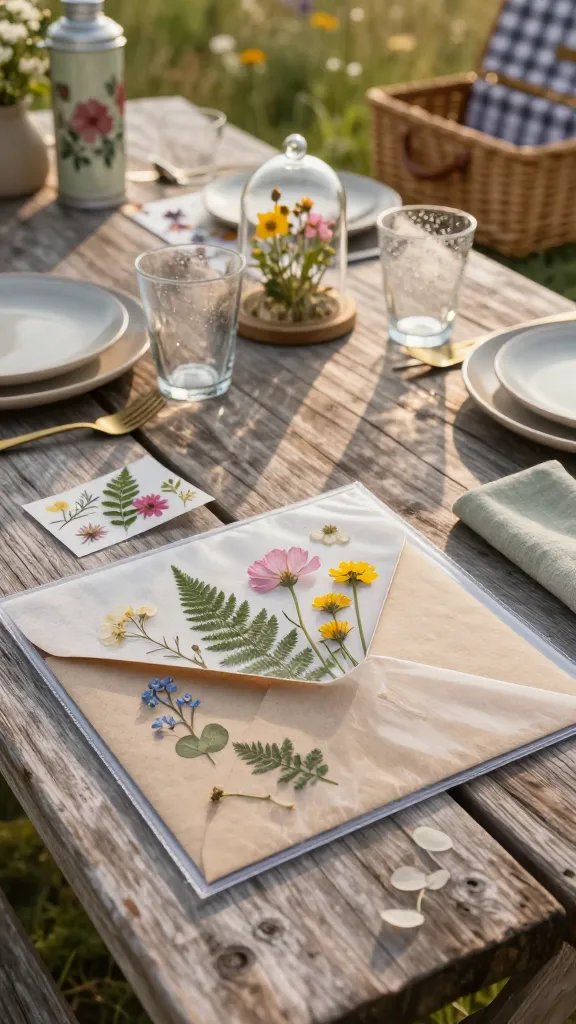
Place mats outdoors? Risky. But these envelope-style mats stay neat, wipe down easily, and let you change the floral inserts depending on your mood. The best part: they fold to the size of a magazine.
Materials
- Clear vinyl or heavy-duty sheet protectors (tab removed)
- Neutral fabric or kraft paper backing cut to letter size
- Pressed flowers arranged on the backing sheet
- Washi tape or stitched edges to seal three sides, leaving one open
Slide in a pressed-flower collage, then tuck the open edge under the plate side so it doesn’t catch breeze. Swap inserts seasonally—pastel anemones for spring, golden ferns for late summer.
They keep crumbs controlled and the table scene coordinated. Easy cleanup, maximum cottagecore elegance, minimal effort—seriously.
6. Postcard-Size Floral Sun-Catchers For Umbrellas And Chairs
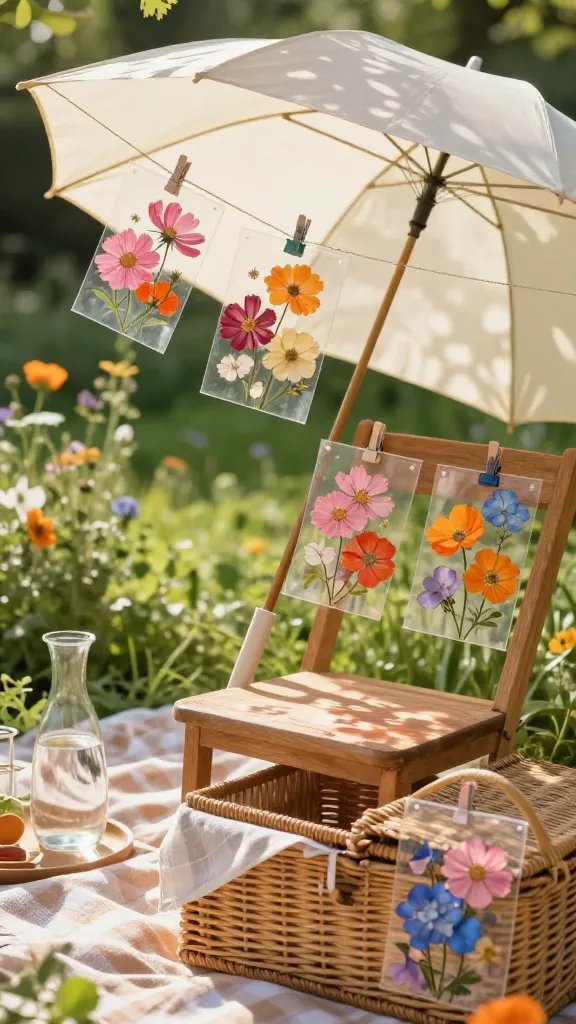
Stringing glass sun-catchers outside feels chaotic to pack. Instead, make ultra-light, postcard-size versions that clip onto umbrella spokes, chair backs, or basket handles. They flutter, they glow, they’re drama without the drama.
Tips
- Sandwich pressed blooms between two sheets of clear acetate.
- Seal edges with clear UV-resistant tape to reduce fading.
- Punch a top hole and use tiny binder clips or mini clothespins to attach.
Try layering translucent petals (cosmos, poppies, hydrangea) for stained-glass vibes. No umbrella? Clip them to twine strung between two baskets to create a mini gallery line.
These pack flat in a document sleeve and take 20 seconds to set up. Instant atmosphere, zero bulk.
7. Foldable Pressed-Flower Photo Frames For Sweet Polaroids
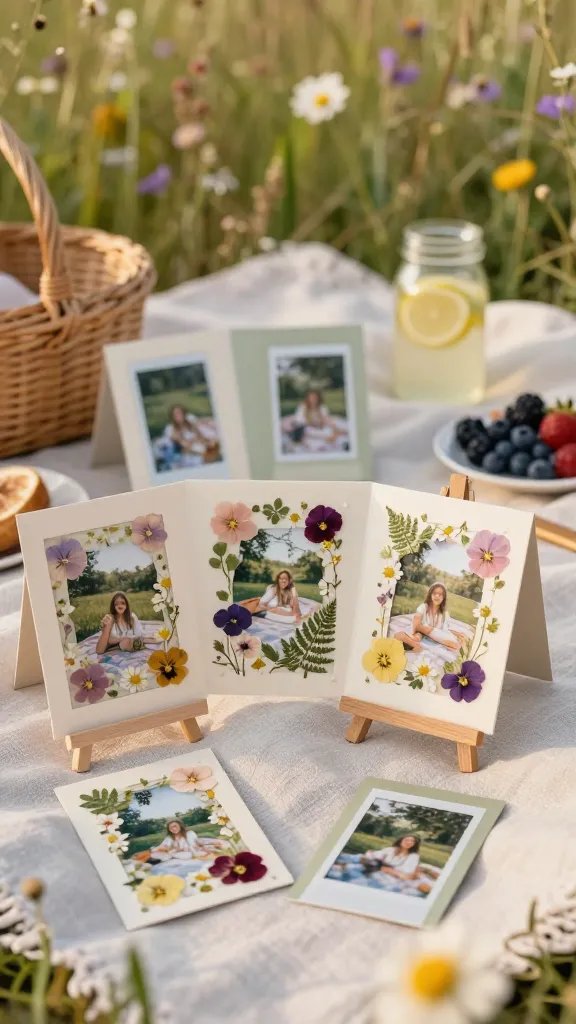
Capture the day and frame it on the spot. These slim, foldable frames let you slide in instant prints and decorate them with delicate petals. They store flat, then stand proudly like tiny easels.
How-To
- Cut cardstock to a 5×7 panel; score a 1-inch flap on the back as a kickstand.
- Create a 3×4.5 window and line it with a thin border of pressed flowers.
- Cover the border with clear tape or laminate to protect the blooms.
- Use photo corners inside so you can swap pictures later.
Scatter a few frames around your blanket for a curated look, or gift them to friends at the end. You get practical decor and built-in souvenirs.
Perfect for birthdays, proposals, or any picnic that calls for extra sentimentality. Trust me, you’ll want the pics displayed before the sun sets.
8. Botanical Candle Sleeves (LED-Only, Because Safety)
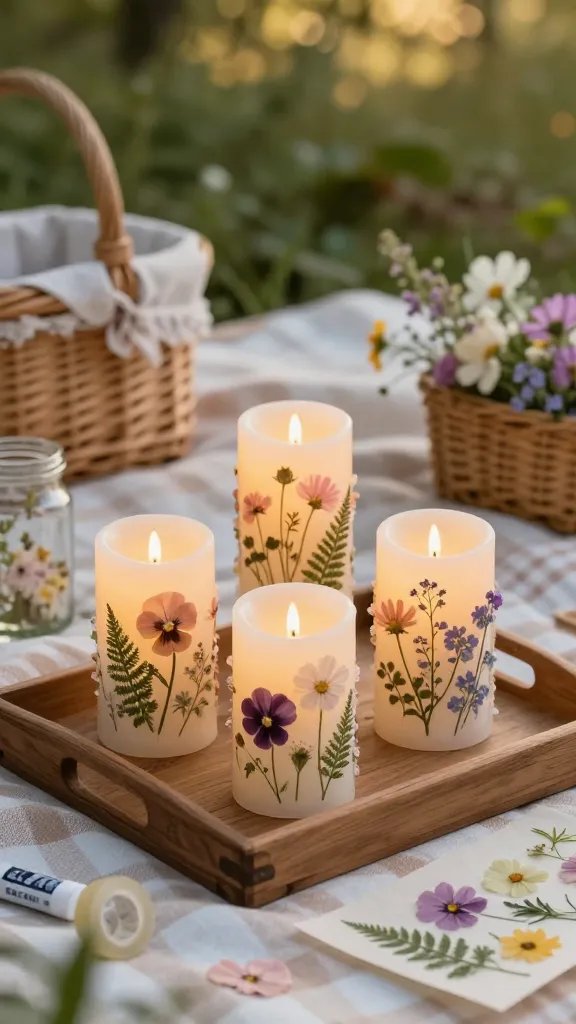
Flame and dried flowers? Hard pass. But pressed-flower sleeves over LED candles? Chef’s kiss. You get the soft flicker and floral silhouette without inviting the fire department.
Build It
- Wrap vellum around an LED pillar to measure, then trim to height.
- Arrange pressed blooms on the vellum and secure with a thin glue stick layer.
- Cover with a second vellum layer or clear film to protect.
- Tape the seam into a cylinder that slides over the candle.
The glow turns petals into dreamy shadows—especially ferns, dill flowers, and buttercups. Use two or three grouped together for cozy twilight vibes.
They roll up like a poster and tuck into any pouch. Use at golden hour when your picnic goes delightfully long.
9. Flat-Lid Floral Charcuterie Toppers
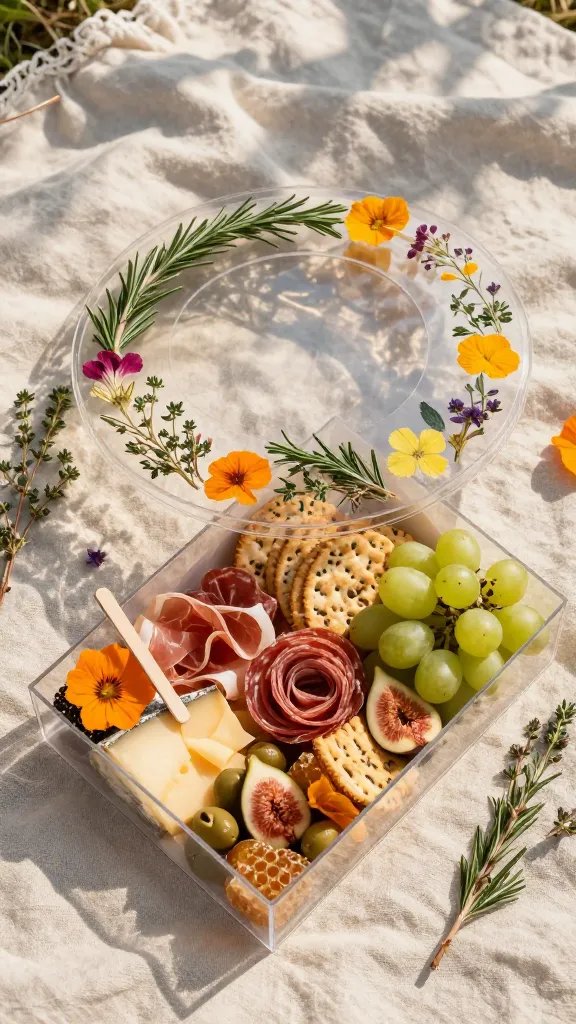
Yes, we decorate the cheese box now. These topper lids sit over to-go containers and boards to keep snacks protected while also looking ridiculously photogenic. Think of them as edible-display couture with a garden twist.
Setup
- Cut a sheet of clear acrylic or thick acetate to your box size.
- Arrange pressed herbs and petals—rosemary, thyme blossoms, nasturtium petals—around the perimeter.
- Seal florals to the underside with food-safe clear tape, leaving the center clear to peek at snacks.
- Add small adhesive bumpers at corners so the topper hovers slightly and doesn’t smudge food.
If you want labels, write cheese names on small vellum flags and tape them to the underside near edges. The result looks custom and keeps curious bugs at bay.
Bring two toppers: one for savory, one for sweets. They stack together with a soft cloth in between and barely take space.
Pressed-Flower Basics (Because You’ll Ask)
- Best Blooms: Violas, pansies, cosmos, hydrangea petals, ferns, queen anne’s lace.
- Pressing Method: Layer blooms between parchment and heavy books for 7–10 days, or use a microwave flower press for speed.
- Color Lock: Store dried blooms in a cool, dark place with silica packs to keep hues bright.
- UV Note: Sun fades petals. If you’ll be outside for hours, choose deeper colors or use UV-protective film.
Packing Tips So Nothing Crinkles
- Slide flat decor into rigid document folders or a slim clipboard case.
- Use wax paper between laminated pieces to prevent static cling.
- Bundle small items (coasters, bands) in resealable bags by set so setup feels breezy.
- Carry a tiny kit: scissors, clear tape, mini clips, twine, and a microfiber cloth.
Styling Notes For Peak Cottagecore Energy
- Color Palette: Soft cream, faded rose, lilac, moss, and a hit of butter yellow.
- Textures: Linen blanket, wicker basket, gauzy scarf, and a ceramic pitcher with wildflowers.
- Layering: Stagger your flat garland panels, prop sun-catchers where light hits, and anchor corners with your plates for wind insurance.
- Contrast: Pair frilly florals with rustic bread and wood boards so it doesn’t read too precious.
One last thing: label and date a couple pieces on the back. Over time, your pressed-flower stash becomes a scrapbook of picnics and seasons. Sweet, right?
You don’t need a van full of props to throw a stunning picnic—just a clever flat-pack strategy and a few blooms. Start with one or two ideas, then build your collection as you go. Your future self, arms blissfully unburdened, will thank you.