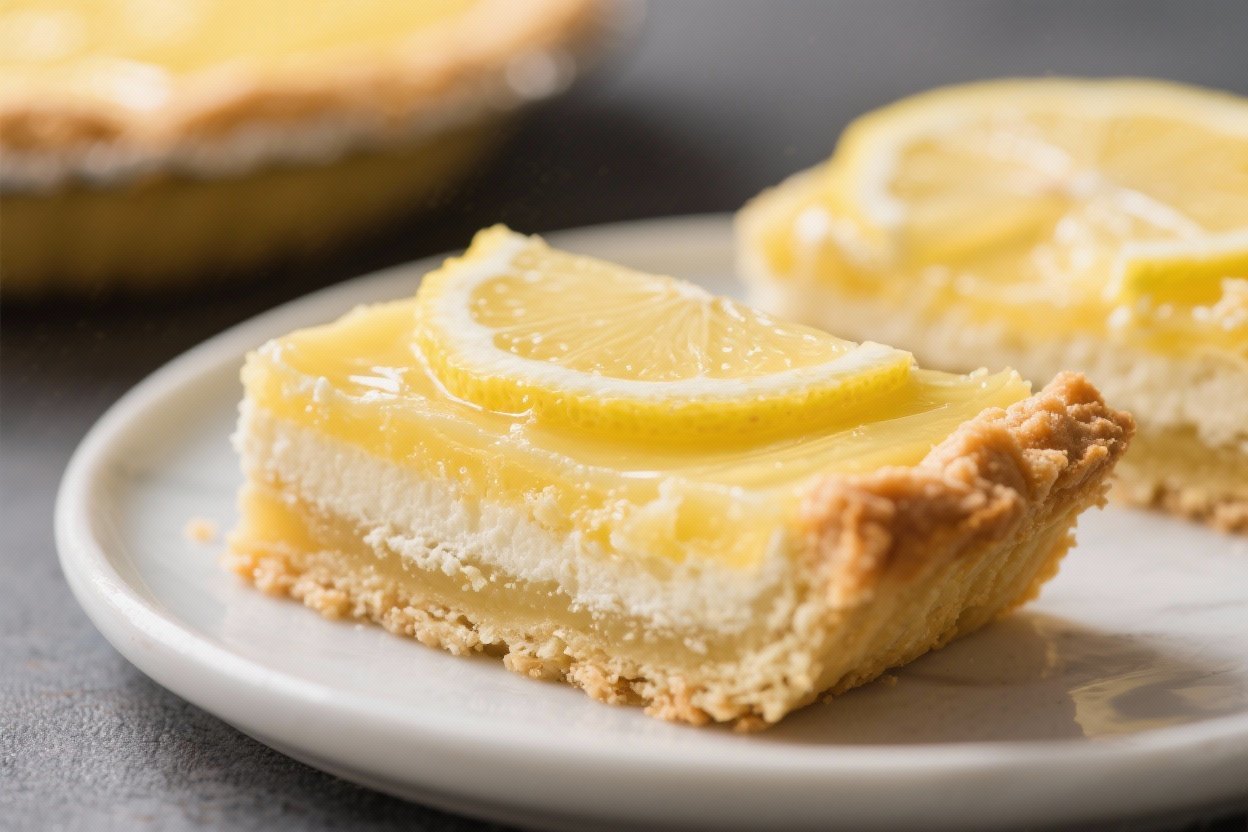
Most Delish Lemon Pie Bars – Bright, Buttery, and Simple
These lemon pie bars bring sunny flavor and cozy comfort in every bite. They’re bright, buttery, and just the right kind of sweet-tart, with a tender shortbread crust and a silky lemon layer on top. The texture lands between a classic lemon bar and a creamy lemon pie, which makes them irresistible for any occasion.
They mix up fast, bake beautifully, and slice neatly once cooled. If you love lemon desserts that taste like pure sunshine, this is your new go-to recipe.
What Makes This Recipe So Good

Most Delish Lemon Pie Bars - Bright, Buttery, and Simple
Ingredients
- Unsalted butter (for crust)
- All-purpose flour (for crust and a little for the filling)
- Granulated sugar (for both crust and filling)
- Powdered sugar (optional, for dusting)
- Eggs (large)
- Fresh lemons (you’ll need juice and zest)
- Salt
- Vanilla extract (optional, for warmth)
- Heavy cream or whole milk (for the pie-style filling)
- Cornstarch (helps the filling set cleanly)
Instructions
- Prep the pan and oven: Heat your oven to 350°F (175°C). Line a 9x13-inch baking pan with parchment, leaving an overhang on the long sides for easy lifting. Lightly grease the parchment.
- Make the crust: In a bowl, whisk 2 cups all-purpose flour, 1/2 cup granulated sugar, and 1/2 teaspoon salt. Add 1 cup (2 sticks) melted unsalted butter and stir until the mixture looks like damp sand and holds when pressed.
- Press and bake the crust: Press the mixture firmly into an even layer in the pan, getting into the corners. Use the bottom of a measuring cup to smooth. Bake for 18–20 minutes, until the edges are lightly golden.
- Whisk the lemon filling: While the crust bakes, whisk 1 1/2 cups granulated sugar, 1/4 cup all-purpose flour, and 2 tablespoons cornstarch in a large bowl. Add a pinch of salt. Whisk in 4 large eggs, 2/3 cup fresh lemon juice, 1 tablespoon finely grated lemon zest, 1 teaspoon vanilla extract (optional), and 1/3 cup heavy cream or whole milk until smooth.
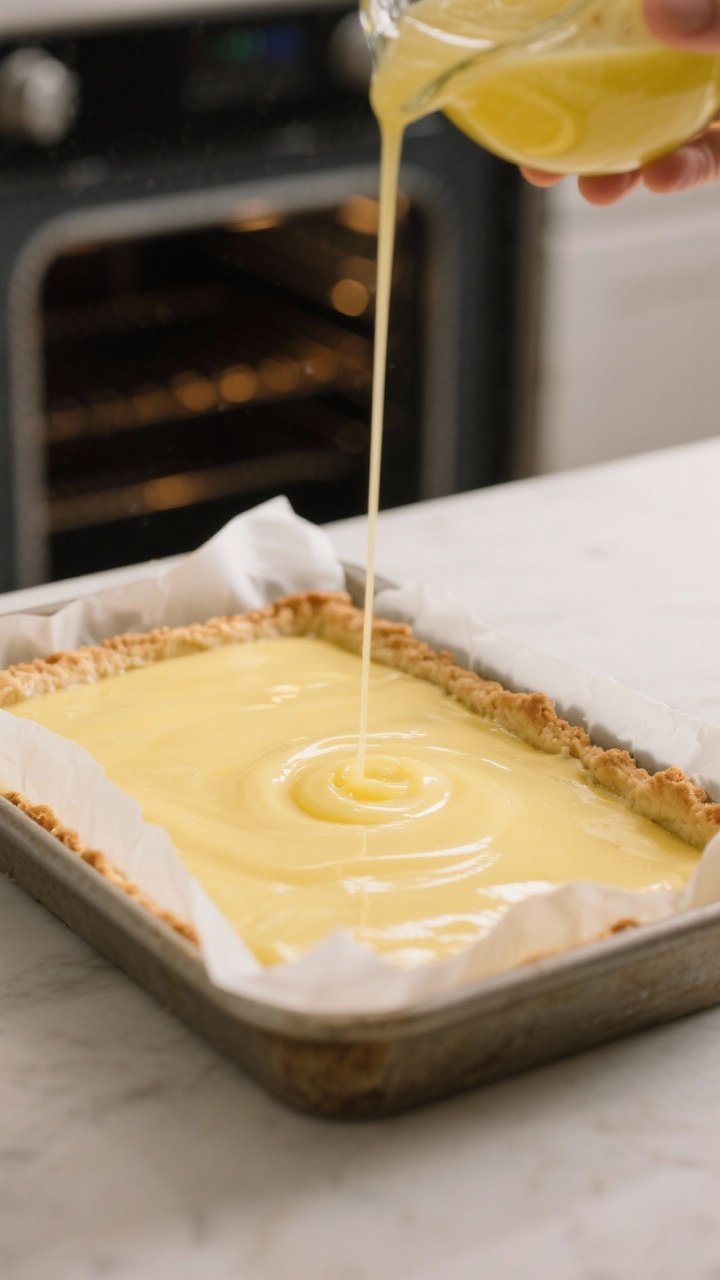
- Reduce oven temperature: After the crust comes out, lower the oven to 325°F (163°C). This helps the filling set without over-browning.
- Pour and bake: Pour the lemon filling over the hot crust. Return the pan to the oven and bake for 18–24 minutes, until the center is just set and no longer jiggly in waves when you gently shake the pan. A tiny wobble is okay.
- Cool and chill: Let the bars cool in the pan on a rack until room temperature. Then chill for at least 2 hours to firm up for neat slices.
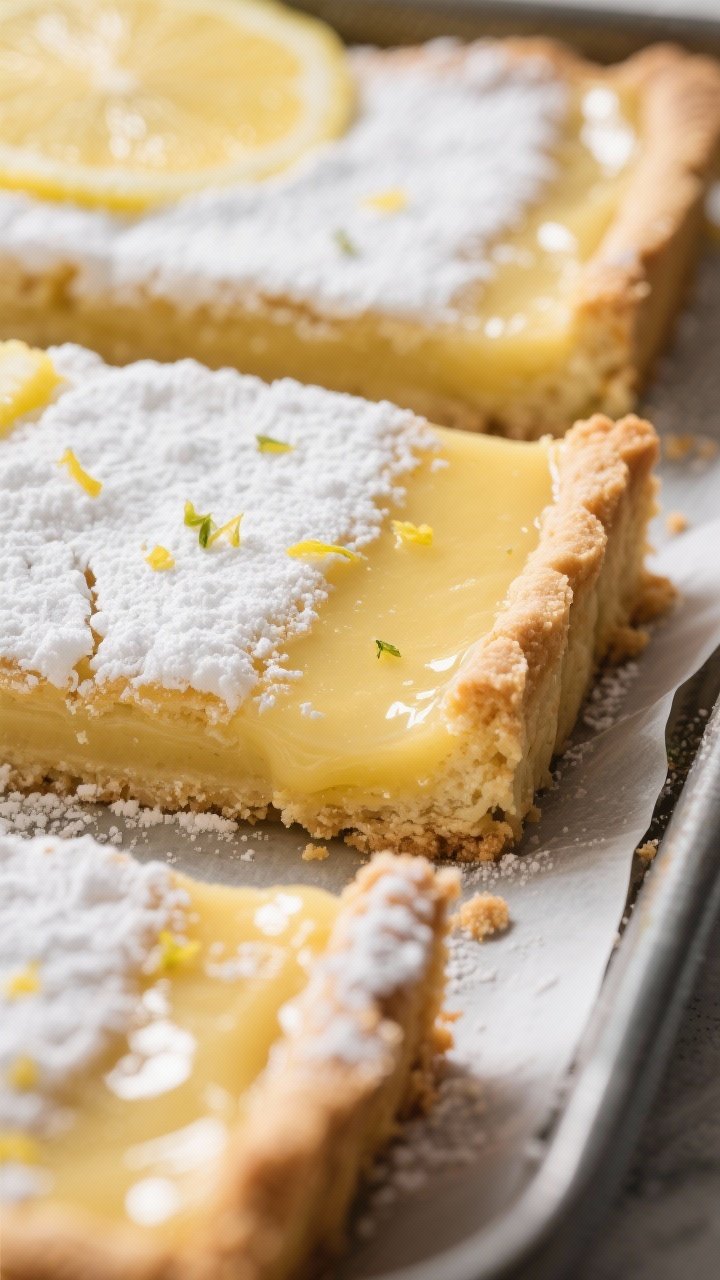
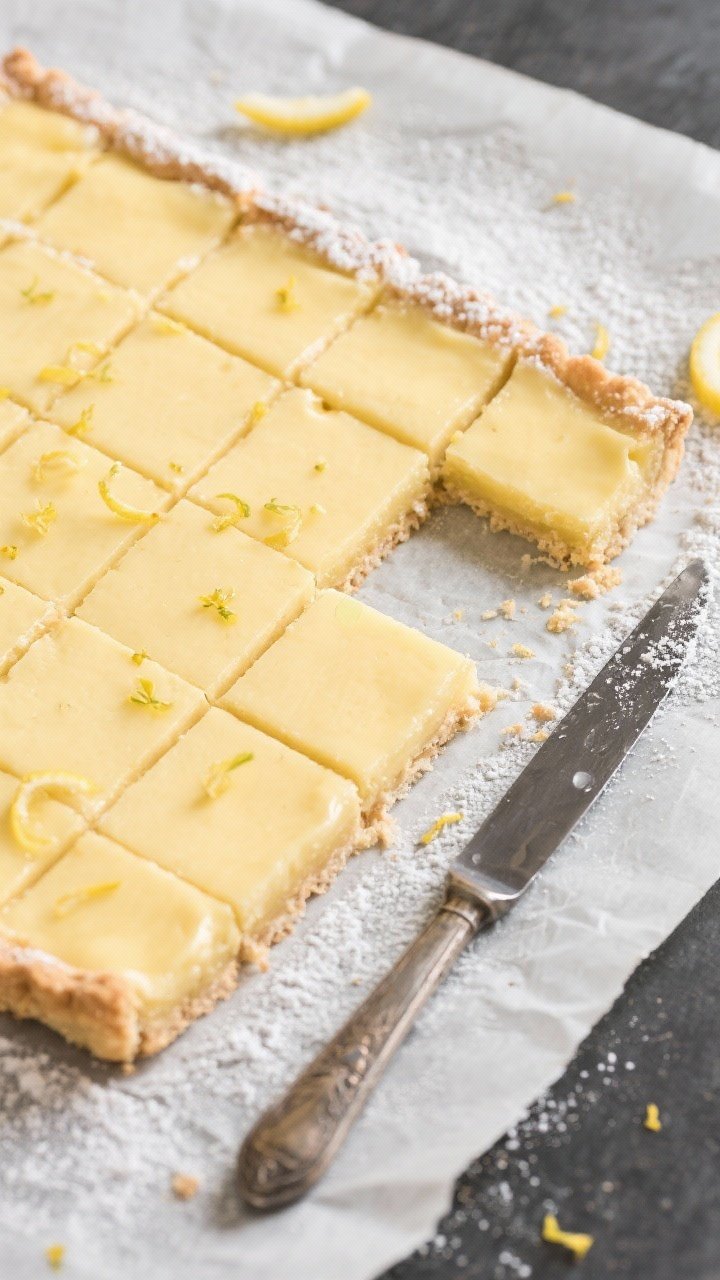
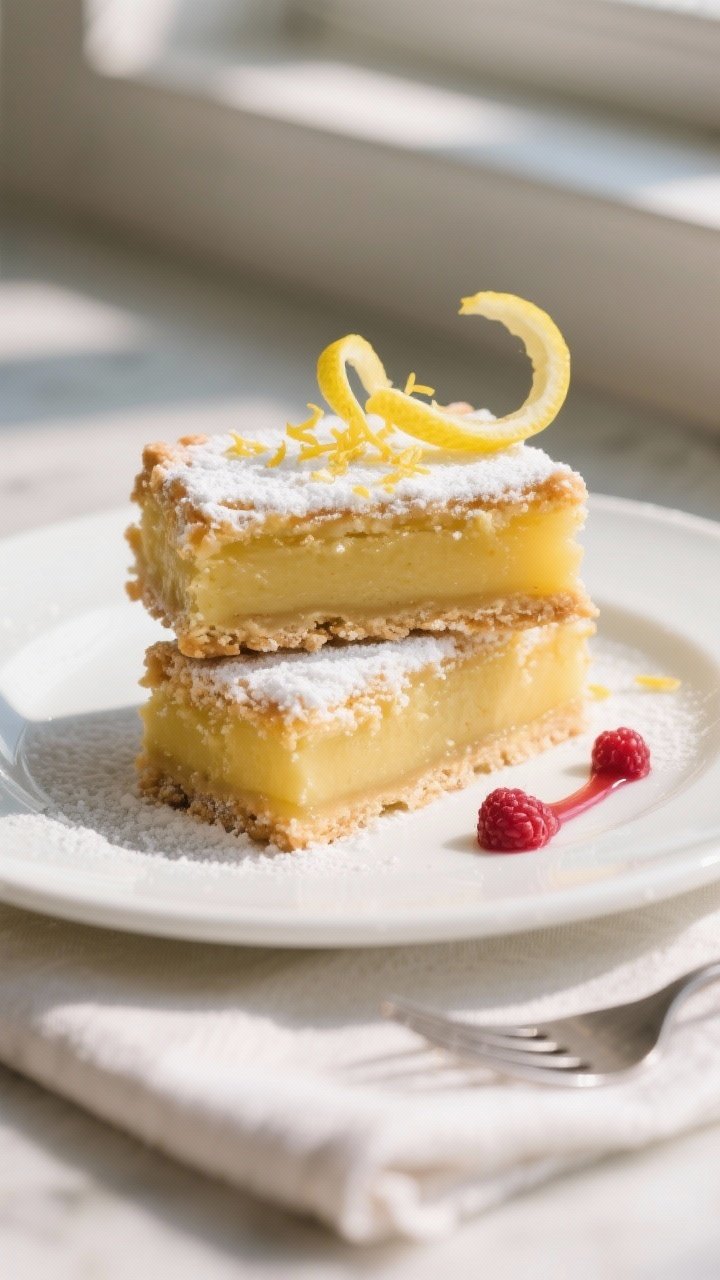
- Slice and finish: Lift the slab out using the parchment overhang. Dust with powdered sugar if you like. Use a sharp knife to cut into bars, wiping the blade between cuts for clean edges.
- Perfect balance of sweet and tart: Fresh lemon juice and zest keep the flavor crisp without being harsh.
- Buttery shortbread crust: Melt-in-your-mouth texture that holds up well to the creamy topping.
- Creamy pie-style filling: A touch of dairy gives the lemon layer a custardy feel without being heavy.
- Simple pantry ingredients: No special tools, no fussy steps—just straightforward baking.
- Great for make-ahead: They set even better after chilling, so you can prep them the day before.
Shopping List
- Unsalted butter (for crust)
- All-purpose flour (for crust and a little for the filling)
- Granulated sugar (for both crust and filling)
- Powdered sugar (optional, for dusting)
- Eggs (large)
- Fresh lemons (you’ll need juice and zest)
- Salt
- Vanilla extract (optional, for warmth)
- Heavy cream or whole milk (for the pie-style filling)
- Cornstarch (helps the filling set cleanly)
Instructions
- Prep the pan and oven: Heat your oven to 350°F (175°C). Line a 9×13-inch baking pan with parchment, leaving an overhang on the long sides for easy lifting.
Lightly grease the parchment.
- Make the crust: In a bowl, whisk 2 cups all-purpose flour, 1/2 cup granulated sugar, and 1/2 teaspoon salt. Add 1 cup (2 sticks) melted unsalted butter and stir until the mixture looks like damp sand and holds when pressed.
- Press and bake the crust: Press the mixture firmly into an even layer in the pan, getting into the corners. Use the bottom of a measuring cup to smooth.
Bake for 18–20 minutes, until the edges are lightly golden.
- Whisk the lemon filling: While the crust bakes, whisk 1 1/2 cups granulated sugar, 1/4 cup all-purpose flour, and 2 tablespoons cornstarch in a large bowl. Add a pinch of salt. Whisk in 4 large eggs, 2/3 cup fresh lemon juice, 1 tablespoon finely grated lemon zest, 1 teaspoon vanilla extract (optional), and 1/3 cup heavy cream or whole milk until smooth.
- Reduce oven temperature: After the crust comes out, lower the oven to 325°F (163°C).
This helps the filling set without over-browning.
- Pour and bake: Pour the lemon filling over the hot crust. Return the pan to the oven and bake for 18–24 minutes, until the center is just set and no longer jiggly in waves when you gently shake the pan. A tiny wobble is okay.
- Cool and chill: Let the bars cool in the pan on a rack until room temperature.
Then chill for at least 2 hours to firm up for neat slices.
- Slice and finish: Lift the slab out using the parchment overhang. Dust with powdered sugar if you like. Use a sharp knife to cut into bars, wiping the blade between cuts for clean edges.
How to Store
- Refrigerator: Store bars in an airtight container for up to 5 days.
Keep parchment between layers to prevent sticking.
- Freezer: Freeze sliced bars on a baking sheet until solid, then wrap individually and place in a freezer bag for up to 2 months. Thaw in the fridge and dust with powdered sugar just before serving.
- Serving tip: They taste brightest slightly chilled, but you can let them sit at room temp for 15 minutes to soften the texture.
Benefits of This Recipe
- Quick to assemble: The crust mixes in one bowl, and the filling comes together with just a whisk.
- Reliable set: A little cornstarch and lower baking temp help avoid runny or rubbery layers.
- Crowd-friendly: The 9×13 pan yields plenty of bars for parties, picnics, or bake sales.
- Fresh lemon flavor: Zest and juice give a natural citrus punch—no bottled flavor needed.
- Make-ahead friendly: Flavor develops as they chill, so they’re even better the next day.
Common Mistakes to Avoid
- Underbaked crust: If the crust is too pale, it may turn soggy under the filling. Look for light golden edges before adding the lemon layer.
- Skipping the chill: Cutting too soon leads to messy slices.
Give them time to set.
- Not lowering the oven: High heat can curdle the custard. Reduce to 325°F before baking the filling.
- Overmixing the filling: Whisk until smooth, but don’t whip a lot of air into it, which can create bubbles and cracks.
- Using bottled juice: Fresh lemons make a noticeable difference in flavor and aroma.
Variations You Can Try
- Meyer lemon: Swap standard lemons for Meyer lemons for a sweeter, floral flavor.
- Coconut twist: Add 1/2 cup finely shredded unsweetened coconut into the crust for tropical notes.
- Almond crust: Replace 1/2 cup of the flour with almond flour and add 1/2 teaspoon almond extract to the crust.
- Berry swirl: Dollop a few teaspoons of raspberry or blackberry jam over the filling before baking and swirl gently with a toothpick.
- Extra tangy: Use 3/4 cup lemon juice and reduce the cream to 1/4 cup for a brighter pucker.
- Gluten-free: Use a quality 1:1 gluten-free flour blend for both crust and filling.
- Smaller batch: Halve the recipe and bake in an 8-inch square pan, adding a few minutes to the bake time as needed.
FAQ
Can I make these without dairy?
Yes. Use a neutral oil or vegan butter for the crust and swap the heavy cream for full-fat coconut milk or a rich, plain non-dairy creamer.
The texture will still be creamy and set nicely.
How do I know when the filling is set?
Gently nudge the pan. The center should no longer ripple like liquid but may have a slight jiggle. The top should look glossy and uniform, not wet.
If unsure, bake another 2–3 minutes and check again.
Do I need to strain the lemon juice?
It’s a good idea. Straining removes pulp and seeds, giving you a smoother custard. Keep the zest, though—that’s where much of the aroma lives.
Why did my bars crack on top?
They likely baked at too high a temperature or too long.
Make sure to lower the oven to 325°F for the filling and pull them once the center is just set. Overbaking can cause cracks and a rubbery texture.
Can I cut them the same day I bake them?
You can, but they slice best after chilling for at least 2 hours. If you’re short on time, chill in the fridge for 45 minutes, then pop in the freezer for 15–20 minutes before cutting.
What’s the best way to get clean slices?
Use a long, sharp knife.
Wipe the blade with a warm, damp towel between cuts. For super neat edges, trim 1/8-inch around the slab before slicing into bars.
Can I reduce the sugar?
You can trim up to 1/4 cup from the filling without affecting texture too much. Keep the crust sugar as written so it holds together and browns properly.
In Conclusion
These Most Delish Lemon Pie Bars deliver bright citrus, a buttery base, and a creamy finish with minimal effort.
They’re simple enough for weeknights and polished enough for parties. With a few easy steps and fresh lemons, you’ll have a tray of sunny, bakery-worthy bars that everyone will ask for again. Keep a batch chilled and ready—you’ll be glad you did.
Printable Recipe Card
Want just the essential recipe details without scrolling through the article? Get our printable recipe card with just the ingredients and instructions.