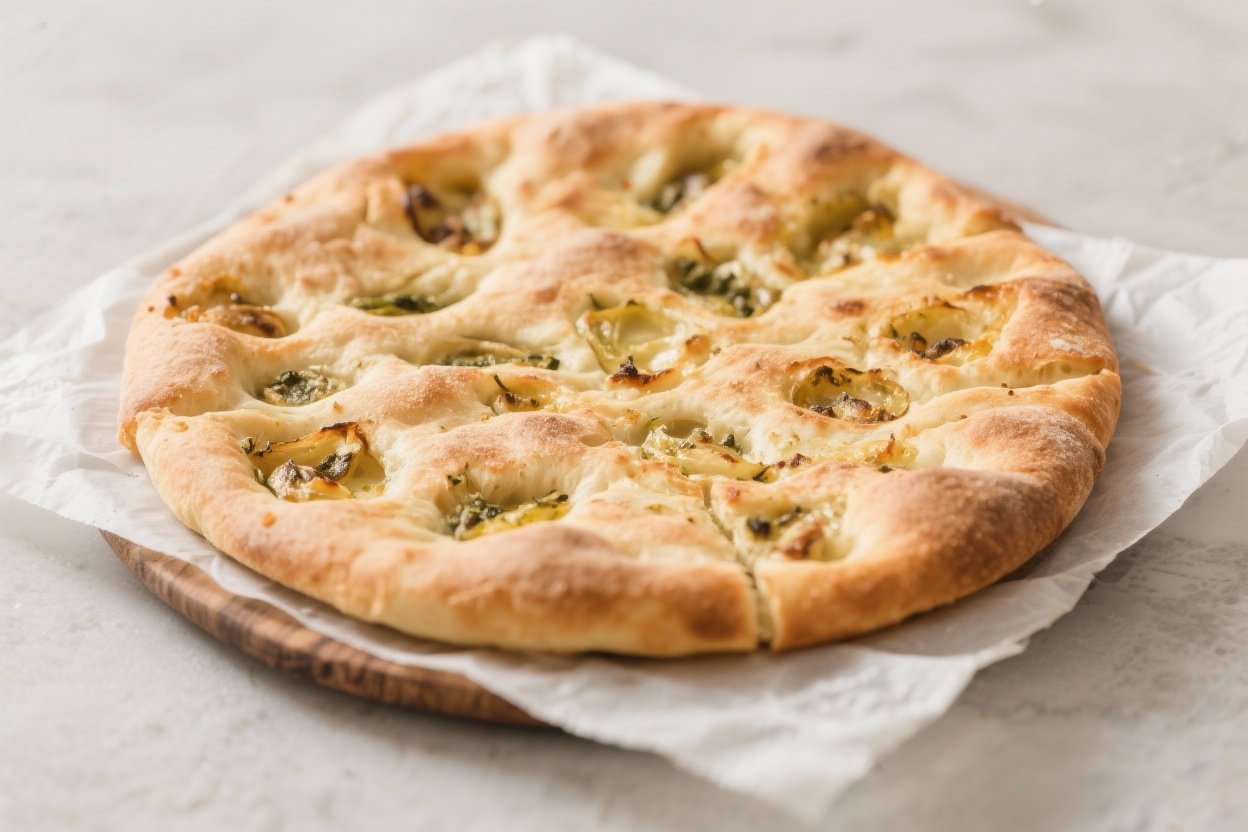
Homemade Focaccia Bread – Soft, Airy, and Perfectly Golden
Focaccia is the kind of bread that makes your kitchen smell like a bakery and your table feel a little more special. It’s soft inside, crisp on the edges, and glossy with olive oil. The best part?
It’s surprisingly simple to make, even if you’re new to bread. With a little patience and a few pantry staples, you’ll get a beautiful, rustic loaf that’s perfect for snacking, sandwiches, or soaking up sauce.
What Makes This Recipe So Good

Homemade Focaccia Bread - Soft, Airy, and Perfectly Golden
Ingredients
- 4 cups (500 g) bread flour or all-purpose flour
- 1 3/4 cups (420 ml) warm water, about 100°F/38°C
- 2 1/4 tsp (7 g) instant yeast or active dry yeast
- 2 tsp (10 g) fine sea salt
- 2–3 tbsp good olive oil for the dough
- 3–4 tbsp olive oil for the pan and topping
- Flaky sea salt, for finishing
- Optional toppings: fresh rosemary, thinly sliced garlic, cherry tomatoes, olives, thin onion slices, red pepper flakes, grated Parmesan
Instructions
- Mix the dough: In a large bowl, whisk the warm water and yeast. Add the flour and salt. Stir with a spatula until no dry spots remain. The dough will be shaggy and sticky. Drizzle in 2–3 tablespoons olive oil and fold it into the dough briefly.
- First rest (bulk rise): Cover the bowl and let the dough rest at room temperature for 30 minutes. After 30 minutes, dampen your hand and perform a set of stretch-and-folds: grab one side, stretch it up, and fold over; rotate the bowl and repeat 4–6 times.
- Repeat short rests: Let the dough rest another 30 minutes, then repeat the stretch-and-folds once more. This builds strength without kneading.
- Let it rise: Cover and let the dough rise until doubled, about 1–2 hours depending on room temperature. For best flavor, you can refrigerate it for 8–24 hours after the first hour of rising. If chilled, let it warm up 45–60 minutes before shaping.
- Prepare the pan: Generously oil a 9x13-inch pan or large sheet pan with 2 tablespoons olive oil. This ensures a crisp, golden bottom.
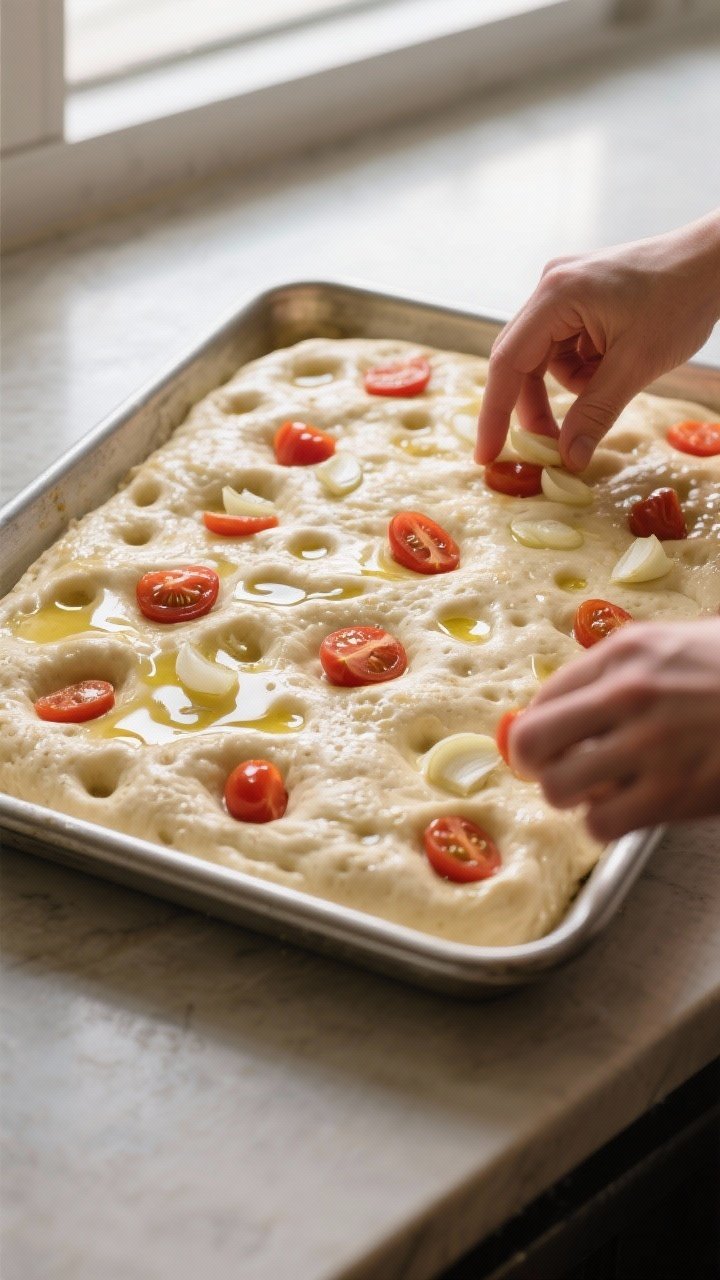
- Shape the dough: Gently scrape the dough into the pan. Drizzle 1 tablespoon olive oil on top. With oiled fingers, stretch the dough toward the edges. If it resists, let it rest 10 minutes and try again.
- Final proof: Cover and let the dough puff up for 30–45 minutes, until light and bubbly. Preheat your oven to 450°F (230°C).
- Dimple and top: Oil your fingertips and press straight down all over the dough to create deep dimples. Add toppings like rosemary, thin garlic slices, or tomatoes. Drizzle another tablespoon of olive oil and sprinkle with flaky salt.
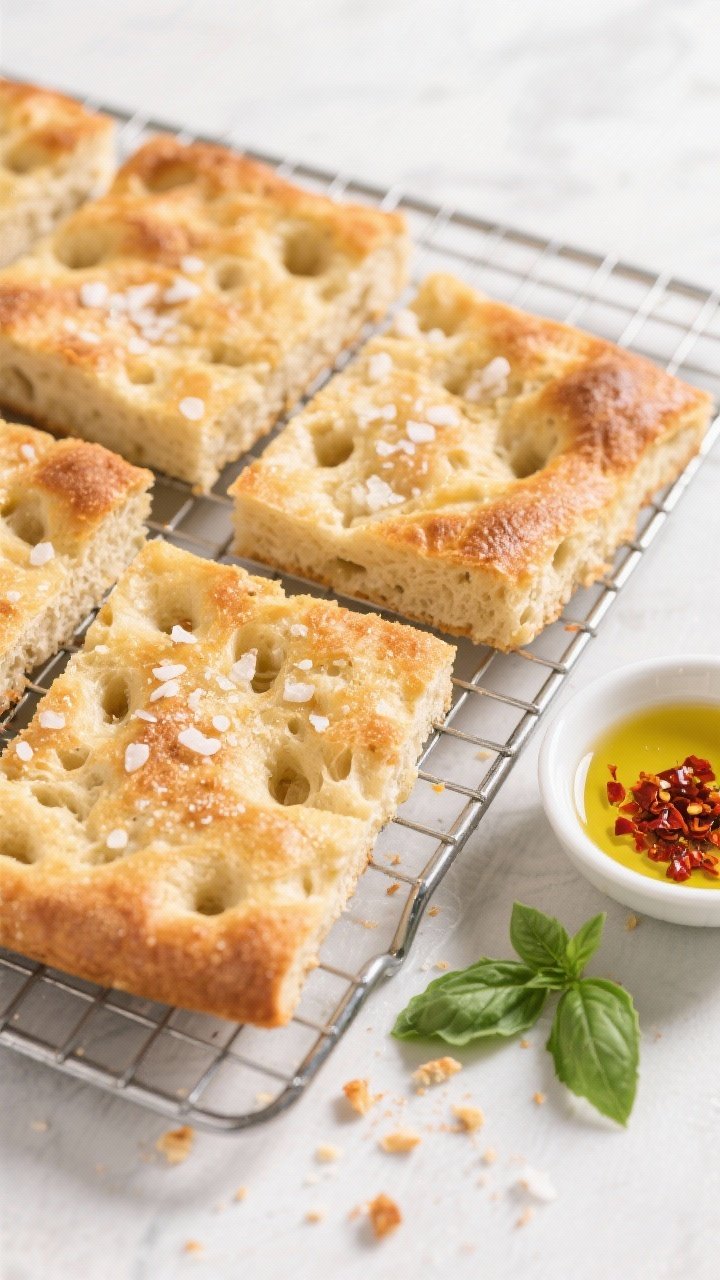
- Bake: Bake 20–25 minutes, until the top is golden and the edges are crisp. For extra color, you can bake on the lower rack for the last 3–5 minutes.
- Finish and cool: Brush or drizzle a little more olive oil on the hot focaccia. Let it cool in the pan for 10 minutes, then transfer to a rack. Slice and serve warm or at room temperature.

- Minimal effort, big payoff: No kneading required. The dough is mixed, rested, and folded a couple of times.
The yeast does most of the work.
- Ultra-soft interior: The long rest helps create an open, airy crumb with lots of little holes to trap olive oil and salt.
- Golden, crisp edges: A generous amount of olive oil ensures a crunchy bottom and a crackly top.
- Flexible timing: You can make it in one day or let it rest in the fridge overnight for deeper flavor.
- Endlessly customizable: Add herbs, garlic, tomatoes, olives, or cheese. Keep it simple or dress it up.
Ingredients
- 4 cups (500 g) bread flour or all-purpose flour
- 1 3/4 cups (420 ml) warm water, about 100°F/38°C
- 2 1/4 tsp (7 g) instant yeast or active dry yeast
- 2 tsp (10 g) fine sea salt
- 2–3 tbsp good olive oil for the dough
- 3–4 tbsp olive oil for the pan and topping
- Flaky sea salt, for finishing
- Optional toppings: fresh rosemary, thinly sliced garlic, cherry tomatoes, olives, thin onion slices, red pepper flakes, grated Parmesan
How to Make It
- Mix the dough: In a large bowl, whisk the warm water and yeast. Add the flour and salt.
Stir with a spatula until no dry spots remain. The dough will be shaggy and sticky. Drizzle in 2–3 tablespoons olive oil and fold it into the dough briefly.
- First rest (bulk rise): Cover the bowl and let the dough rest at room temperature for 30 minutes.
After 30 minutes, dampen your hand and perform a set of stretch-and-folds: grab one side, stretch it up, and fold over; rotate the bowl and repeat 4–6 times.
- Repeat short rests: Let the dough rest another 30 minutes, then repeat the stretch-and-folds once more. This builds strength without kneading.
- Let it rise: Cover and let the dough rise until doubled, about 1–2 hours depending on room temperature. For best flavor, you can refrigerate it for 8–24 hours after the first hour of rising.
If chilled, let it warm up 45–60 minutes before shaping.
- Prepare the pan: Generously oil a 9×13-inch pan or large sheet pan with 2 tablespoons olive oil. This ensures a crisp, golden bottom.
- Shape the dough: Gently scrape the dough into the pan. Drizzle 1 tablespoon olive oil on top.
With oiled fingers, stretch the dough toward the edges. If it resists, let it rest 10 minutes and try again.
- Final proof: Cover and let the dough puff up for 30–45 minutes, until light and bubbly. Preheat your oven to 450°F (230°C).
- Dimple and top: Oil your fingertips and press straight down all over the dough to create deep dimples.
Add toppings like rosemary, thin garlic slices, or tomatoes. Drizzle another tablespoon of olive oil and sprinkle with flaky salt.
- Bake: Bake 20–25 minutes, until the top is golden and the edges are crisp. For extra color, you can bake on the lower rack for the last 3–5 minutes.
- Finish and cool: Brush or drizzle a little more olive oil on the hot focaccia.
Let it cool in the pan for 10 minutes, then transfer to a rack. Slice and serve warm or at room temperature.
Keeping It Fresh
- Room temperature: Store in an airtight container or wrapped in foil for up to 2 days. If the crust softens, re-crisp in a 350°F (175°C) oven for 5–8 minutes.
- Freezing: Slice and wrap tightly.
Freeze for up to 2 months. Reheat from frozen at 350°F (175°C) for 10–12 minutes.
- Avoid the fridge: Refrigeration can dry out bread. Freeze instead if you need longer storage.
Why This is Good for You
- Quality ingredients: You control the oil, salt, and toppings.
Use extra-virgin olive oil and fresh herbs for flavor and healthy fats.
- Satisfying, not heavy: The airy crumb makes it filling without feeling dense. Pair with salad, soup, or grilled vegetables.
- Customizable nutrition: Add fiber with whole wheat flour (swap 25–30%), or top with tomatoes, olives, or caramelized onions for extra nutrients.
What Not to Do
- Don’t rush the rise: If the dough hasn’t doubled or looks flat, give it more time. Under-proofed dough won’t be airy.
- Don’t skimp on oil: The oil creates the signature crust and flavor.
A lightly oiled pan leads to sticking and pale edges.
- Don’t overmix: Stir just until combined. Overworking the dough can make it tough.
- Don’t overload toppings: Heavy toppings can weigh the dough down. Keep pieces small and scatter lightly.
- Don’t slice too soon: Let it rest at least 10 minutes.
Cutting immediately can compress the crumb.
Recipe Variations
- Classic Rosemary and Sea Salt: Fresh rosemary needles pressed into the dough, plus flaky salt and olive oil.
- Tomato and Basil: Halved cherry tomatoes, olive oil, and a sprinkle of basil after baking.
- Olive and Lemon: Pitted olives and thin strips of lemon zest for a bright, savory twist.
- Garlic Parmesan: Thinly sliced garlic added before baking; sprinkle grated Parmesan in the last 5 minutes.
- Caramelized Onion and Thyme: Spread cooled caramelized onions over the top, then add thyme and salt.
- Everything Spice: Brush with oil and sprinkle everything bagel seasoning before baking.
- Whole-Wheat Boost: Replace 25–30% of the flour with white whole wheat flour; add 1–2 tablespoons extra water if needed.
FAQ
Can I use active dry yeast instead of instant yeast?
Yes. If using active dry yeast, whisk it into the warm water with a pinch of sugar and let it sit 5–10 minutes until foamy before adding the flour and salt. The rest of the method stays the same.
Why is my dough so sticky?
Focaccia dough is meant to be sticky and loose.
That high hydration creates an airy crumb. Oil your hands and the bowl to make handling easier instead of adding extra flour.
How do I get bigger air pockets?
Use a wet, loose dough, give the dough enough time to rise, and avoid deflating it when shaping. Gentle handling and proper proofing are key.
What pan should I use?
A metal 9×13-inch pan or a rimmed baking sheet works best for even browning.
Avoid glass if possible, as it can brown unevenly and may require temperature adjustments.
Can I make this dough ahead?
Absolutely. After the initial rise, refrigerate the dough for up to 24 hours. Let it warm up before shaping, then proceed as directed.
How do I know it’s done baking?
The top should be deep golden, the edges crisp, and the bottom well-browned.
If you tap it, it should sound slightly hollow. Internal temp will be around 200°F (93°C).
Is gluten-free focaccia possible?
Yes, but you’ll need a reliable gluten-free bread flour blend and slightly different hydration. Follow a gluten-free specific recipe for best results.
Can I reduce the oil?
You can, but expect a softer crust and a greater chance of sticking.
For classic texture and flavor, use the recommended amount of olive oil.
What’s the best way to reheat focaccia?
Bake at 350°F (175°C) for 5–8 minutes to refresh the crust. For slices, a toaster oven works well. Avoid microwaving, which makes it chewy.
Can I add cheese on top?
Yes.
Add grated Parmesan or shredded mozzarella in the last 5–7 minutes of baking so it melts without burning.
Final Thoughts
Homemade focaccia feels special without being complicated. With a few simple steps and enough time to rise, you’ll get a loaf that’s crisp, tender, and full of flavor. Keep it classic with rosemary and sea salt, or make it your own with seasonal toppings.
Once you’ve made it once, it’ll become a regular in your kitchen.

Printable Recipe Card
Want just the essential recipe details without scrolling through the article? Get our printable recipe card with just the ingredients and instructions.