10 Portable Picnic Furniture Ideas That Upgrade Any Outdoor Feast
· Yogi

You’ve got picnic food that slaps, but where are you sitting? Balancing a pasta salad on your knee while swatting ants is a rite of passage… once. These 10 portable picnic furniture ideas are fun, functional, and wildly easy to carry—so you can lay out a spread that feels like a pop-up outdoor dining room. From roll-top tables to wine holding stakes, we’re covering comfort, stability, and style. Let’s build your best picnic yet.
1. Roll-Top Bamboo Table That Packs Down Like Magic
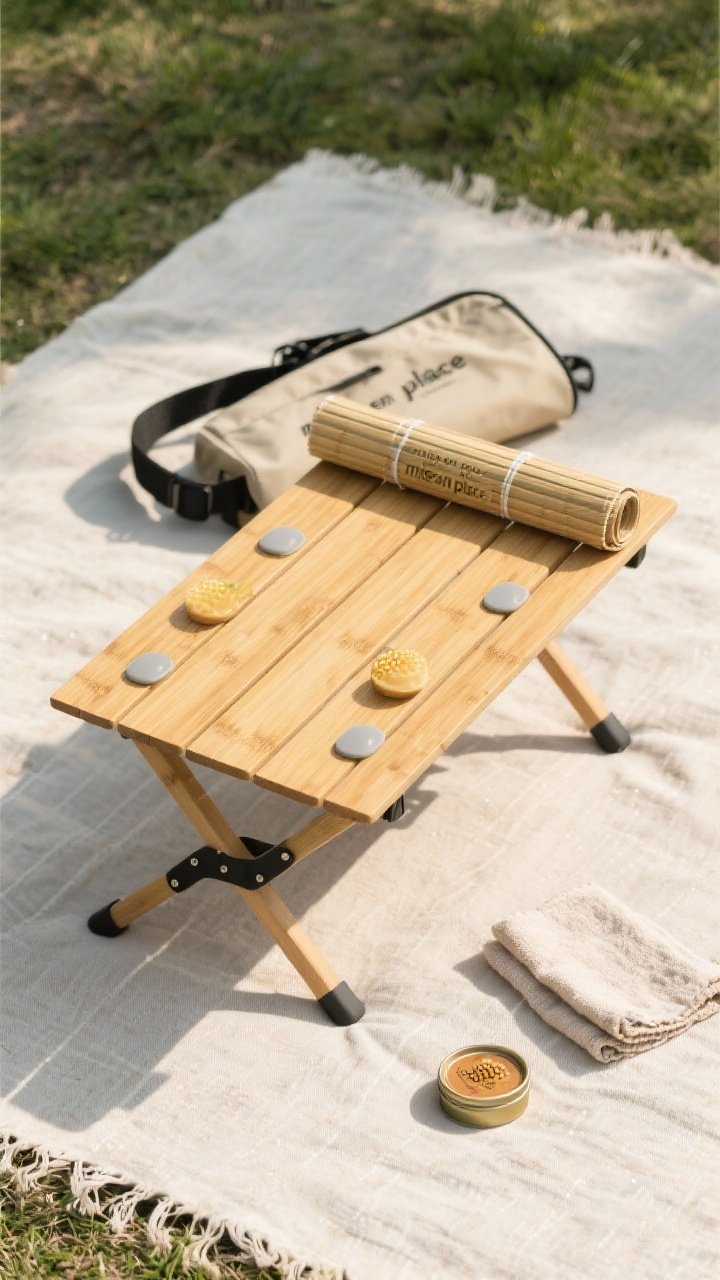
This compact roll-top table is the ultimate blend of pretty and practical. The slatted bamboo top rolls up and the legs scissor-fold, so it slides into a slim bag but still gives you a sturdy surface for drinks, dips, and the star charcuterie board. It looks like furniture, but packs like a yoga mat. Perfection.
Ingredients:
- 1 roll-top bamboo table (24–31 inches wide)
- 1 carrying bag with shoulder strap
- 4 locking leg braces
- Non-slip silicone corner pads (4)
- Microfiber cloth for cleanup
- Optional: Beeswax wood conditioner
Instructions:
- Unzip the carrying bag and remove the table base and rolled slatted top.
- Open the scissor legs and lock the braces until you hear a firm click.
- Align the dowels at the edge of the slatted top with the frame grooves and roll it across the top to secure.
- Press silicone pads under each corner to prevent wobble on grass.
- Wipe the surface with the microfiber cloth before plating.
Serve your main spread here—boards, salads, and a carafe look stunning on bamboo. For sandy beaches, add wide foot caps to the legs. Refresh the wood with beeswax once a season to keep it picnic-pretty.
2. Inflatable Ottoman-Cooler Combo That Doubles as a Seat
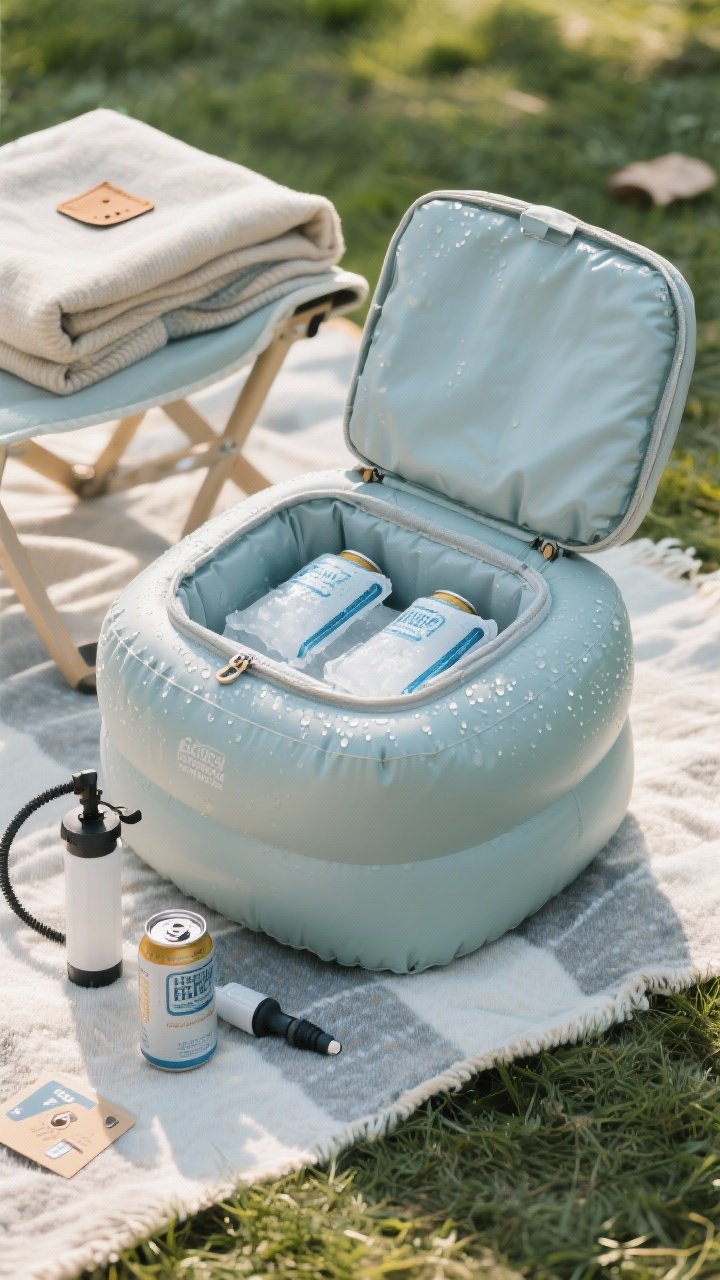
Seating that chills your drinks? That’s picnic royalty. This inflatable ottoman hides a soft-sided cooler inside the base, so you get cushy seating plus cold beverages without hauling an extra tote. It’s lightweight, surprisingly sturdy, and a conversation magnet.
Components:
- 1 inflatable ottoman with zip-top lid
- 1 soft-sided cooler insert (fits inside ottoman)
- Manual pump or USB air pump
- Ice packs (2–4)
- Seat cover or blanket topper
- Patch kit (just in case)
Instructions:
- Unfold the ottoman and locate the inflation valve.
- Use the pump to inflate until firm—no wrinkles on the sides.
- Place the cooler insert inside the ottoman and add ice packs and drinks.
- Zip the lid closed and set a seat cover or blanket on top for comfort.
- Test the balance by gently sitting; adjust air if it feels squishy.
Use this as extra seating or a footrest near your main table. Swap ice packs for a hot-water bottle in cold weather to create a warm perch. If you’re setting up on gravel, put a thin mat underneath to protect the base—trust me, it’ll last much longer.
3. Convertible Blanket Tote With Hidden Cushion Pads
This isn’t your average picnic blanket. It folds into a tote with a structured base, and tucked inside are two foam seat pads for instant comfort. You’ll go from “let’s sit on the ground?” to “we basically brought a living room” in seconds.
Components:
- 1 waterproof-backed picnic blanket (60 x 80 inches)
- 2 EVA foam seat pads (12 x 12 inches)
- Carrying straps with buckle closures
- Snap buttons or Velcro strips
- Detachable pocket for utensils/napkins
Instructions:
- Lay the blanket waterproof side down and smooth out wrinkles.
- Place the foam pads under the top corners where you’ll sit.
- Press the snap buttons or Velcro to hold pads in place beneath the fabric.
- Fold the blanket into thirds lengthwise, then roll and buckle into tote mode.
- Attach the utensil pocket to the exterior for easy access.
Pair this with low chairs or use alone for a minimalist setup. For windy parks, add corner grommets and stake the blanket down. Wash on gentle and line dry—keeping the waterproof layer intact is key to avoiding damp grass drama.
4. Low-Lounge Chairs With Mesh Backs for All-Day Comfort
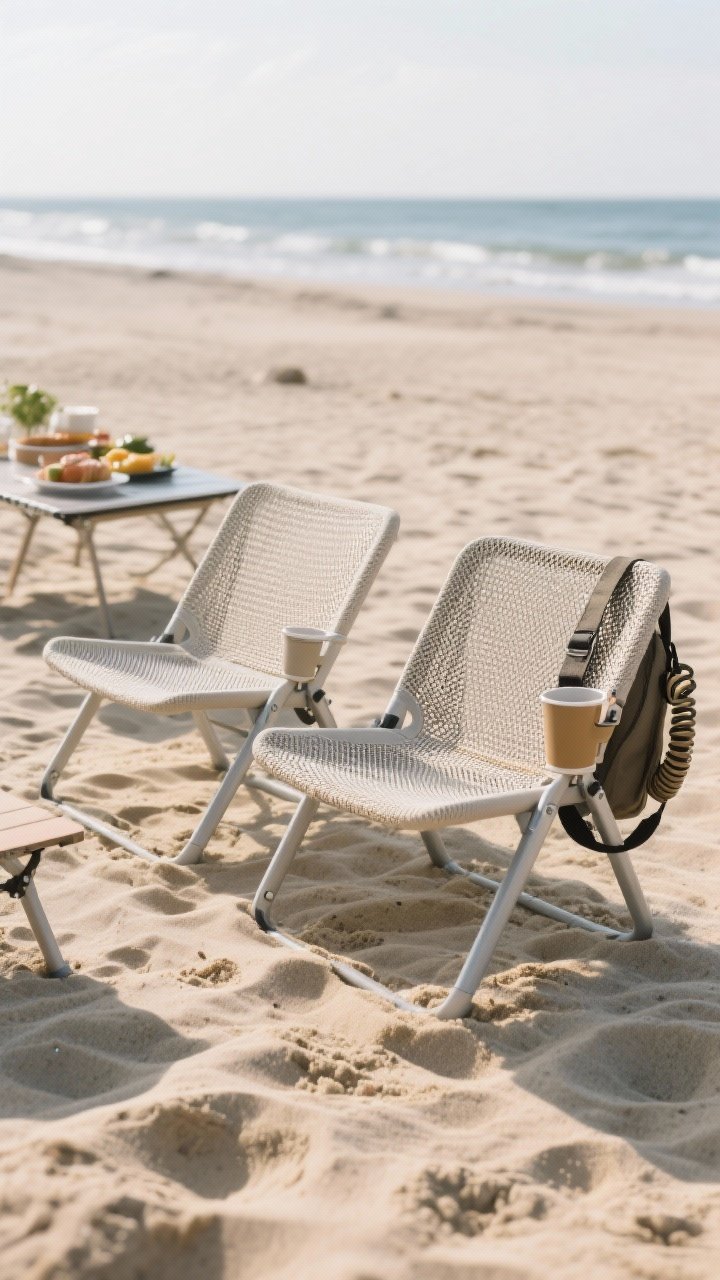
If you’ve ever tried to chill in a camp chair and felt like you were sitting in a bucket, these low loungers fix that. They sit close to the ground (great for stadium rules and beach vibes), and the mesh backs keep you cool while you demolish a baguette.
Components:
- 2 low-profile foldable lounge chairs (seat height 5–8 inches)
- Breathable mesh backrests
- Wide feet for sand stability
- Carry sling or backpack straps
- Clip-on cup holders (optional)
Instructions:
- Unfold each chair and lock the side hinges until fully extended.
- Check that the feet are seated flat; twist the caps for sand if adjustable.
- Attach optional cup holders to the frame within easy reach.
- Sit and adjust your posture—lean back to engage the lumbar support.
- Test stability by shifting your weight; move to firmer ground if necessary.
These play nicely around a low table or on their own by the blanket. If you’re picnicking on sloped terrain, orient the chair backs uphill. Bring a tiny neck pillow and, yes, you might nap—fair warning.
5. Collapsible Crate Bench That Carries and Converts

Two birds, one very clever bench. This collapsible crate transports your food and then flips into a sturdy seat with a snap-on cushioned lid. It’s the ultimate pack-mule-turned-furniture move that makes clean-up just as easy as set-up.
Components:
- 1 heavy-duty collapsible crate (50–70 lb capacity)
- 1 snap-on cushioned lid (bench topper)
- Non-slip rubber feet (4)
- Removable inner divider for organized packing
- Shoulder strap or side handles
Instructions:
- Pop open the crate and lock side panels; insert the divider if needed.
- Load heavier items at the bottom and lighter ones on top for balance.
- On-site, empty the crate and place it upside down if your lid requires a flat base.
- Snap the cushioned topper onto the crate, pressing until all corners click.
- Check stability; add rubber feet if the surface is slick or uneven.
This bench fits two kids or one adult comfortably. Use it as a makeshift side table by flipping the cushion to the flat underside. If you’re near mud, set a small tarp under the crate so it stays clean for the ride home—seriously, future you will thank you.
6. Stake-Style Wine and Snack Holders That Fight Gravity
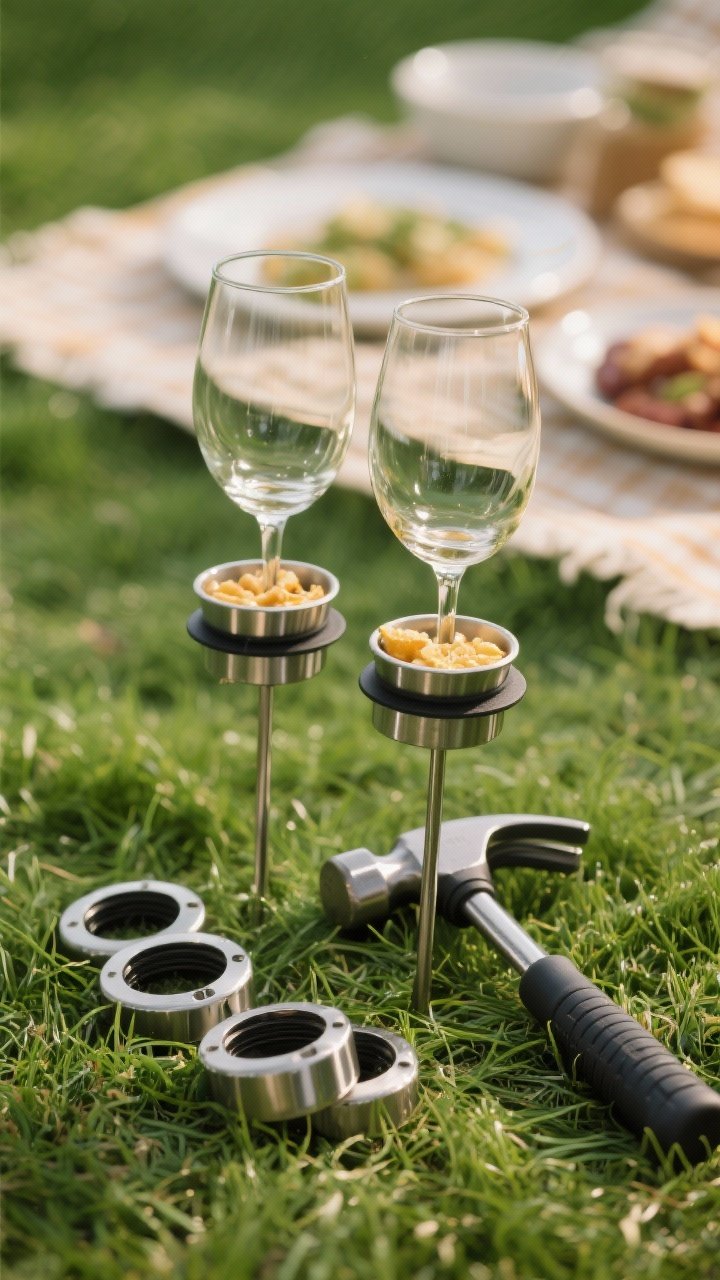
Red wine in one hand, olive skewer in the other, gravity on your side. These metal stakes keep stemware and small plates off the ground, and they look charming in a meadow or backyard. No more tipping glasses—or wrestling with wobbly ground.
Components:
- 4 stake-style holders (2 for wine glasses, 2 for plates/bowls)
- Hammer or rubber mallet
- Protective caps for transport
- Cleaning wipes for post-picnic
- Optional: Adapter rings for stemless glasses
Instructions:
- Position the stakes 6–12 inches from the blanket edge for easy reach.
- Push or gently hammer each stake into the ground at a slight inward angle.
- Slide wine stems into holders and set small plates into the flat rings.
- Rotate the holders until your glass hangs level; adjust depth if needed.
- After use, wipe clean and cap the points before packing.
These shine on lawns and soft soil. For hard ground, bring a pilot spike or choose tripod-style stands instead. If you prefer canned drinks, clip a koozie to the plate ring—DIY but effective.
7. Folding Camp Kitchen Rack for Elevated Serving
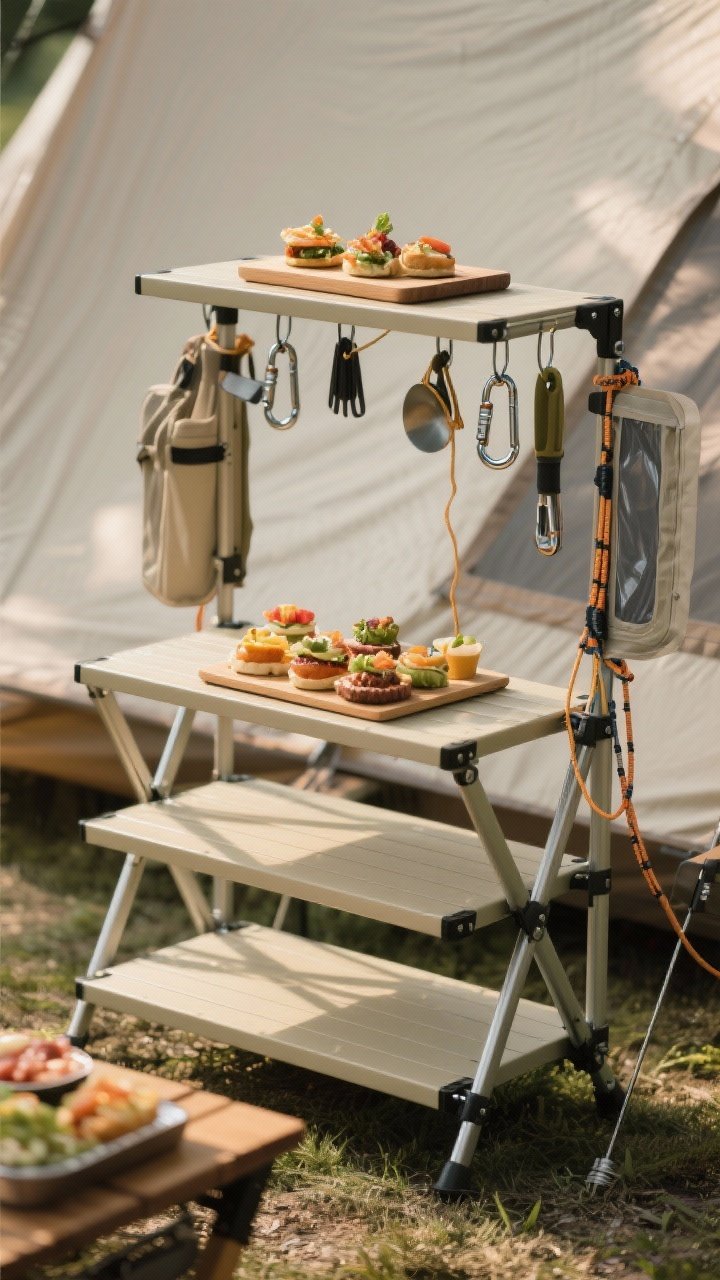
Think of this as your portable buffet station. It’s a lightweight, multi-shelf rack that folds flat yet holds your serving bowls, utensils, and a small cutting board. No more crouching or juggling; you get a clean, elevated space that makes plating feel easy.
Components:
- 1 folding camp kitchen rack (2–3 shelves)
- Windshield side panels (optional)
- Top surface mat or thin cutting board
- Carabiners for hanging tools
- Bungee cords for securing in wind
Instructions:
- Unfold the frame and lock the side braces.
- Attach shelves, starting from the bottom for stability.
- Clip on side panels if you’re in a breezy spot.
- Lay the mat or cutting board on the top shelf for a stable prep surface.
- Use carabiners to hang tongs, towels, and a bottle opener.
Keep heavier items like water jugs on the lowest shelf. In gusty conditions, anchor the rack with tent stakes and bungees. This station is also perfect for dessert—stack cookies and fruit up top, stash napkins below, and watch your picnic flow.
8. Ultralight Folding Stool Trio for Flexible Seating
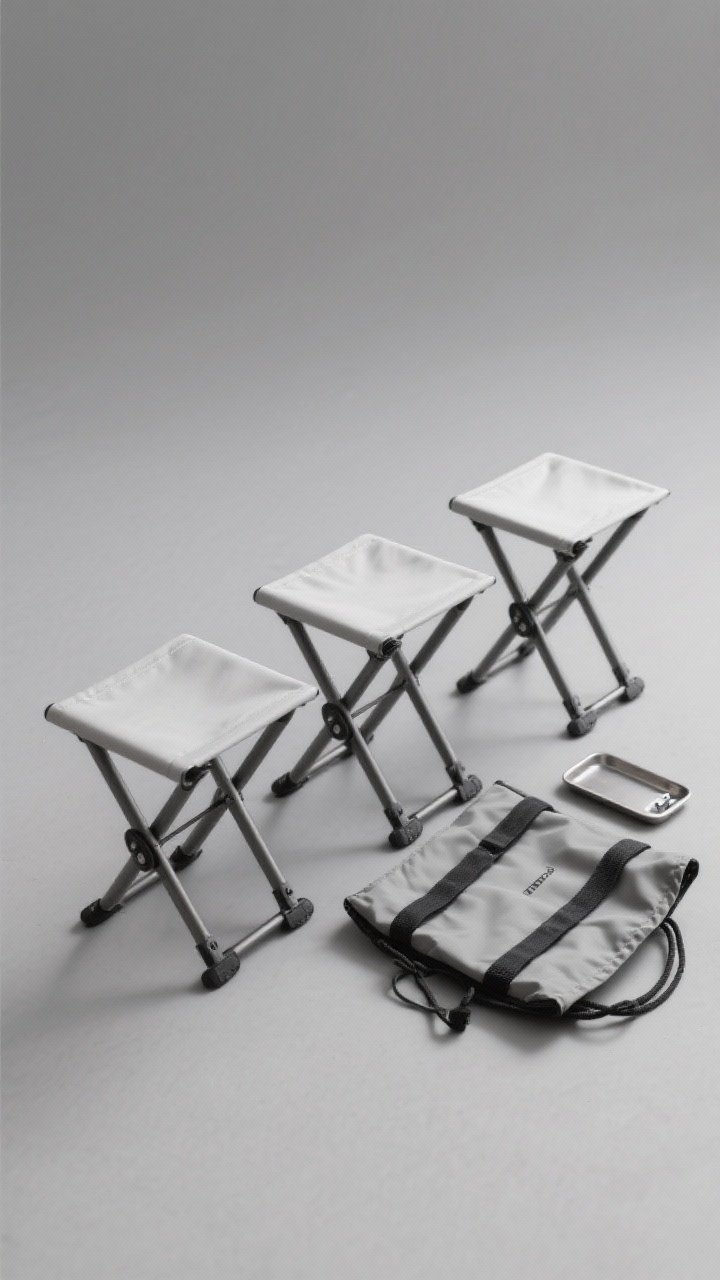
These tiny heroes weigh almost nothing and pop open in seconds. Bring a trio and you’ve got instant flexible seating, a footrest, and even a little side perch for your speaker or snack bowl. They’re minimalist but ridiculously useful.
Components:
- 3 ultralight folding stools (aluminum or carbon fiber frame)
- Non-slip feet caps
- Carrying pouch
- Elastic straps to keep them bundled
- Optional: Clip-on mini tray
Instructions:
- Remove each stool from the pouch and secure the seat fabric to the frame if detached.
- Spread the legs until the pivot locks fully open.
- Press down gently to confirm stability and seat tautness.
- Add the mini tray to one stool to create a side table.
- Place on even ground or add non-slip caps for grass.
Use these for a picnic that moves—sun chasing, cloud dodging, you name it. They fit neatly under a blanket edge for hidden extras. If your picnic crew includes kids, assign them a “snack stool” and a “game stool”—organization disguised as fun.
9. Pop-Up Canopy With Clip-On LED Lanterns
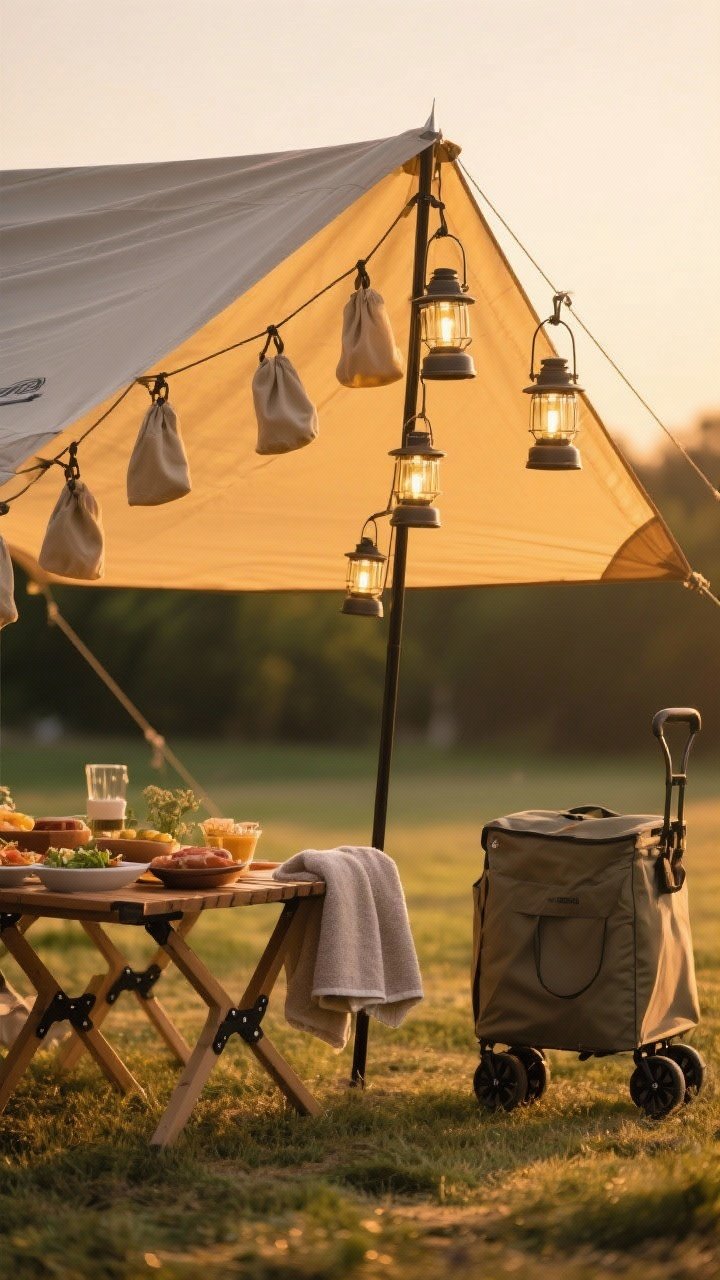
Shade is non-negotiable when the sun’s blazing. A compact pop-up canopy turns your picnic into a legit outdoor room, and clip-on LED lanterns take it from afternoon to golden-hour glow. It’s easy, elegant, and a lifesaver on hot days.
Components:
- 1 pop-up canopy (6 x 6 or 8 x 8 feet)
- 4 sandbags or stake/rope tie-downs
- Clip-on LED lanterns (2–4)
- Storage bag with wheels (if available)
- Microfiber towel for quick wipe-down
Instructions:
- Two people: pull the frame outward until partially open.
- Drape the canopy fabric over the top and secure with Velcro tabs.
- Extend the legs to your desired height and lock the buttons.
- Anchor with stakes or fill sandbags at each corner.
- Clip LED lanterns to interior crossbars for ambient light.
Position the canopy so one side shades your table and the other cools the blanket. In breezy weather, keep it on the lowest leg setting and double up on anchors. Wipe it dry before packing to avoid mildew—future picnics will smell like summer, not basement.
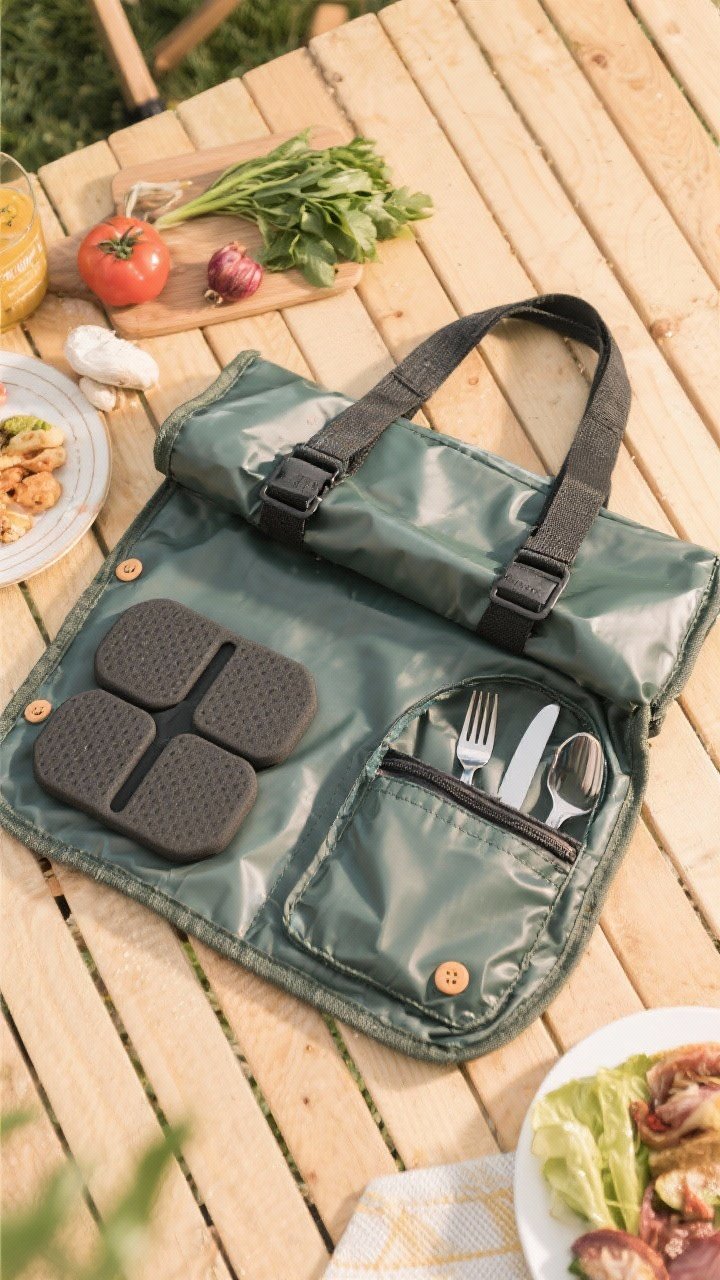
10. Modular Picnic Caddy With Built-In Cutting Board Lid
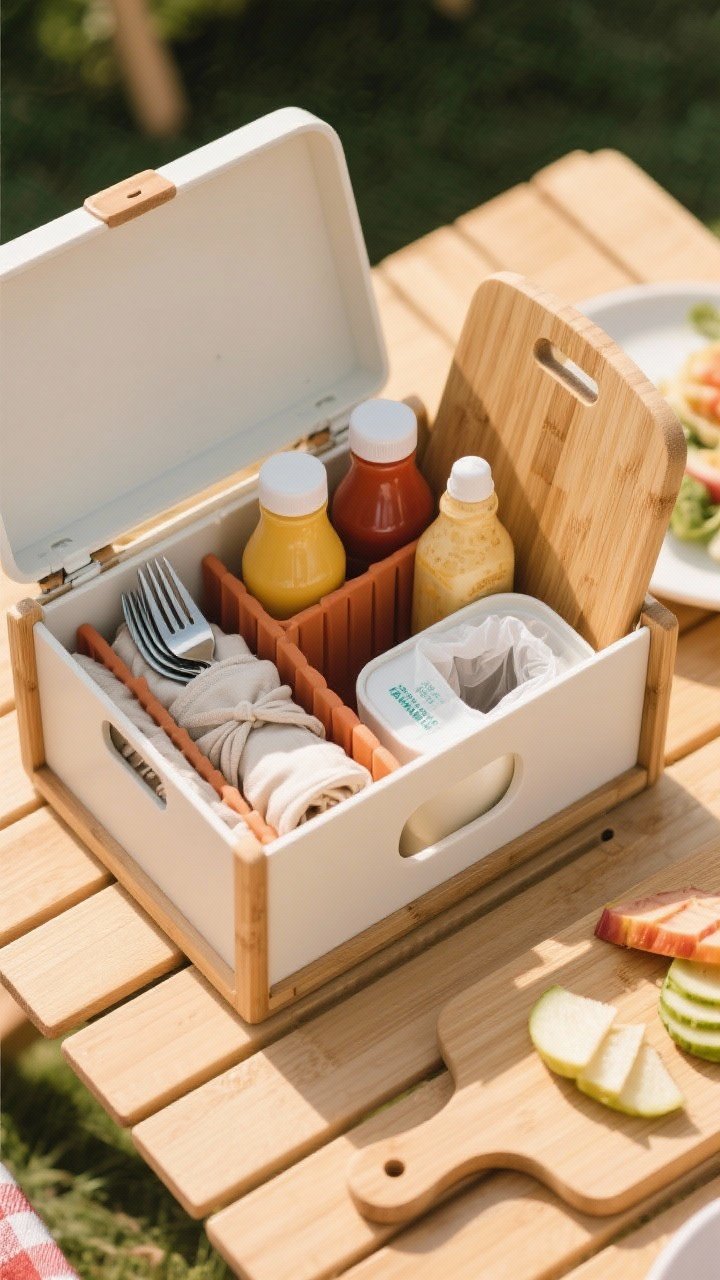
Organization nerds, rejoice. This modular tote carries your utensils, condiments, and napkins, then flips into a mini prep station with a cutting board lid. It keeps everything where you expect it, even when you’re grazing and chatting and maybe slicing peaches on the fly.
Components:
- 1 modular picnic caddy with removable dividers
- Bamboo cutting board lid
- Silicone condiment bottles (2–4)
- Flatware roll and cloth napkins
- Small trash bag dispenser
- Sanitizing wipes
Instructions:
- Arrange dividers to fit your flatware roll, bottles, and napkins snugly.
- Fill condiment bottles and label them (mustard, herby mayo, chili oil—live a little).
- On-site, remove the lid and set it face-up as a cutting board.
- Prep fruit, baguette, or cheese; wipe between tasks to keep flavors clean.
- Use the caddy as a standing station for sauces and utensils, and hang the trash bag from the side loop.
Keep a tiny paring knife in a sheath inside the caddy for last-minute slicing. The cutting board lid doubles as a serving platter—just add parchment if you want easy cleanup. When you’re done, tuck wipes and trash bags back in so it’s always ready for the next picnic.
Final Touches: How to Mix and Match
Build your setup based on your crowd and mood. For date night: roll-top bamboo table, two low loungers, wine stakes. For family chaos (the good kind): canopy, crate bench, blanket tote with pads, and the kitchen rack. Minimalist hang: stools, modular caddy, and the convertible blanket.
Now go claim that shady spot and throw down a spread that feels effortless. These 10 portable picnic furniture ideas make eating outside comfortable, stylish, and actually relaxing. Pack light, sit pretty, and enjoy every bite. The ants can find another party.
Printable Recipe Card
Want just the essential recipe details without scrolling through the article? Get our printable recipe card with just the ingredients and instructions.
Leave a Reply